Pages

Tuesday, October 30, 2012

Giant Triple Chocolate Biscuits

When I was a little girl, there came a certain satisfaction with making a double batch of biscuits and seeing them all go before they got the chance to completely cool. Yes, I am lucky enough to have six lovely brothers who all appreciated something sweet at the end of the day, and as much as I loved to see the biscuits go, there was also a sinking feeling that came with it. All that work and it's disappeared within 5 minutes!
I remember thinking the biscuits just weren't big enough or numerous enough, and so I started making triple batches to subdue the hungry masses. (Gee they must miss me since I moved out of home. What a warm fuzzy feeling--ha!)
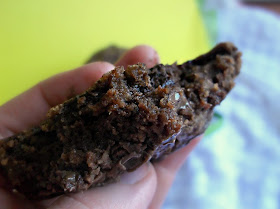
This recipe would have come in handy at the time. My brothers also would have appreciated these thick, hamburger-sized, triple-chocolate, fudgey-centred biscuits that I like to think of as "man sized". Maybe I ought to send a box to each of them, with the bribe that they come and visit my blog?
These biscuits are of course, best slightly cooled but fresh out of the oven. They will firm up a bit on cooling, so I like to pop them for a few seconds in the microwave before serving to get that warm, soft and fudgey centre back into them, plus the chocolate chips within melt a little on doing so and make them all the more decadent.


GIANT TRIPLE CHOCOLATE BISCUITS (slightly adapted from Annie's Eats)

1 cup cold butter
1 1/4 cup sugar
2 large eggs
1/2 cup cocoa powder
2 1/4 cup plain flour
pinch of salt
1 tsp baking powder
2 1/4 cups chocolate chips

Preheat the oven at 180C. Line and grease two baking trays and set aside.
In a medium bowl, beat the butter and sugar for 3 minutes until light and fluffy. Beat the eggs in one at a time. Then beat the cocoa powder through the mixture until well combined. Add the flour, salt and baking powder and beat on a low speed until just combined. Fold 2 cups of chocolate chips through the mixture. Knead briefly to incorporate all the ingredients thoroughly. Divide into 12 even balls and then flatten each slightly with the palm of your hand. Place them a few inches apart from each other to allow for some spreading. Bake for 16-20 minutes. Remove from oven and allow to partially cool for 10 minutes before removing to a wire cooling rack. Melt the remaining chocolate  and drizzle over the tops of each biscuit.
Serve slightly warmed.

Makes 12

NOTES: If the mixture appears too soft to form balls from, refrigerate the bowl of mixture for 20 minutes. The warmer weather can make the dough quite soft.


Thursday, October 25, 2012

Strawberry Ice Cream like Ben & Jerry's

I realise that most of the people who view Lick the Spoon are Americans, and so I think this needs to be addressed. A lot of people have been asking questions about measurement conversion. A lot of people have been commenting back telling others where to go. I appreciate the involvement, and I fear this is going to be a continuing thing around here. I'd love to please everyone, but I just cant convert every recipe into five different measurement styles for your convenience--I simply don't have the time.
All my measuring cups are in the Australian sizes. I prefer to use cup and spoon measurements where I can, it just makes the baking process go a bit quicker when I have kids hanging from my legs. Of course I use the scales where I have to (in grams, usually), and I use both imperial and metric measurements depending where I source the recipe from. I know this inconsistency is the source of some annoyance, but for the moment it will continue.
It was only very recently that someone brought to my attention that Americans have their own size of measuring cup, and measurements such as I tablespoon did not equal 3 teaspoons in all parts of the world. This can all get very, very confusing.
I have found, for everyone's benefit, a great link with all the conversion tables anyone could wish for. No, I am not going to do it for you! With the internet at our fingertips it's simple to do yourself. Just click on the link below:

CONVERSION TOOL

I am ever so happy to continue answering people's questions about substitutes and descriptions of some ingredients that are not common in their countries, but please, do not ask for measurement conversions. There are so many sites that can easily convert these figures for you. I'm always converting American recipes over, so I figure it's just as easy for everyone else. I hope everyone understands and finds the above link as helpful and useful as I have! It's the best conversion chart I have seen to date.

Now. I hope no one found that too unpleasant.
Onto sweeter things. I found this recipe for Ben and Jerry's Strawberry Ice Cream. Well, apparently it's as good as Ben and Jerry's ice cream, although I can't tell you. I never could convince myself I loved ice cream so much that I could spend so much money on a tiny tub. If it is on a par with Ben and Jerry's Ice Cream, then you've just scored about 1.5 litres of it for about $5.
I can't tell you if it really is like Ben and Jerry's, but I can tell you everyone who tasted this ice cream loved it. It's by far one of the best homemade ice creams I have ever made. The website where I found it had a five star rating from everyone that had made it. Now I think that's saying something!
I made a few alterations to the original recipe, but only because I don't fancy big chunks of strawberries throughout my ice cream. There's something about chunks that puts me off. It's to be smooth, creamy and silky in my books. That's ice cream.
What is it like?
Smooth and creamy yet still light,  this pink strawberry ice cream has a lovely hint of lemony zest. It's so refreshing with the addition of lemon, it just makes the strawberry flavour sing. Oh my. There is no way I made enough of this ice cream! I think I can survive another tropical summer with a tub or ten of this by my side.


B&J's STRAWBERRY ICE CREAM (Adapted from Food.com)

2 cups strawberries, hulled and chopped
1 tbsp. fresh lemon juice
1 cup sugar
2 large eggs
2 cups cream
1 cup milk
1 tsp vanilla

Hull and chop the strawberries. Place them in the blender and process into a fine puree. In a medium sized bowl, place the strawberry puree, lemon juice and 1/4 of a cup of the sugar, and refrigerate for an hour.
In a separate bowl, beat the eggs for two minutes, until light and fluffy. Gradually add the remaining 3/4 cup sugar, mixing well after each addition. Stir in the milk and vanilla. Add strawberry puree mixture and mix until well combined. Gently stir in the cream. Pour into your ice cream machine and follow the manufacturer's directions to churn. Freeze in an airtight container. Thaw for 5-10 minutes on the bench-top before serving.

NOTES: You can use either fresh or frozen berries. I used frozen and it was sublime!


Wednesday, October 24, 2012

Banana Muffins with Cinnamon Walnuts and Brown Butter Icing


It's a banana muffin. But it's sporting a gorgeous and scrumptious topping of sticky cinnamon-brown sugar walnuts, browned butter icing and a swirl of caramel sauce. When you sink your teeth into this delectable muffin you can feel the smoothness of the icing, the stickiness of the caramel, the firm yet soft crunch of the walnut and the moistness of the banana cake. It's a perfect combo of flavour and textures with just the right amount of sweetness.
For those who are counting calories or are fussy, feel free to leave off the caramel or the icing, or both. You will definitely want to keep the walnuts, and they're good for you, as is the cinnamon the are coated in. They also make a delicious snack on their own. But I warn you, they are highly addictive!
In the recipe I followed for the walnuts, they are not supposed to stay sticky (I must have made an error with the temperatures--my candy thermometer is out perhaps?) They are supposed to dry out and are like candied walnuts. Either way they will be delicious atop this lovely banana muffin!I think the walnuts on their own would make a very pretty Christmas gift, tied up in a clear cellophane bag with some red ribbon. That is, if they don't stay as sticky as mine turned out! Keep and eye on your candy thermometer and you'll be fine.


BANANA MUFFINS WITH STICKY CINNAMON WALNUTS & BROWN BUTTER ICING  
(A Lick the Spoon Original with walnuts adapted from Eat Good 4 Life)

Muffins:

1 1/4 cup Self Raising flour
1/4 level tsp. bicarbonated soda
1/2 level tsp salt
85g butter
1 cup sugar
2 eggs, beaten
4 bananas, mashed

Walnuts:
1/2 cup brown sugar, packed
1/2 cup milk
1 tsp cinnamon
pinch salt
1/2 tsp vanilla
150g walnuts

Icing:
1/4 cup butter
2 cups icing sugar
1 tsp vanilla
1/4 cup thickened cream

To make the muffins, sift flour, bicarb soda and salt together in a bowl. Cream the butter and sugar until fluffy and pale. Add the beaten egg a little at a time, beating after a each addition until well combined. Add the mashed banana and beat again.  Add the flour mixture and stir until just combined. pour mixture into muffin trays or paper liners. Bake at 180C for about 1 hour or until firm on the surface and golden brown.

Meanwhile, to make the sticky cinnamon walnuts, place brown sugar, milk, cinnamon and salt in a small saucepan. Place on medium heat and whisk until the mixture comes to the boil.
Boil the mixture on a lower heat until it reaches 115C on the candy thermometer. Remove from heat and stir through the vanilla, then the walnuts.
Spoon onto baking paper and separate any clumps. Let to cool.

To make the icing, place the butter in a saucepan over medium heat. When melted, reduce the heat and swirl the butter in small circular motions. The melted butter should foam and begin to turn amber. Remove from heat and set aside to cool. In a medium bowl, place the other ingredients. When the butter has cooled, add to the icing mixture and beat into a thick icing.

To assemble, remove the cooled muffins from the pan and add a dollop of icing to each. Top with sticky walnuts and serve with caramel topping or sauce, if desired.

NOTES:


Monday, October 22, 2012

Cous Cous Salad

There's something fantastic about cous cous. To me, living in Australia, it seems like a foreign food, and I do get a bit of a thrill out of eating it when I do. I love cous cous salads with bbqed meats on one of those hot summer days we're heading into, so when I saw this recipe on Josie's Kitchen blog for the Secret Recipe Club Reveal, I just had to make it. I added some shredded turkey, and left out the mint (only because the caterpillars which have infested my garden have eaten it all!) but I think the mint sounds delightfully refreshing for a summer's afternoon dinner. It's a light salad yet hearty at the same time. My kids love it, my little one year old came back for seconds (which is amazing because she hates solids!) So thank you Josie! It's a wonderful recipe that makes me think of Moroccan dishes, warm weather and sitting out on the deck with a glass of wine on those sultry summer nights...


COUS COUS SALAD (Adapted from  Josie's Kitchen)

1 cup water
olive oil
1 cup dry cous cous
handful fresh parsley
1 cucumber
2 firm, large tomatoes
1/4 cup lemon juice
1/2 cup shredded turkey (pre cooked)
Salt and pepper to taste

In a medium saucepan, boil water. Add one tablespoon olive oil to the water, plus the dry cous cous. Remove from heat and set aside with the saucepan lid on. When the water has been absorbed by the cous cous, remove from the saucpan into a salad bowl. Break up any lumps. If the lumps do not break down and it appears "gluggy", add a little more oil and mix through.
Finely chop the parsley.
Finely chop the cucumber and tomatoes. Mix the parsley, cucumber and tomatoes through the cous cous. Add the shredded turkey and mix through. Drizzle lemon juice over the salad. You may add salt and pepper to the salad if you desire.

Monte Carlo Cheesecakes

Is it just me, or has the silly season already begun? It's October, yet I feel time has escaped me and I am trying (and failing) to slow things down, resisting the thought of Christmas and all the things, events and people that are to be done, attended and seen before December 25.
In less than a month I am off to attend the unnerving, the exciting, the butterfly-in-the-tummy-filling cook off to find the next Blogger Come Chef at the Brisbane food and wine show. Holy Macaroly, how did I end up there? I am still asking myself. I have never done anything like this before, and I find my heart in my throat at the thought of cooking in front of a crowd of starring eyes and judges...and actually being in competition with another creative foodie mind. Yes Brisbane bloggers. I have been scoping you out, and hoping I am not up against one of you super mums who just seems to have it all figured out! My mind wanders thinking of what I'd put prize money towards...trying not to get too far ahead of myself. With the dream of publishing a cookbook in the forefront of my mind. I. Must. Win.
Having said that, I am not cooking anything sweet.
I know.
Insanity, Louise.
What ARE you thinking?
Well I cant disclose what I'm making in case I have Brisbane foodie stalkers, hoping they're up against me with their wizz-bang recipes that they have been practicing and preparing for months in order to beat me to the prize. You will not know until I'm standing there with my plated creation.
By the way, if anyone is interested in coming and watching me sweating like a pig over the stove in the middle of summer, you're welcome. I am slowly but surely gathering a very gorgeous cheer squad and you can get your pom poms out too. Okay. Rehearsals are every Friday night at my house, cheese and wine provided. Just kidding.
Bring your own wine.
I've had the last of it to steady my nerves.
In all seriousness, you're most welcome to come. Not to my house, to the event. I believe there are lots of exciting things to be seen at these food and wine festivals besides wannabe cooks like me, battling against other wannabe cooks.
I'll be there on Saturday the 10th of November at the Chopping Block stage 7, from 2pm until 2.45.
Phew. That sounds so official.
In the meantime, I'm calming my nerves by cooking everything but what I am meant to be practicing for the cook off. Smart, I know.
Anyway, I've come up with a new recipe, incorporating one of my all time favourites, Monte Carlos. Is there anything quite as delicious as that red line of jam tucking away a filling of vanilla cream? Only a Monte Carlo cheesecake could be that touch more delicious than that.
This is a real treat for the tastebuds. Two gorgeous, vanilla-y, coconut-y, jam-y Monte Carlo biscuits sandwiching a creamy strawberry cheesecake filling.  Oh my. Yes it's as good as it sounds.


MONTE CARLO CHEESECAKES (A Lick the Spoon Original)


3/4 cup sugar
250g strawberries
1/4 cup water
1 tbsp gelatin
150g cream cheese, room temperature
1 cup cream
20 monte carlo biscuits
10 8cmx25cm strips of acetate plastic/ projector film

Hull the strawberries and place in a food blender. Process until pureed. Place the puree and 1/2 cup of the sugar in a saucepan. Turn the heat on low and cook until it just begins to boil. While heating, place water and gelatin in a small bowl and let soften. When the puree begins to boil, add the gelatin mixture and stir, until the gelatin dissolves into the puree mixture. Remove from heat. Allow to cool to room temperature. Meanwhile,
beat the cream cheese and the remaining 1/4 cup of the sugar together in a bowl until well combined. Set aside.
In a separate bowl, whip the cream until firm peaks form. Add the cream cheese mixture to the cream and briefly beat to combine.
When the puree mixture has cooled to room temperature, gently fold it through the creamy mixture until combined.
Place half the monte carlo biscuits on a plate or tray. Firmly wrap one acetate plastic strip around each monte carlo, and fix with a piece of sticky tape to hold together. Spoon the cheesecake filling into each until all the mixture is used up. Top each cheesecake with another monte carlo. Refrigerate until set, for 3 or more hours.
Before serving, remove from the refrigerator and gently peel away the acetate from the sides of the cheesecake. Serve with strawberry puree and cream, if desired.


Makes 10

NOTES: The pictures show the monte carlo cheesecakes served with strained strawberry puree and rolled fondant roses. To make your own fondant roses, click here. Also, acetate plastic sheets (or projection sheets) can be found at your local copy shop or Officeworks. If you cant find any, you can cheat like I did, and cut up a few plastic folders like this one. You could possibly also use baking paper.

Thursday, October 11, 2012

Forbidden Fairy Foam


This is a tooth fairy's greatest nightmare. She'll be working extra hard after the kids have eaten some of this forbidden fairy foam--a gorgeous gold dusted, pink spotted cloud of sugary deliciousness. The tooth fairy would never visit me when I had a bad tooth fall out as a child, so maybe she will get a chance to sit back and relax if you have a few...or make them for your daughter's birthday party and send the kids home bouncing off walls.
You won't believe it, but these faux-meringue creations are made of three simple ingredients, and would make a great  and fun project for when the kids are home and on school holidays. It's almost like a scrumptious science experiment, and best of all, they're made in the microwave, so you don't have to turn the oven on and heat up the whole house. They start off as a sticky, coloured marble, and billow up within moments into great fluffy clouds. Yes, there will be stickiness, lots of excitement, possibly some crumbly powdery stuff to sweep up. But the look on the faces of those kids crunching through this forbidden fairy foam is delightful. I had to hide them. My son would stop at nothing to get another, and another. He pulled the table cloth off the buffet just to bring them to his arm's reach, and quickly became a sticky, meringue flavoured little boy. All the better to kiss, I say.
And it wasn't just he who enjoyed this pretty stuff. They look so unique and elegant, you could easily serve mini ones at a high tea or girl's get together, topped with roses or some other feminine garnish. They would also be fabulous for a treat at a little girl's birthday party, with a touch of edible glitter on the tops (be sure to send the kids outside to eat them!)


FORBIDDEN FAIRY FOAM (adapted from Scrumptious)

1 egg white
1 tsp vanilla essence
3 cups icing sugar
a few drops of pink food colouring
edible glitter or edible gold dust (optional)

Place the egg white and the vanilla in a small bowl. Beat briefly, until the egg has broken down and there are no stringy bits. In a medium sized bowl, place the icing sugar, and make a well in the centre. Gradually add the egg mixture to the icing sugar, slowly incorporating the icing sugar into the wet mixture. You may not have to use all the egg, but combine until all the dry is mixed into the wet to make a thick, pliable icing, the consistency of thick dough. Add a little more icing sugar if it becomes too sticky, it should not leave residue on your hands when you handle it. Dab a little food colouring onto the mixture and twist it randomly through the icing until you have a marbled effect. Roll into walnut sized balls and place in the centre of 7cm round paper patty pans. (If you are using smaller pans, make the balls smaller, and lessen the cooking time accordingly). Sprinkle the tops of each with edible glitter or edible gold dust.
Place 6 at a time inside the microwave on the turntable, in a circle. This ensures they all cook at an even rate. Set the microwave on high and at a setting of two minutes, just to be on the safe side. Start the cooking, watching carefully. After about 30 to 45 seconds, the balls will melt, then start to billow at a rapid rate. They will stop billowing momentarily, then cook for a further 30-45 seconds. Each microwave has different powers so you will have to do a trial run to begin with to see if your fairy foams will have to be cooked for more or less time. The outer should be crisp and firm to touch on removing, as will the inside. If the insides are brown, you have cooked them too long.


Makes approximately 20.


Wednesday, October 10, 2012

Apple Custard Tart of Roses

Here's a wonderful recipe translated from Bulgarian with some alterations on my part. I love finding these interesting and exquisite recipes that are not found in English, because there's a certain feeling of specialty that comes with it. If I ever travel overseas, it will be to Europe to try all the delightful foods that are not commonly found in English speaking countries. There's something so good about European food, the way they cook, and the unprocessed ingredients used. You have no idea how tired I am of hearing the words "cool whip", "canned scone dough" and so forth when I look for recipes on the web. What is this stuff? What's in it? (did you know you can even get canned crispy bacon, and canned cheeseburgers? Yummy?)
It's refreshing to be able to make everything from scratch that doesn't involve any over-processed consumables.
This apple custard tart is delightfully European. It's laced with sweet white wine, and has wonderful zesty orange hints throughout, and boasts a shortbread crust, and an arrangement of pinkened apple rosettes on the top. Brushed with jam and cooked to golden perfection, this lovely tart is best served warm with a drizzling of thickened cream.


APPLE CUSTARD TART OF ROSES (Adapted From Delicious With Jolien)

Pastry:
125g butter, softened
3/4 cup icing sugar
1 tsp vanilla
1 tsp orange rind, grated
1 egg
100g ground almond (almond meal)
1 1/2 cups plain flour

Custard:
4 tbsp corn flour (corn starch)
6 tbsp. sugar
1 tsp vanilla
1 tsp orange rind, grated
3 egg yolks
400mls milk
100ml white wine (I used Moscato)

5-6 apples (I used Pink Lady apples)
1 tsp fruit jam (I used strawberry jam)

To make the pastry dough, place butter and sugar, vanilla and orange rind in a large bowl and incorporate briefly with the beaters. Add egg and almond meal and lightly beat again until the egg has broken down and is mixed through the butter. Add the flour and knead into a soft dough.
Spread into a greased and floured 24cm round flan dish. Using your fingers, press evenly into the base and up the sides of the flan dish. Refrigerate.
Meanwhile to make the custard filling, place the corn flour, sugar, vanilla and orange rind together in a medium saucepan. Add the yolks and a little milk and bring to a smooth, paste-like consistency. Place on a medium-high heat, and add the remaining milk and the wine. Whisking continuously, bring the custard to the boil and then for a further few minutes to thicken. (Custard will also thicken further in the oven).
Set the custard aside in a medium bowl to cool.
Heat the oven at 180C.
Take the apples and wash them. Using a potato peeler, make strips of apple form the peel and the flesh. The larger and wider the strips, the better.
When the custard has cooled, pour it into the base. Begin arranging the apple strips into rose shapes on the custard. (I found it helpful to start building the centre few layers of the rose in my hand before placing it in the custard, then building around it with larger strips. See photos below for a visual)
When the whole surface of the custard is covered in rose shapes, brush the top gently with a little warmed jam. Bake for 40-45 minutes, until the crust is golden and the apples have browned.

Serves 8-10

Building an apple peel rose:


Thursday, October 4, 2012

Creme de Menthe Chocolate Fudge Slice

I have a bit of a confession to make. I'm one of those people that is easily inspired to do things and then, like water on a firecracker, it often fizzles out before it really goes off. I have the best intentions of course. I suppose that comes with being sanguine in nature. As you can imagine, I'm a bit of a hoarder (so many possibilities in this!) and pintrest will be the death of me. My junk cupboard is filled with all sorts of unfinished projects--because half way through them, I get a huge inspiration for something else and have to start it before the inspiration I forget and lose the interest to do it. I don't know how that darling husband puts up with me.
Anyway, I'm pretty proud to say that my baking passion has not fizzled out (thanks to you all, and my "the way to a man's heart is through his stomach" theory--which happens to be true), and neither has this blog! Unlike so many of my interests, this has somehow stayed consistent, and happily, I find myself writing Lick The Spoon's 200th post. Yes I have a baby on my knee and am writing at a painful rate with one hand, whist she chews on the other with her not-so-gummy mouth. But it's still the 200th post!
Here's a recipe I had a dream about. Yes, that happens frequently, and then I just have to create it. Minty creme de menthe filling wedged between fudgy brownie base and a corrugated layer of thick, chocolate fudge ganache. Oh my! This is a lady killer. A man killer too, as a matter of fact. I couldn't quite get the intensity of mint flavour I wanted with the creme de menthe, so I intensified it by adding a little mint essence just to jack up the flavour a notch. You can substitute the creme de menthe for 1 tsp. mint essence if you don't have any of that sublime liqueur handy, and add a few drops of green food colouring in it too. There, there's a cheats non-alcoholic version for you. Enjoy!


CREME DE MENTHE CHOCOLATE GANACHE SLICE (A Lick the Spoon Original)

Base:
1/2 cup butter
1/2 cup cocoa powder
1 cup brown sugar, firmly packed
2 eggs
1/2 tsp. vanilla
1/2 cup plain flour
1/4 tsp salt

Filling:
1/4 cup cream
2 tbsp. green creme de menthe
3 cups icing sugar
1/2 tsp. mint essence (optional)

Fudge Ganache:
200g dark cooking chocolate
2 tbsp thickened cream
mint leaves to garnish (optional)

Preheat your oven to 180C.
Melt butter and remove from heat. Stir through the cocoa and brown sugar until combined.
Beat in the eggs and vanilla. Next, blend in the flour and salt. Spoon the batter into a greased and lined 18x18 square baking dish. Bake for 15-20 minutes. Remove from heat and set aside to cool.
Meanwhile, prepare the filling by placing cream, creme de menthe, icing sugar and essence in a medium bowl. Beat until well combined and at the desired thickness and flavour. The filling should be thick yet spreadable.
Spread over the top of the base layer. Refrigerate while making the ganache.
To make the ganache, gently melt the chocolate using your microwave, checking and stirring every 20 seconds or so until the chocolate is almost melted.  Stir to melt the last of the chocolate. Set aside to cool momentarily. Remove the slice from the refrigerator.
Working quickly, add the cream to the chocolate and stir thoroughly to combine. The mixture thickens quickly, so mix in a timely manner and immediately spread over the top of the filling. You can add a pattern to the top of the slice by using the tip of a butter knife.
Refrigerate until ready to serve, then cut into squares.