Showing posts with label pizza. Show all posts

Sunday, June 29, 2014

Tandoori Prawn and Pawpaw Pizza

If you had a pawpaw, what would you do with it? I had no idea how to use a pawpaw, because I have never tasted it. It's not available all year round and is a tropical fruit, so some may find it hard to get their hands on-which sort of makes it the holy grail of fruits because it tends to be rare in parts of the world. I live in a sub tropical climate, so I see those pawpaw trees all over the place. And I still didn't know what it tasted like!
What does a pawpaw taste like? It doesn't have a strong flavour, and while some say it reminds them of mango and pineapple, it does not hold the same sweet and aromatic qualities. It isn't really comparable to any taste I have experienced before, and while some say its texture is like that of a ripe banana, I also find this quite unique. It almost has a buttery quality to it. In a nutshell, it's indescribable, and must be tasted! I personally think it's a little like cantaloupe.
I initially was thinking baking it into something sweet, but on cutting open that golden baby, my husband and I decided it should be paired with curry. So the Tandoori Prawn and Pawpaw Pizza came into existence. Its a great pizza recipe for the base, requiring no proofing and no kneading. That makes this recipe a quick and easy dinner or lunch choice, and perfect for those days you just need to quickly whip up a meal. I used my chef's toolbox saute pan to make this pizza in the oven without the lid on. You can use any round pan or pizza tray for this, but I used the saute pan because I liked the size of it, and I could mix up the pizza base in there also, and just press it straight into a disc before topping.
So-what did the tandoori prawn  and pawpaw pizza taste like?
Imagine an open front cafe so close to the beach that you can dip your toes in the sand. There's a warm fresh breeze tangling your hair and swaying the palm trees, and you can hear the waves pummeling the sand close by, on the shores of some exotic holiday destination. Biting into a slice of this pizza is like being carried away there. If you close your eyes you immediately forget you can't literally feel that sand and breeze because the flavours that hit you are so deliciously distracting-that exotic indian tandoori flavour combined with the tang of greek yogurt, the subtle yet very present tropical vibe of the paw paw and the seafood thrill of the crunchy prawns at the end. Who needs a holiday when you have a slice of this pizza in your hands?

NOTES: This pizza is great for the family table and would be very appealing to teenagers and adults alike, and if you wish to serve this to children (while it is not very spicy due to the addition of the greek yogurt) you may wish to adjust the quantity of tandoori paste to 1 tsp for their little pallets!(my 2 and 4 year olds ate this pizza with 1 heaped tbsp tandoori paste in the sauce, and loved it! I added a little sour cream to the top of their pizza just in case it was too spicy for them.)


TANDOORI PRAWN & PAWPAW PIZZA

Base:
1 cup SR flour
1 cup plain flour
1 tsp dry yeast
pinch salt
1 tsp honey
1 cup luke-warm water

Sauce:
1 heaped tbsp tandoori paste (this is concentrated tandoori paste. For children, you may wish to reduce the tandoori to 1 tsp.)
1/2 cup greek yogurt

Topping:
1/4 yellow pawpaw, seeded, skinned and sliced thinly
1 1/2 cup raw prawns, tails removed (about 20 prawns)
3/4 cup grated cheese (I used Tasty cheese)

Preheat the oven to 190C. In a bowl, combine all the base ingredients and combine until a soft dough forms. Dump this mixture onto a greased or non stick round pizza tray and using your fingers, push around the tray until it forms a disc. (You may like to dust your hands with a little flour if it's sticking to your hands)
In a small bowl, combine the tandoori paste with the yogurt, and spread it over the pizza base.
Arranged the sliced pawpaw on the tandoori paste, along with the raw prawns. Sprinkle grated cheese over the top and cook for 30-35 minutes, or until the base is golden brown on the underside, and the prawns have turned pink and curled into themselves.
Set aside for 5 minutes before slicing to serve.


Sunday, October 16, 2011

These Are A Few Of My Favourite Things

My kitchen, after my bed, is my favourite niche in the house.
There are things in my kitchen I am very attached to...ingredients and objects alike. I have to have them always at hand and would not know what to do without them. Of course there are the other things I must always have stock of...flour, sugar, milk, eggs and real butter. I would go into panic without those. What cant you live without in your kitchen? Here are a few of my kitchen addictions.

One of them makes this delicious pizza!

Vanilla Essence--I put this stuff in just about everything. You cant go wrong with vanilla in baking!


Cookbook Stands-- I hate having to lean over a kitchen bench to read a recipe, I want my cookbook looking at me at all times! Besides, when you can buy shabby chic ones like this, who wouldn't have one in their kitchen?


Lemon Pepper--here's the vanilla essence of savory cooking. Adds a salt-free zing to anything and tastes amazing.


Chocolate Chips--do I need to explain? these little dudes are irresistible in anything.


Chef's Toolbox Saute Pan--This baby rocks my world. It's a stove-top oven, and you can also use it inside the oven if you want. It makes the most incredible pizzas, just sitting on the stove.


Its this last, but certainly not least, addictive appliance I mean to speak about. I have never tasted such amazing pizzas, and they are created with such little effort. You don't even have to wait for the dough to rise, and there's absolutely no kneading or bowl-use involved. It is the simplest, quickest and yummiest home made pizza you will ever have. And there's no fancy ingredients to buy! (unless you want gourmet topping).
The pan itself is excellent quality non-stick, and contains no bad chemicals like so many other non-stick pans.

Because of the excellent quality non-stick surface, the pizza simply slides out! and there is minimal cleanup in the saute pan...simply wipe it clean with a cloth!
Because it is like an oven itself, you can simply have it sitting on the stove top cooking anything you would usually have in the oven...without heating up the whole house! I cook everything in this saute pan and it has never once failed me. If you want to know more about it, head over to Pauline Phillip's Toolbox Tastings Facebook page and give her a holler. She sells them!


CHEF'S TOOLBOX STOVE TOP PIZZA

1 cup plain flour
1 cup SR flour
1 cup luke-warm water
1 tsp. dry yeast
1 tsp. honey
Pinch of salt
Topping of your choice

We used:
200g roast beef, sliced
good squirt mayonnaise
splash of hoi sin sauce
1 large tomato, sliced
1/2 cup cheese
3 mushrooms, sliced
handful of spinach, finely chopped
1/4 cup pasta sauce

In your Chef's Toolbox Saute Pan, add all ingredients. Using a silicone spoon, combine thoroughly to form a dough.
Press into the edges of the saute pan to cover the base evenly. You can use the silicone spoon or your fingers, as preferred. A little flour sprinkled on the dough may aid against sticking to hands or utensils.


Spread with your favourite toppings. (We spread the base with a combination of hoi sin and mayo, then added all the other ingredients to the top, lastly drizzling the pasta sauce, and then the cheese. So Yummy!)


Place on the stove top. Place the lid on with the vent closed for the first 5 minutes and have on a medium heat. Turn the lid to open the vents and cook a little lower for a further 15-20 minutes. Serve and enjoy!

NOTES: you can make a thin base by halving the mixture. Cooking time may also be reduced.

Thursday, June 2, 2011

Chunky Pesto and Cashew Damper Scrolls

My husband and I recently went out for dinner at a lovely Italian restaurant, "Mariosarti". I've missed Italian food, as my hometown Melbourne is packed with Italian dining spots and I had become accustomed to that cuisine...Brisbane seems to have a lot of Thai restaurants but the Italian eateries seem few and far between.
Besides being a wonderful night, it was also slightly amusing. The restaurant was cozy, and full of laughing couples and tables of friends and people having a good time together. Besides us sat a couple on what I presume was a date. Amongst all the mirth from other diners I could hear the man sitting next to me talking in the most serious tone. "I can tell good quality herbs in a dish--I'm a food conosure. I really know food...like, really know food. I can taste quality." On and on he went into the history of this part of his meal and that, raving, and the girl sat and said nothing. I wonder if she was wondering when she would be able to go home? It made me laugh. The woman excused herself and went to powder her nose. The waiter came and asked the man if the meal was okay, and ended up standing there for a good ten minutes listening to the customer jabber about fine dining and the quality of the meal and the perfection of the cooking.
If I ever become so tedious when speaking of food on this blog, shoot me!
I love food, and he bored me to tears, and I only caught snippets of his spiels. I felt for his poor date.
Anyhow, feeling the need for another taste of something Italianesque, enter pizza scrolls. These are super yummy, especially when served straight from the oven and are very easy to make. Except, I made the error of not using enough flour when I rolled the dough, so it was a near fatality. They came out of the oven looking delicious, so all's well that ends well, as they say.


CHUNKY PESTO AND CASHEW DAMPER SCROLLS (adapted from Taste.com.au) 


3 cups self-raising flour
80g butter, chopped
Salt & freshly ground black pepper
1 1/2 cups buttermilk
Buttermilk, extra, to brush
150g container chunky basil pesto dip with cashew nuts (we used Black Swan brand)
1/4 cup finely sliced sun dried tomatoes
2 rashers bacon, fat removed, finely sliced
1 cup cheese, grated
1/4 cup Parmesan cheese


Preheat oven to 200°C. Line a baking tray with non-stick baking paper. Sift the flour into a large bowl. Use your fingertips to rub the butter into the flour until it resembles fine breadcrumbs. Season with salt and pepper. Make a well in the centre and pour in the buttermilk.
Use a round-bladed knife in a cutting motion to mix until evenly incorporated and the mixture begins to hold together. (Do not overmix. The dough should be soft but not sticky.) Turn the dough onto a well floured surface and gently knead until just smooth.
Use a lightly floured rolling pin to roll out the dough to a 30 x 40cm rectangle, about 1cm-thick. Spread the pesto evenly over the dough and sprinkle with Parmesan, sun dried tomatoes and bacon. Sprinkle a little grated cheese over the top.
Starting from a long side, roll up firmly to form a log. Brush the edge with a little extra buttermilk and press down firmly to seal. Cut log crossways into 16 equal portions, about 2cm thick. Place the scrolls on prepared tray. Sprinkle the tops with grated cheese. Bake in oven for 20 minutes or until golden brown and just cooked through. Set aside for 10 minutes to cool slightly. Serve warm or at room temperature.

 NOTES: the scrolls look and taste wonderful with some tomato pasta sauce spread on top before the grated cheese is placed onto them. You may also substitute the bacon for ham or salami, and the pesto dip for any other dip or spread. Also if the scrolls are done but the tops aren't golden, you can pop them under the grill on high for a minute or so to brown them.


With a smear of tomato under the cheese

Wednesday, May 18, 2011

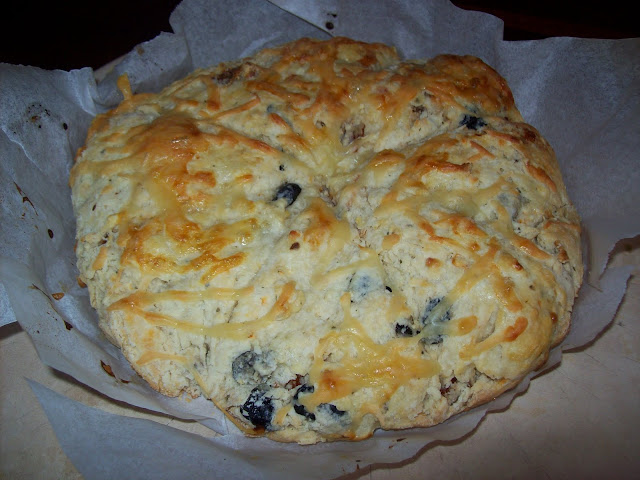
Hot Pizza Damper...Just out of the oven...

I know that a lot of  my readers are heading into summer, but here in Australia we're getting into that season where hot soups, puddings and hearty veggie casseroles are to be desired on those cooling nights that are fast on our heels. Our faux flame heater is out and keeping our toes toasty but it helps when the bellies are warm to boot...and that's where this recipe comes in. I made this pizza damper as an accompaniment to the roast pumpkin soup featured in my last blog, and they went perfectly together. We had my father in law over for dinner and he promptly asked where the pizza damper came from, because he thought it had been bought.
Yes it looks impressive, so if you're ever having guests over for dinner, I recommend you make it as a table centrepeice. It smells divine, it looks divine and its absolutely delicious. This one came straight out of the oven onto the table...nothing like bread fresh out of the oven! There's really nothing to this recipe, the buttermilk does all the hard work. It requires no bread making skills at all. I've never used buttermilk until now, and I am absolutely impressed by how delicious it makes scones, pancakes and damper. Again, this was one thing that only lasted a few minutes on the table...so make a couple! Everyone will want seconds. Even the kids who hate tomato and olives ate this baby with relish. Now that's saying something!


PIZZA DAMPER (adapted from taste.com.au)

1/4 cup sun dried tomatoes, chopped
1/4 cup  black olives, finely chopped (we used Spanish olives)
1 tsp. dried parsley
1/3 cup grated cheese
1/4 grated cheese, extra
2 cups self raising flour
1 tbs sugar
pinch salt
60g butter, chilled, diced
3/4 cup buttermilk

Preheat oven to 220°C/200°C fan-forced. Line a round baking tray with baking paper. Position oven rack in the top half of oven.
Sift flour, sugar and salt into a bowl. Add butter. Using fingertips, rub butter into flour mixture until mixture resembles fine breadcrumbs. Add the olives, parsley, 1/3 cup cheese and tomatoes. Stir until well combined, and then make a well in the centre of the mixture. Add buttermilk. Using a flat-bladed knife, stir until a sticky dough forms. Turn out onto a lightly floured surface. Knead gently until just smooth. Form into a flat disc big enough to fit inside the pan (20cm base). Cut round into 8 wedges (don't cut all the way through). Brush the top with a little buttermilk, and sprinkle the extra cheese on the top of the damper. Bake for 20 to 25 minutes or until hollow when tapped on top or turns golden. Serve hot.