Friday, August 31, 2012

No Bake Triple Chocolate Layer Cheesecake

I recently did a short poll on Lick The Spoon's facebook fan page about cheesecake. I don't know anyone who doesn't like cheesecake, but the question is, baked or refrigerated? The votes were pretty even but refrigerated came out on top, to my surprise. I had always thought a baked cheesecake would win hands down. The image that came to my mind of a refrigerated cheesecake was one of those cheap supermarket cheesecakes that you can buy for about $4.00. Which, mind you, is probably okay for one of those quick desserts but now I know its nothing like the real deal! I am fully converted to refrigerated cheesecakes. Wholeheartedly converted.
This means I never have to go through that stress of pulling the cheesecake from the oven, testing the wobbly centre and thinking "is it cooked or isn't it?"
I couldn't believe the smooth and silky texture of the refrigerated cheesecake also, and how quick and easy it was to put together, without the use of eggs. Trust me, when you've grown up watching chooks lay eggs, it can put you off using eggs. At one stage I swore never to eat another egg...but then I discovered baking. Anyway, this recipe requires no eggs and loads of chocolate, with a decadent chocolate ripple biscuit base. It is three layers of cheesecake--white, milk and dark chocolate, sprinkled with crushed biscuit and piled high with chocolate dipped strawberries. It's the ultimate cheesecake. By far the best cheesecake I have ever tasted. Stress free.


NO BAKE TRIPLE CHOCOLATE LAYER CHEESECAKE (Adapted from Taste)

350g Chocolate Ripple Biscuits (or plain chocolate biscuits)
125g butter
1/4 cup boiling water
3 tsp unflavoured gelatine
3x 250g packets cream cheese, at room temperature
1/2 cup caster sugar
300ml thickened cream
200g white cooking chocolate
200g milk cooking chocolate
200g dark cooking chocolate
250g strawberries, washed and dried
100g extra chocolate to garnish strawberries if desired

Break up 300g of biscuits into a food processor. (Reserve the remaining 50g to garnish the top of the cheesecake at a later point.)
Process the biscuits until they resemble fine crumbs. Melt the butter in a large microwave proof bowl, then add the biscuit crumbs and stir until well combined. Tip the contents of the bowl into a 23cm round springform tin. Using a straigh sided glass, press this mixture into the base and up the sides of the tin until even and compact. Place in the refrigerator to harden.


In a small bowl, place the hot water and shower the gelatine evenly over the surface. Stir with a fork until the gelatine has dissolved completely. Set aside.
In a large bowl, beat the cream cheese and sugar together until smooth and well incorporated. Add the Cream and beat until smooth. Add the gelatine mixture and stir until well combined.
Melt the white chocolate gently in the microwave. Remove from heat and set aside.
Divide the cream cheese mixture into three. In one third, stir through the melted white chocolate. Spoon this third onto the base of the cheesecake and smooth. Place in the freezer to harden.
Meanwhile, melt the milk chocolate gently in the microwave.
Stir the melted milk chocolate through the next portion of the cream cheese until thoroughly combined. Remove the pan from the freezer, and smooth the milk chocolate layer over the white chocolate layer.
Return to freezer.
Melt the dark chocolate gently in the microwave. Stir the dark chocolate through the remaining cream cheese mixture until well combined. Remove the pan from the freezer and spread with the final cheesecake layer. Cover in plastic wrap and refrigerate for 3 hours until firm.
To add the garnishes, process the remaining 50g of biscuit in the food processor. Place a 20cm round bowl face down in the centre of  the cheesecake and sprinkle the biscuit crumbs around the edges. Remove the bowl. Dip the strawberries in chocolate if desired and pile in the centre of the cake.

Serves 10-12


Thursday, August 30, 2012

Feast for the Eyes

Dear Droolers,
Thank you for your comments and concerned emails while I have been away indulging in Victorian and Melbournian cuisine over the last month and have not been fit to blog.
Fear not--I have not drowned in chocolate or suffocated on an over sized mouthful of cake or been hospitalized due to some morbid sugar-related disease. I am well refreshed on good clean country air and a little of the polluted city air as well. Until yesterday I hadn't cooked in three weeks and feel ever so ready to get back into the swing of things again. My mother somewhat babied my husband and I, and I found myself so far from the kitchen, it felt foreign. So yesterday I made a cheesecake. A scrumptious, decadent, sumptuous triple chocolate layered cheesecake--white, milk and dark chocolate topped in chocolate dipped strawberries. I think my gut is still reeling from it. It was wickedly divine. I will be posting it and the recipe as soon as I can...but meanwhile, here are some pictures of a few delights from Melbourne for a good drool or some inspiration for the more creative among you. I know I felt like a kitchen hack looking at these windows in St. Kilda, Victoria.


European cake shops in St. Kilda
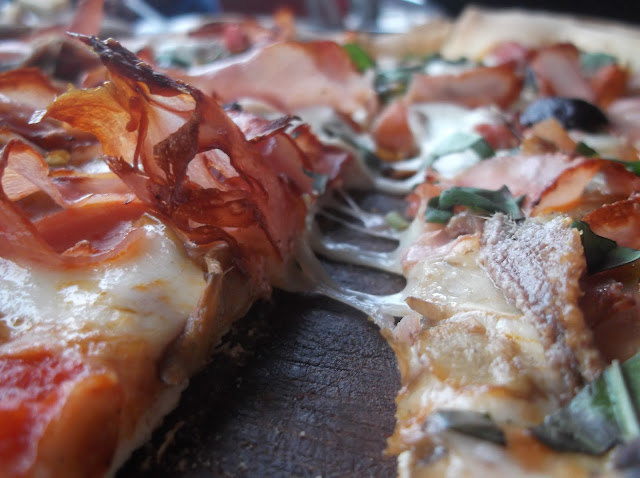
Pizza in St Kilda was divine!


Ice Cream and Gelato at Southbank, Melbourne
A little coffee art never goes astray.

European cake shops in St. Kilda
I know, amazing, isn't it?
It was so hard to choose what to sample. We came home with a chocolate rollade, and it was so decadent it had to be shared amongst us all. Now, excuse me while I go and find recipes for the rest of the window contents. So inspiring.
Now onto another place that I mentioned in a previous post. Churros at Flinder's Street Station. Go there. Go!


I highly recommend the white chocolate and coconut coated churro at the far end...its filled with strawberry jam too.

Hot churros with chocolate dipping sauce

Vienna enjoys crunching on a churro
The chocolate penguins on Phillip Island were pretty impressive too.
Somehow, despite all this decadence and delicious eating, I came home lighter. To my delight I heard reports that in my absence, one of my guinea pigs (aka taste testers) also lost a kg or two in my absence, and my husband didn't have to go to the gym as a result of me being on holidays from the kitchen. Anyone else lose weight while I was away?

More recipes coming soon! Keep licking the spoon!
Louise xo

ps. I will try and respond to all comments received in my absence...although it may take me a week or so to get around to it. Amazing the cleaning that follows a holiday!


Thursday, August 2, 2012

Pink Pancakes with Crushed Strawberry Oreos

I had the most fabulous Mother's Day in May. I know, the post is a few months late, but there's always an excuse to pamper your mum,or wife, or lucky lady in your life with these femininely pink pancakes. Any woman will be impressed by the sweet gesture and "your" creativity (you don't have to tell them where the idea came from) Have you ever treated her to pancakes in bed on Saturday morning? You know you want to! (for all those times you had man-flu and she waited upon you hand and foot)
It cant get much better than this...pink pancakes, smothered in strawberry jam and topped with vanilla ice cream and crushed strawberry flavoured oreos. Its rich and decadent and oh so good in bed.


PINK PANCAKES WITH STRAWBERRY OREOS (adapted from Better Homes and Gardens 07/11)

1 cup self raising flour
1/2 tsp bicarb soda
60g butter
2 tbsp honey
1 cup milk
1 egg, lightly beaten
a few drops of pink or red food
4 strawberry oreos
ice cream
strawberry jam if desired

Sift flour and bicarb into a medium sized bowl. Heat butter and honey in a small saucepan over a low heat. Cook, stirring, until the butter has melted and is smooth. Set aside to cool.
Add milk and beaten egg to the butter mixture and whisk until combined. Place a few drops of pink or red food colouring in the mixture and stir gently to combine. Make a well in the centre of the flour and pour in the wet mixture. Stir until a smooth batter forms.
Add a little butter to the base of a large fry pan, at medium heat. Dollop four spoonfuls of batter into the fry pan at once. When bubbles begin to burst on the surface of the pancakes, flip and cook the other side until golden. Repeat with remaining batter. Serve pancakes spread with strawberry jam and with a large scoop of ice cream with crushed oreos on the top.

Serves 3-4

Care to lick the spoon?

Monday, July 23, 2012

Strawberry Cream Tart

You know when you make the same thing so many times that the recipe gradually and unconsciously changes over time? I once discovered a great custard recipe and have been making it ever since. I made it so many times that I knew the recipe off the top of my head and discarded the hard copy. Eventually the custard turned out slightly odd, with a real corn flour taste and still not quite as thick as I swear it used to be. Time to go back and find the recipe, or time to try something new? When I saw this strawberry cream tart recipe from Cathy's blog Wives With Knives, I thought "try something new", just to shake things up in my world of custard. Custard has long been a favourite of mine. Occasionally I'll be seen buying a litre of it just to have on it's own. I preferred home made custard of course, until my cornflour dilemma.
And strawberries, please don't get me started! They're my favourite berry and come with so many childhood memories. I think I previously mentioned how my brother and I used to thieve them with our grotty little hands from the old lady's garden next door when we were kids. Seeing as I don't have any blind grannies living next door anymore, with loads of fat strawberries glaring at me through the crack in the fence, hubby comes home from the Brisbane markets with them instead. Legally obtained ones, of course.
Usually my two year old son gets to them first though, and has been known to scoff down a punnet in a sitting. Good thing they're high in vitamin C. When I think of that fact, I don't mind how many he eats.
So. Strawberries and custard, in a tart. How much better can it get? Oh wait! It's topped with strawberry jam as well. Delicious. And it's such a fancy looking yet simple dessert, and contains less sugar than my usual sweet morsels.
I added some lychee liqueur to the custard in my version of this tart, just to give it a more fruity, tropical twist. The smell is divine and the texture and taste just fabulous. The custard holds together beautifully, so if you go for the whole large tart instead of the smaller version, have no fear that it's going to squish everywhere out the sides when you cut it, as it chills nice and firm. The pastry case is particularly impressive too, resembling a (less crumbly) uncooked shortbread in the dough stage, and a nice, sturdy, crisp and sweet shell in the end. I will be keeping this recipe for other invented recipes, as you could fill these great pastry cases with anything from fruit to mousse, jelly or cheesecake! Don't forget to check out more delicious recipes from this months Secret Recipe Club reveal, and head over to Wives With Knives for the original recipe, which is a whole tart instead of my little individual ones. Bon appetit!


STRAWBERRY CREAM TART (Adapted from Wives With Knives)


Patisserie Creme:

2 cups milk
6 large egg yolks, room temperature
3/4 cup white sugar
3 tbsp. corn flour
1 heaped tsp. butter
1 tsp vanilla essence
3 tbsp lychee liqueur 


Pastry:

3/4 cup butter, room temperature
1/2 cup sugar
1/2 tsp. vanilla essence
1 3/4 cup plain flour
pinch salt

Garnish:

12 strawberries, fanned (see directions below)
 3 tbsp strawberry jam to glaze


To make the patisserie creme, place the milk in a saucepan over high heat until boiling. Meanwhile, beat the yolks and sugar in a bowl on medium high until it is light yellow and falls into the bowl as a ribbon, after about 3 minutes. Add the vanilla essence. On a low speed, beat in the corn flour until well combined. Once the milk has boiled, remove from heat and, with the beaters running on low, pour the milk into the egg mixture. Combine. Pour the mixture back into the saucepan and return to the heat. Lower the heat to medium and stir continuously with a whisk until the mixture is thick and the corn flour is cooked, after about 8 minutes. Bring this custard to the boil and cook, whisking for another 3 minutes. Remove from the heat and transfer to a bowl. Stir in butter, vanilla and liqueur. Cover with plastic wrap and refrigerate until chilled.
To make the pastry, preheat the oven to 180C.
Place the butter and sugar in a medium bowl and beat until just combined. Add the vanilla.Sift the flour and salt over the top of the butter mixture. Beat until a dough begins to form.
With a light hand, gently combine the mixture and form into 12 rough ball shapes, all of equal size. Place each ball inside the holes of a regular sized, 12 hole muffins tray. If you are using a regular muffin tray, ensure it is well greased.
Press the dough into the holes and up the sides to make pastry cases. Make sure the dough is pressed evenly around the sides and bottom. Place the tray in the refrigerator to chill for about 15 minutes. Meanwhile cut out 12 squares of non stick baking paper to fit inside the muffin tray holes. Place these papers inside each hole on top of the chilled pastry. Use pastry weights or rice over each paper to ensure the pastry does not rise in the first faze of cooking. Place the tray into the oven and cook for 20 minutes. Remove from heat and gently remove the papers and their weights. Poke a few holes in the pastry bases using a fork. Return the pastry cases to the oven and cook for a further 15-20 minutes, or until golden and crisp looking. Cool in the tray, then remove and place on a cooling rack.
Fill each case with the patisserie creme. You can simply spoon it in or pipe it in for a prettier effect, as the creme is quite thick. Top with a fanned strawberry, and brush with jam to glaze. Serve with cream, if desired.

Making a fanned strawberry garnish:


 Lay the strawberry on a flat surface. Working from about a cm from the green stalk, cut a series of thin slices through the strawberry in a vertical motion from one side to the next. Take the strawberry and gently urge the slices apart in a fan motion. Voila!

NOTES: You can substitute the lychee liqueur for any desired flavouring, however, the intensity of flavourings differ, so add only a little at a time until you reach the desired strength. 1 tsp of cognac or brandy is a good substitute. If you are not using a silicone muffin tray, ensure the tray is well greased before placing the pastry inside the holes. You can also make this as one whole tart, by pressing the dough into a 10 inch round or 9 inch square false bottom tart pan. If you are using rice as a pastry weight, you can keep this and reuse this, as it will be unaffected by the heat.


Wednesday, July 18, 2012

Best Ever "Scrambled" Eggs and a Proposal

They say food is the way to a man's heart. I think it definitely is, and the way to a woman's heart too. Any man that can cook a nice feed at the end of the day gets brownie points in my books, and lots of them.
But can food really make someone fall in love? I don't know if it can, to be honest, but it can make a man get down on one knee and propose.
Never! you say.
Well, I'm about to share a recipe that did. Every six months or so, I give away one of my secret recipes that I have always sworn is signature and not to be parted with. Anyway, I'm feeling generous today, and feel like sharing some humour as well. Be warned...this might be a love potion of sorts!
So, I used to work and supervise at a small cafe, the Marmalade Deli. Yes, it was just as quaint and pretty as its name, with pots and colanders hanging from the ceiling, polished wooden surfaces, adorable cakes for sale and floral tea towels. I felt this place was mine in many ways, and any one who entered it was entering my house. I put my heart and soul into creating gourmet food for my guests and took pride in whipping things out at top speed.
Anyway, every morning for several months, a troop of tradesmen would come in and order breakfast, sitting down together at the large wooden table that had become a centrepeice of the cafe. There was one guy, a big fellow, and I cant for the life of me remember his name--so he shall be Russel, because he looked like one.
He would grin, blue eyes sparkling, lean in close in and order, then say something cheeky to me just before he walked away. He became a bit of an embarrassment to me, and the other guys would always laugh at how red he made me turn. Poor shy creature that I am! He ordered the same every day...Scrambled Eggs, extra bacon. Every day the same, every day a cheeky comment, and almost every time when he dropped the plate back at the counter he would tell me I made the "best eggs in the world".
One day I got up the nerve to be saucy right back, and after a very  cheeky comment from him, I had enough and told him I was indeed engaged. I proudly flashed my diamond ring in his face, and I still remember what he said. "Aw darling! Don't do this to me! I was getting up the courage to ask you--would you marry me? Marry me, and cook me those scrambled eggs for the rest of my life!"
Is there a deeper shade of red than scarlet? Crimson? Maroon!
Of course it was all in silliness, but forever more when he came in, he would give puppy dog eyes at me, order, and ask "Are you still going to marry him?"
He later disappeared and never came back, to my relief.
So, do you want to get a proposal out of you man? I'd say its worth a try!!

I posted this recipe a little while back, but decided to re-post it due to the questions that arose. I have added pictures to increase the ease of replicating these scrumptious, fluffy, creamy, folded "scrambled" eggs.


BEST EVER "SCRAMBLED" EGGS--THE SECRET RECIPE

2 eggs
a dash of cream (about 1/4 of a cup)
a dash of water (about 2 tbsp.)
a pinch of salt
a dash of pepper

Break eggs into a microwaveable plastic measuring container. Add the dash of cream, water, and salt and pepper. Whisk vigorously until well combined and fluffy. Place the container in the microwave and set on high. Check every 20-30 seconds, gently swirling the container to shift the cooked egg and coat with it with uncooked egg. Repeat until  the liquid egg is significantly reduced. Fold the cooked egg in with the raw gently using a spatula (do not break it up too much!) Microwave again until you get moist, creamy, folded eggs. The success is in the folding, and not letting any part of the egg become dry and over cooked. Sounds too easy? It is. Best eggs ever.

Want to watch me do it? I'll go through the folding with you. And give you a running commentary.


 You egg mixture should look a bit like this after the first 30 seconds or so of cooking. Of course this depends upon the power of your microwave. See how the edges are starting to cook yet the centre is still very liquid? Just give it a swirl in the bowl. No spoons yet! Pop it back in the microwave for 30 seconds.


Remove from the microwave and swirl again. Try to get the liquid egg mixture on top of the cooked edges. We don't want that egg to dry out! Pop it back in for another 30.


Repeat the above process, covering the cooked edges with the egg liquid every time, with a simple swirl of the bowl. It's a very gentle process, as we don't want to break up the egg too much, we just want the cooked egg to shift so it doesn't dry out.


There will come a stage where the cooked egg on the edges is quite thick and the uncooked centre reduces in size. If the cooked egg no longer moves when you swirl the bowl, gently ease it off the side with a spatula.


I'm just going to take a moment here to say YUM! And that's saying something. I don't even like egg. But I simply LOVE this scrambled egg we're making. It's...well, you'll find out. It converted me to eating eggs again. Okay. Stick it back in the microwave, we're almost there!


Be careful at this stage where there isnt much liquid egg left, because the cooked egg can dry out if not watched well. Get your spatula and gently fold the cooked egg into the uncooked to moisten it. You can now set it aside! The heat in the cooked egg will cook the rest on its own.
If the scrambled egg looks dry, you can try and save it by adding a dob of butter to the top and letting it melt in. It should moisten the egg sufficiently. Serve immediately.


If your using one egg instead of two, I recommend cooking the egg at 15 second increments.