Showing posts with label slice. Show all posts

Thursday, May 7, 2015

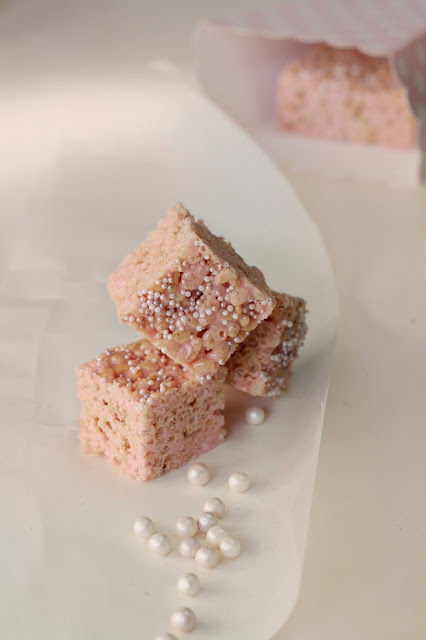
Pink Ricebubble Marshmallow Squares (Like ICMs)

I've just read a whole stack of blog posts from different authors about how hateful their Mother's Day gifts have been in the past. I sit here gobsmacked. I'm serious, mums are knocking their husbands for organising the likes of massage vouchers, lingerie, wine and chocolate and flowers bought from the service station (seriously who cares where they are purchased?) While people piped up that the articles were satire, I couldn't help but cringe. I'm getting slippers for Mother's day and I'm pretty damn pleased about it. Every time I slip my feet into those warm fuzzy pink things I will remember that hubby and my three little darlings all trotted off and picked them out for me, and that my 5 year old was so excited that he couldn't contain himself and told me what my present was as soon as they got home.
My swollen pregnant feet get so cold in the mornings that I just can't wait to slide into those babies. I've even secretly checked them out while putting away hubby's shirts. Shhh!
So shrinking husbands who don't know what to do get your wives, and who happened to read those blog posts, just remember your wife is not your mother, so anything you buy her in my books, is a win. You don't even have to spend money to make sure Mum gets a memorable Mother's Day. Sometimes I think the best gifts are the ones which are hand made and home made by the kids-the paintings, the weird cutout cardboard thingies and the not so perfect baking.
But here's a foolproof and fail-proof recipe for some yummy treats to spoil mum with that will definitely be appreciated. They're a hit with the young and the old and only have three ingredients. They're quickly put together, are no cook, and are a great recipe for the kids to get involved in.
They're chewy and sweet and look so pretty wrapped up in cellophane and given as a gift. How could you go wrong?
I sprinkled mine with tiny edible pearls. You can leave them plain, trust me they taste just as good!


PINK RICEBUBBLE MARSHMALLOW SQUARES

4 cups marshmallows (I used 2x 180g bags)
1 tbsp butter
5 cups of ricebubbles
tiny edible pearls (optional)

Grease and line a 20x20cm dish with a little oil and baking paper. Ensure the sides of the paper come up higher than the sides of the dish for easy removal.
Place the marshmallows and the butter in a large saucepan. Stirring continuously over medium heat, melt the two ingredients until smooth. Pour in the ricebubbles and stir until well combined. Quickly pour the mixture into the lined dish. Wet your hands with cold water and press the mixture down evenly into the dish until the top is flat. Sprinkle with edible pearls if desired. Refrigerate for 2 hours or more before cutting into squares.



Thursday, March 20, 2014

Caramel Walnut and Chocolate Slice


Have you heard of the paleo diet or lifestyle? I only discovered it recently, as some of my friends have joined in this way of eating. I had my first paleo muffin yesterday and it was indeed a healthy snack. It's a far cry from the sweets I'm used to creating in my kitchen, and it made me think of how boney I would be if I followed the trend. I say trend, although my friends are certain it's not, and call it a lifestyle rather than anything. I suppose it has become popular recently though, as several paleo cafes have popped up in the area in the last year out of the blue. It's one diet that seems to be a sustainable way of eating, unlike so many diets that people use to lose weight, like the shake diet, which for me, is a recipe for fluctuation. It also seems to be a good thing to stick to if you're lactose or gluten intolerant. It cuts out many processed and refined foods, and steers clear of legumes, starchy vege, dairy and grains. It's a sort of cave man style of food--fresh vegies, meat, fish, nuts and fruit.
For myself however, I am sticking to "balance is key" and just eating a little bit of all the good and tasty stuff, even if it is processed. Life is too short to deny yourself one piece of slice--especially when it comes with a layer or chocolate, a gooey golden filling of caramel dotted with walnuts, and a buttery, shortbread base. Walnuts are healthy, right?


CARAMEL WALNUT SLICE  (Better Homes and Gardens)

350g butter
225g caster sugar
275g plain flour
395g sweetened condensed milk
1/4 cup honey or golden syrup
1/4 cup walnuts, chopped
200g dark chocolate, melted

Preheat oven to 180C. Put 225g butter and 100g of the sugar into a bowl and beat until light and creamy.
Add flour and stir to form a soft dough.
Spread the dough in a lined slice or lamington tin. Bake for 25-30 minutes or until golden.
Put remaining butter and sugar in a medium-sized pan and stir over low heat until the better melts. Add condensed milk and honey, stirring continuously until the mixture is combined and very thick.
Remove from heat. Stir walnuts through, before pouring over the slice base.
Leave to cool, and then spread melted chocolate over the caramel to the edges.
Refrigerate for 3 hours before cutting into 24 squares.

NOTE: You may want to use a hot knife to cut through the chocolate as it tends to crack a little when cutting.


Sunday, January 26, 2014

Marshmallow and Strawberry Jam Slice

I expect my husband's former colleagues will now be free to withdraw from their gym memberships. Those yoga buffs in the Botanical Gardens will have to go elsewhere to seek their clients. (Seriously yogis and personal trainers, we could go into business here--I keep them eating and you keep them working it off. Win win situation) Belts will once more be able to be tightened, notch after notch.
Seriously, I'm going to have to start finding other places to off load the goodie boxes. At least until all the "I will not indulge in sweet food" new years resolution wears off, and people begin to succumb once more to the beckoning of the truffles and slices and cakes.
Is there anyone out there that hasn't decided to eat more healthily this year? I'll take that as a no. Don't worry, the pictures of recipes on this blog are all completely fat free--if you can resist the temptation to make them.
Even the queen of sugar here has been painstakingly closing her eyes to the come-hither look that comes at me from the slice box every time I open the refrigerator. Marshmallow and jam slice lays cut into squares within, just waiting to be eaten.
Truth be told, I almost didn't send this slice along to Luke's work for morning tea with his collegues. "Luke" I said "I dont know if I can send this slice, it may just have to stay home with me. I just cut it up, and it looks pretty messy."
I left the kitchen and returned some ten minutes later to find the slice on the bench somewhat reduced in size. "I think we may have--mice"
The tell tale strand of sticky marshmallow trialling down my husband's chin made me laug, and then he said "You have to let me take this to work!"
So reluctantly I put the messy looking slice into the catering box and shipped it off with hubby the next morning. He returned to tell me it had been a hit, and I must put up the recipe on the blog--so here it is.
Fear not the stringy sticky mess! I found out the next day, while cutting the remainder of the slice, that if I had only let it cool down a little more before dipping the blade into it, I would have come out with neatly cut squares. After refrigeration, the marshmallow had reset and it was simple and mess free to cut. Unfortunately I took the photos of the slice after cutting it the first time, so it does look a little oozy...but oh so good!


MARSHMALLOW & STRAWBERRY JAM SLICE (Adapted from Coles Recipes)

1/3 cup sugar
1 cup unsweetened dessicated coconut
1 cup plain flour3
Weet-Bix, crushed
150g butter, melted
2/3 cup strawberry jam
400g marshmallows (I used Pascal's berry swirl marshmallows)


Preheat the oven to 180C (or 160C if your oven is fan forced). Grease and line a  18 x 28cm slice or lamington tray with baking paper and set aside.
In a large bowl, combine the sugar, coconut, flour and crushed Weet Bix. Combine well, then stir the melted butter in until well incorporated.
Using the back of a spoon or fork, flatten this mixture into the lined tray and press down until there is an even layer on the bottom.
Bake for 20-30 minutes, until golden.
Remove from oven and spread the warm base with the jam. Arrange the marshmallows on the top of the jam to cover the entire surface. Return to the oven for about 7 minutes until marshmallow begins to soften. Place underneath the grill on high for 30 seconds to 1 minute for a slightly browned top.
Cool completely before cutting.

NOTES: For clean cuts, use a wet blade. Slice is best served the day it is made, or the day after. Ensure it is stored in an air tight container.


Thursday, October 4, 2012

Creme de Menthe Chocolate Fudge Slice

I have a bit of a confession to make. I'm one of those people that is easily inspired to do things and then, like water on a firecracker, it often fizzles out before it really goes off. I have the best intentions of course. I suppose that comes with being sanguine in nature. As you can imagine, I'm a bit of a hoarder (so many possibilities in this!) and pintrest will be the death of me. My junk cupboard is filled with all sorts of unfinished projects--because half way through them, I get a huge inspiration for something else and have to start it before the inspiration I forget and lose the interest to do it. I don't know how that darling husband puts up with me.
Anyway, I'm pretty proud to say that my baking passion has not fizzled out (thanks to you all, and my "the way to a man's heart is through his stomach" theory--which happens to be true), and neither has this blog! Unlike so many of my interests, this has somehow stayed consistent, and happily, I find myself writing Lick The Spoon's 200th post. Yes I have a baby on my knee and am writing at a painful rate with one hand, whist she chews on the other with her not-so-gummy mouth. But it's still the 200th post!
Here's a recipe I had a dream about. Yes, that happens frequently, and then I just have to create it. Minty creme de menthe filling wedged between fudgy brownie base and a corrugated layer of thick, chocolate fudge ganache. Oh my! This is a lady killer. A man killer too, as a matter of fact. I couldn't quite get the intensity of mint flavour I wanted with the creme de menthe, so I intensified it by adding a little mint essence just to jack up the flavour a notch. You can substitute the creme de menthe for 1 tsp. mint essence if you don't have any of that sublime liqueur handy, and add a few drops of green food colouring in it too. There, there's a cheats non-alcoholic version for you. Enjoy!


CREME DE MENTHE CHOCOLATE GANACHE SLICE (A Lick the Spoon Original)

Base:
1/2 cup butter
1/2 cup cocoa powder
1 cup brown sugar, firmly packed
2 eggs
1/2 tsp. vanilla
1/2 cup plain flour
1/4 tsp salt

Filling:
1/4 cup cream
2 tbsp. green creme de menthe
3 cups icing sugar
1/2 tsp. mint essence (optional)

Fudge Ganache:
200g dark cooking chocolate
2 tbsp thickened cream
mint leaves to garnish (optional)

Preheat your oven to 180C.
Melt butter and remove from heat. Stir through the cocoa and brown sugar until combined.
Beat in the eggs and vanilla. Next, blend in the flour and salt. Spoon the batter into a greased and lined 18x18 square baking dish. Bake for 15-20 minutes. Remove from heat and set aside to cool.
Meanwhile, prepare the filling by placing cream, creme de menthe, icing sugar and essence in a medium bowl. Beat until well combined and at the desired thickness and flavour. The filling should be thick yet spreadable.
Spread over the top of the base layer. Refrigerate while making the ganache.
To make the ganache, gently melt the chocolate using your microwave, checking and stirring every 20 seconds or so until the chocolate is almost melted.  Stir to melt the last of the chocolate. Set aside to cool momentarily. Remove the slice from the refrigerator.
Working quickly, add the cream to the chocolate and stir thoroughly to combine. The mixture thickens quickly, so mix in a timely manner and immediately spread over the top of the filling. You can add a pattern to the top of the slice by using the tip of a butter knife.
Refrigerate until ready to serve, then cut into squares.


Monday, June 4, 2012

Raspberry Lemonade Slice

I knew that this May was all panning out too well not to come with some sort of price. Everything was in my favour until the last day, when I found out that I had some sort of malware warning coming up when anyone tried to visit the page though the internet browser Chrome. I had no idea what malware even was, how it got there and what on earth I was going to do about it. It was deterring visitors and scaring the heck out of me since reading a post earlier that day about blog hijacking. It will never happen to me, I thought. Anyway, it didn't get that serious that I lost control of my page or anything, but there was apparently some evil content on my page coming through the site that hosted the picture for my blog background, Shabby Blogs. So after lots of panicking and hasty researching, I came up with a solution. Delete everything connected to that wormy site! Htmls, everything had to go. Now the problem seems to have disappeared, sadly with the pretty little blog design that was the skin of Lick The Spoon. So that's the explanation for the little facelift that the blog has undergone in the last few days.
 But the recipes keep on churning out! If you've been following for a while, you'll be seeing a bit of a theme going on here. I get quite thrilled by colour when it comes to food, and like a bull, excited by red. Actually I recently heard that bulls can only see blue and yellow, and that movement is what excites them...but...you get my point. If you've been in my kitchen you will see splashes of red appearing too. There's just something about that colour.
So when I decided to buy some frozen raspberries, that made me go on a mad raspberry recipe hunt, and my eyes were instantly drawn to this vivid raspberry lemon slice.
My hubby doesn't like berries like I do, and I think it's mainly to do with the seeds that tend to sneakily linger in your teeth after devouring them. Especially raspberry seeds. Those little demons can hang around for a while and make you look pretty demented as you try to remove them. Well have no fear, all the seeds are removed from this delicious slice. I call it a slice, but as soon as I cut into it, a million ideas were pulsating through my brain.  To me this is a wonderfully versatile recipe as far as sweets go, just depending on how you cut it and decorate it. You can cut it  into a slice or squares for a casual affair, or make them fancy petits fours simply by cutting them into 2x2 inch squares, and topping them with a raspberry. If you cut them into long rectangles you could serve it as an elegant dessert, with a pretty garnish of mint, raspberry and a drizzling of cream. This slice freezes well too, so it is a perfect make ahead dessert for your up and coming dinner party menu. A no stress yet impressive dessert sounds pretty good to me. And it's practically guilt free too!
The filling has a similar texture to lemon curd that has set (as you often find in lemon meringue pies once cooked) and has that same delightful tartness, combined with the subtle raspberry flavouring and a lovely simple buttery base. It reminds me somewhat of Starburst lollies. Fruity and tangy! I think I will try this filling inside a meringue pie. How does Raspberry Lemon Meringue Pie sound to you? Makes me start craving. Keep your eyes open for the recipe!


Cut into petit fours as a lovely dessert at a cocktail party


Fancy it up with a garnish
Dessert style
A winning combination..
RASPBERRY LEMONADE SLICE (Adapted from The Improv Kitchen)


Crust:

9 tbsp butter
1/4 cup sugar
1 cup flour
1 tsp vanilla essence
pinch of salt

Filling:

2 1/2 cups frozen raspberries, thawed
1 cup sugar
2/3 cup lemon juice (about 3-4 medium lemons)
zest of 3 lemons
3 egg whites
1 egg
2/3 cup flour
pinch of salt, extra

Preheat the oven to 180C. Line and grease a 8x8 inch square baking dish.
To make the crust, cream together butter and sugar until light. Add the flour, vanilla and salt and mix until combined well. Do not over mix as this can make the base tough. Press the dough evenly into the bottom of the prepared baking dish. Bake for 20-25 minutes or until just golden brown. Remove from oven and cool.

To make the filling, place all thawed raspberries in a fine sieve and press them into a large bowl with the back of a spoon. Discard the caught seeds and skin. Add the sugar, juice, zest, whites, egg, flour and salt and combine, until well incorporated.
Pour the raspberry mixture onto the base and place in the oven. Bake for 30-35 minutes. Cool on the bench before placing in the refrigerator to set completely (about 3-4 hours) Cut and decorate as desired.

NOTES: This slice freezes well and makes a great dessert or afternoon tea to have handy for unexpected guests or dinner parties.


Wednesday, May 9, 2012

Red Velvet Cheesecake Brownies

Red velvet cake has often piqued my curiosity. What could it possibly taste like? There's never enough cocoa powder in the recipe to make it taste like chocolate, and never enough vanilla to make it taste like vanilla...so does it taste like vanilla and a little milk chocolate?
You have to personally experience it to really know. Unlike the intense colour, the flavour is delicate and is only enhanced by the texture and by what accompanies it, and that brings on a real deep sigh of satisfaction. Cream cheese does it for me. The combination is a match made in heaven, and could send you to hell (for gluttony). You often see these two teamed up as cake and cream cheese icing. How about a slab of red velvet cheesecake brownie?
Personally the whole red velvet flavour on its lonesome doesn't faze me, but I appreciate it for its visual beauty and wow-factor. I'd prefer it to taste a little more chocolatey. So if your tastes match mine, you can always add more cocoa powder than stated in the recipe, and a little less flour to balance the addition.


RED VELVET CHEESECAKE BROWNIES (Lightly adapted from Freutcake)

1/2 cup butter, melted (roughly 8 tbsp)
1 cup sugar
1 tsp vanilla essence
1/4 cup cocoa powder
pinch salt
1 tbsp red food colouring (I used Queen brand in Pillar Box Red)
1 tsp. apple cider vinegar
2 eggs
3/4 cup plain flour

For the cheesecake topping:
125g cream cheese, room temperature
1/4 cup sugar
1 egg
1/2 tsp vanilla essence

 Preheat the oven at 180C. Grease and line a 20x20cm dish.
To make the brownie layer, place melted butter in a bowl with sugar, vanilla essence and cocoa powder and salt. Stir thoroughly to combine; add the food colouring and vinegar and stir again to incorporate. Whisk in the eggs. Gently fold in the flour.
Pour the mixture into the prepared dish, reserving 1/4 of a cup of this batter for the swirling effect.
In a small bowl, combine cream cheese, sugar, egg and vanilla to make the topping. Smooth this cream cheese mixture over the top of the brownie batter. Randomly drop teaspoons of the reserved brownie batter on top of the cream cheese layer. Using the end of a knife, or a skewer, pull the red through the white layer to create a swirl effect. Place in the oven for approximately 30 minutes. Let the cooked brownie cool in the pan before removing to complete the cooling process on a rack before cutting into squares.


Wednesday, November 30, 2011

Toasted Coconut Marshmallow Slice

If ever I need a confidence boost with my blogging, I simply pop my 18 month old son on my lap and browse the blog. His little tongue comes out to lick his lips and he points to the pictures and says "mmmh mmmmh!" over and over. 
I tell you its therapeutic. 
His all time favourite is his Farm Animal Birthday Cake that was made for his first birthday, and he always requests a viewing by oinking like a pig. With his very limited vocab, he has informed me that he wants a "pen-un" (penguin) cake for his next birthday when I asked him.
Anyway, this little guy is my biggest (and smallest) fan. Yesterday I found him in the refrigerator licking hands covered in marshmallow and toasted coconut. There were hand trails throughout the slice. Goo on the fridge door, tell-tale remnants around his mouth...but a giant grin on his cheeky face.
I love that boy.


TOASTED COCONUT MARSHMALLOW SLICE (Taken from Better Homes and Gardens Magazine Dec 2011)

2 cups plain flour
1/2 cup brown sugar, firmly packed
185g butter, melted and cooled
1 tsp. vanilla essence
1/2 cup cold water
2 tsp. geletine powder
3/4 cup caster sugar
1/3 cup shredded coconut, toasted

Preheat the oven to180C.
Grease a 26x16cm slab pan and line with non stick baking paper.
Sift the flour into a large bowl. Add brown sugar and stir to combine. Add melted butter and vanilla and mix until a stiff mixture forms. Spoon into the prepared pan and flatten firmly with a fork until evenly spread.
Bake for 20 minutes or until lightly golden.
Set aside to cool completely.
Meanwhile, put 1/4 cup of the water into a microwavable jug and sprinkle gelatine over. Set aside for 5 minutes or until softened. Cook in microwave on high for 20-30 seconds until the gelatine has dissolved. Set aside to cool.
Put caster sugar and remaining water in a clean bowl and beat on high for 5 minutes until the mixture turns white. Add the gelatine mixture and continue beating for a further 10 minutes or until a thick white marshmallow forms.
Spread the marshmallow onto the biscuit base, then sprinkle with toasted coconut.Stand for one hour or until marshmallow has set. Cut into squares using a large wet knife, dipped into hot water between cuts. Serve.

Tuesday, September 13, 2011

Raspberry Jelly Cheesecake Slice

There’s something about jelly I just cant resist. I know, it’s just plain old ordinary jelly, but it fascinates me in ways I can’t describe. There’s something about the vibrancy, the texture, the way it can easily be made plain or fancy, the way the light falls through it, the way it sets. Gelatine…one of the wonders of the cooking world. I love it! And you won't have to worry about adding layers to your hips. Jelly has to be just about fat free! No guilt in diving into a bowl of this stuff!
So I’m bringing back an old family favourite once more, and changing it a little to add my own touch. 
You will just love this slice. It has a beautiful moist base that a friend described as “apple crumble-like”, topped with creamy lemon filling and then again with a layer of red raspberry jelly. It has a certain cheesecake taste and creaminess between the jelly and the base without the heaviness, and looks adorable when cut into squares. 
So here you are, ladies who wanted more slice recipes. This one is simple and gets compliments all around, every time, and is perfect for just about any occasion.


 RASPBERRY JELLY CHEESECAKE SLICE

BASE:

1 cup Self Raising flour
1/2 cup plain flour
1/2 cup brown sugar, firmly packed
125g butter, melted
1 tsp. vanilla essence

LEMON LAYER

1/2 can (200g) sweetened condensed milk
2 lemons, juiced
2 tsp. unflavoured gelatine
3/4 cup boiling water

TOP LAYER:

1 packet raspberry jelly
1 1/2 cups boiling water


Preheat the oven at 180C. To make the base combine flours and sugar in a bowl. Add melted butter and vanilla, and stir until well combined. Using a metal spoon or fork, press the mixture very firmly into a greased 18 x 20 dish. Bake for 15-20 minutes until golden. Remove from heat and set aside to cool.

While waiting for the base to cool, make the lemon filling. Place the boiling water into a small bowl and gradually shower the unflavoured gelatine into it so that it does not clump. Stir until dissolved. Add the lemon juice and condensed milk and stir until well combined. Pour over the cooled base and cover with plastic wrap. Refrigerate until set.

When the lemon layer is firm, take the raspberry jelly crystals and combine with the boiling water. Stir until completely dissolved and sit aside to cool for 15 minutes. Gently pour the raspberry jelly liquid over the lemon layer. Cover with plastic wrap and refrigerate until set.
Cut into squares and serve.


NOTES: Occasionally the jelly layer may escape down the sides of the base before it sets. To avoid this, firmly compact the base before cooking, and leave a lip of base mixture around the edges of the baking tray. (you can see from some of the pictures that I learned the hard way! it was still delicious though!)


Friday, August 19, 2011

Furry Green Monsters in your Fridge?

I don't know about you, but I am constantly finding food in the back of the fridge that needs to be thrown out. Yes, those furry green monsters no one wants to touch. Okay, it's not that bad...especially as now I have got my act together and decided I will be that Domestic Goddess my husband thinks I am. *giggles*
It is much easier than you think. It depends how determined you are. I suppose there are a lot of factors that go into it, but I decided to begin, I would reorganise my day and prioritise properly.
Starting with the kitchen of course.
After all, a great percentage of the day is spent in that room (as well as that room that harbours the computer, but that's changed too). I bought myself a thick folder, made myself shopping list spreadsheets, pantry inventory lists, menu planners, to do lists, weekly chore planners, the lot, and  set it out all nicely. It now lives on my kitchen bench and looks at me every morning to remind me. Once every fortnight I sit and plan the next fortnight, the meals, the cleaning, the appointments, the things I want to get done.

My house has gone from bomb to bliss! 

The refrigerator has gone from clutter to clean! I know what I have and I know what has to be used, and I plan meals and baking around that. There are no furry monsters hiding way back in the shadows. I have more time to do what I want as well, would you believe? More baking can be slotted in, grocery bills reduced due to menu planning, and I never have to get up and wonder what on earth we are having for dinner that day. I have the kitchen organised and the sink sparkling and the rest of the housework feels like a joy...its done in no time. Planning...is all it takes!
Are you ready to take the challenge? Get organised? I dare you to start with the green furry monsters.
Did you find a half full can of sweetened condensed milk that's still okay back there? Here's a winner for the sweet tooth's from my mum's archives. Mmmh, citrus! That's what I call a clean taste!


ICED LEMON COCONUT SQUARES

1/2 cup condensed milk
1 tsp. grated lemon rind
1 packet plain sweet biscuits (such as Marie or Arrowroot biscuits)
125g butter
1 cup coconut
extra coconut to decorate

Place the condensed milk and butter in a small saucepan, and stir over a gentle heat until the butter melts. Stir to combine.
Crush biscuits to resemble fine breadcrumbs. Add lemon rind and coconut to the crumbs and mix well. Add the warm butter mixture and mix until well combined. Press into a greased and lined 11"8" lamington tin with a fork.
Refrigerate for one hour. Ice with lemon icing and sprinkle with coconut if desired. Refrigerate and cut into squares when the icing has set.

NOTES: to make the lemon icing, combine 2-3 cups of pure icing sugar with lemon juice and stir to combine, adding more lemon juice until you reach the desired consistency.


Wednesday, June 15, 2011

Deceitful Slice

Like I previously said, I'm a big fan of wow-factor foods. But I'm doubly impressed when something looks completely ordinary and turns out to have lots of  wow and pow in the mouth. Of course then you can always jazz up the look of these plain-janes, but sometimes, its better to leave them as they are so as not to spoil the flavour or the simplicity of an edible. Its like those rare people you stumble across...the ones who look super ordinary and once you get to know them, their personalities just glow and they become beautiful. If you dolled them up, they wouldn't seem to be the same person, its as if they are somehow changed, not themselves.
Such is life for the family favourite that I am going to share with you. It was the president's favourite slice too...don't ask me what president. This is an older recipe that I dug out of one of Mum's cookbooks during my stay in Melbourne, so it was probably a president from a fair way back. This slice is always quick to disappear at our house, because everyone knows of its yumminess. Mum says she cant take it to parties though, because it looks too ordinary, but for the person who tries it, they will love this fact...the plate will be theirs! You could jazz it up with a drizzle of chocolate if you do want to fancy it up and take it out...if you can bear sharing it. I cant. Greedy me knows that this  moist, deceiving little slice is too good to pass up.  It even covers the fact that I dislike sultanas immensely. Now a recipe that can have a hated ingredient in it and still be totally irresistible is something!


PRESIDENT'S FAVOURITE SLICE

8 oz butter, melted
1 cup sugar
2 tbsp. golden syrup
2 cups self-raising flour
2 cups dried mixed fruit
2 eggs, beaten

Melt butter and golden syrup in a large saucepan. Add dry ingredients. Add beaten eggs and mix well to combine. Press with a fork into a lined lamington tin and bake in oven at 180C for 20-30 minutes until the top is golden.

NOTES: Honey is a good substitute for golden syrup. You could also substitute mixed fruit for chocolate chips.