Monday, October 22, 2012

Cous Cous Salad

There's something fantastic about cous cous. To me, living in Australia, it seems like a foreign food, and I do get a bit of a thrill out of eating it when I do. I love cous cous salads with bbqed meats on one of those hot summer days we're heading into, so when I saw this recipe on Josie's Kitchen blog for the Secret Recipe Club Reveal, I just had to make it. I added some shredded turkey, and left out the mint (only because the caterpillars which have infested my garden have eaten it all!) but I think the mint sounds delightfully refreshing for a summer's afternoon dinner. It's a light salad yet hearty at the same time. My kids love it, my little one year old came back for seconds (which is amazing because she hates solids!) So thank you Josie! It's a wonderful recipe that makes me think of Moroccan dishes, warm weather and sitting out on the deck with a glass of wine on those sultry summer nights...


COUS COUS SALAD (Adapted from  Josie's Kitchen)

1 cup water
olive oil
1 cup dry cous cous
handful fresh parsley
1 cucumber
2 firm, large tomatoes
1/4 cup lemon juice
1/2 cup shredded turkey (pre cooked)
Salt and pepper to taste

In a medium saucepan, boil water. Add one tablespoon olive oil to the water, plus the dry cous cous. Remove from heat and set aside with the saucepan lid on. When the water has been absorbed by the cous cous, remove from the saucpan into a salad bowl. Break up any lumps. If the lumps do not break down and it appears "gluggy", add a little more oil and mix through.
Finely chop the parsley.
Finely chop the cucumber and tomatoes. Mix the parsley, cucumber and tomatoes through the cous cous. Add the shredded turkey and mix through. Drizzle lemon juice over the salad. You may add salt and pepper to the salad if you desire.

Monte Carlo Cheesecakes

Is it just me, or has the silly season already begun? It's October, yet I feel time has escaped me and I am trying (and failing) to slow things down, resisting the thought of Christmas and all the things, events and people that are to be done, attended and seen before December 25.
In less than a month I am off to attend the unnerving, the exciting, the butterfly-in-the-tummy-filling cook off to find the next Blogger Come Chef at the Brisbane food and wine show. Holy Macaroly, how did I end up there? I am still asking myself. I have never done anything like this before, and I find my heart in my throat at the thought of cooking in front of a crowd of starring eyes and judges...and actually being in competition with another creative foodie mind. Yes Brisbane bloggers. I have been scoping you out, and hoping I am not up against one of you super mums who just seems to have it all figured out! My mind wanders thinking of what I'd put prize money towards...trying not to get too far ahead of myself. With the dream of publishing a cookbook in the forefront of my mind. I. Must. Win.
Having said that, I am not cooking anything sweet.
I know.
Insanity, Louise.
What ARE you thinking?
Well I cant disclose what I'm making in case I have Brisbane foodie stalkers, hoping they're up against me with their wizz-bang recipes that they have been practicing and preparing for months in order to beat me to the prize. You will not know until I'm standing there with my plated creation.
By the way, if anyone is interested in coming and watching me sweating like a pig over the stove in the middle of summer, you're welcome. I am slowly but surely gathering a very gorgeous cheer squad and you can get your pom poms out too. Okay. Rehearsals are every Friday night at my house, cheese and wine provided. Just kidding.
Bring your own wine.
I've had the last of it to steady my nerves.
In all seriousness, you're most welcome to come. Not to my house, to the event. I believe there are lots of exciting things to be seen at these food and wine festivals besides wannabe cooks like me, battling against other wannabe cooks.
I'll be there on Saturday the 10th of November at the Chopping Block stage 7, from 2pm until 2.45.
Phew. That sounds so official.
In the meantime, I'm calming my nerves by cooking everything but what I am meant to be practicing for the cook off. Smart, I know.
Anyway, I've come up with a new recipe, incorporating one of my all time favourites, Monte Carlos. Is there anything quite as delicious as that red line of jam tucking away a filling of vanilla cream? Only a Monte Carlo cheesecake could be that touch more delicious than that.
This is a real treat for the tastebuds. Two gorgeous, vanilla-y, coconut-y, jam-y Monte Carlo biscuits sandwiching a creamy strawberry cheesecake filling.  Oh my. Yes it's as good as it sounds.


MONTE CARLO CHEESECAKES (A Lick the Spoon Original)


3/4 cup sugar
250g strawberries
1/4 cup water
1 tbsp gelatin
150g cream cheese, room temperature
1 cup cream
20 monte carlo biscuits
10 8cmx25cm strips of acetate plastic/ projector film

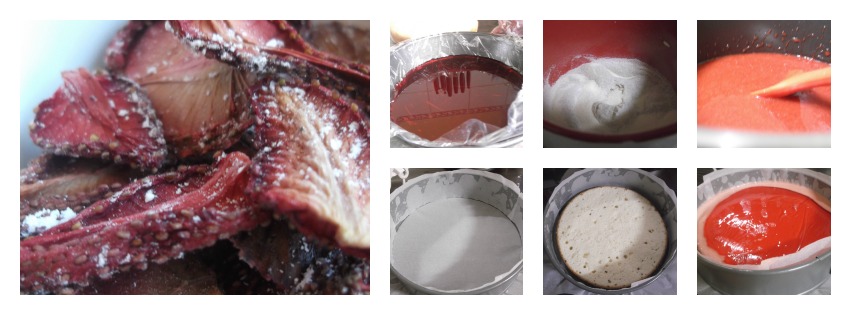
Hull the strawberries and place in a food blender. Process until pureed. Place the puree and 1/2 cup of the sugar in a saucepan. Turn the heat on low and cook until it just begins to boil. While heating, place water and gelatin in a small bowl and let soften. When the puree begins to boil, add the gelatin mixture and stir, until the gelatin dissolves into the puree mixture. Remove from heat. Allow to cool to room temperature. Meanwhile,
beat the cream cheese and the remaining 1/4 cup of the sugar together in a bowl until well combined. Set aside.
In a separate bowl, whip the cream until firm peaks form. Add the cream cheese mixture to the cream and briefly beat to combine.
When the puree mixture has cooled to room temperature, gently fold it through the creamy mixture until combined.
Place half the monte carlo biscuits on a plate or tray. Firmly wrap one acetate plastic strip around each monte carlo, and fix with a piece of sticky tape to hold together. Spoon the cheesecake filling into each until all the mixture is used up. Top each cheesecake with another monte carlo. Refrigerate until set, for 3 or more hours.
Before serving, remove from the refrigerator and gently peel away the acetate from the sides of the cheesecake. Serve with strawberry puree and cream, if desired.


Makes 10

NOTES: The pictures show the monte carlo cheesecakes served with strained strawberry puree and rolled fondant roses. To make your own fondant roses, click here. Also, acetate plastic sheets (or projection sheets) can be found at your local copy shop or Officeworks. If you cant find any, you can cheat like I did, and cut up a few plastic folders like this one. You could possibly also use baking paper.

Thursday, October 11, 2012

Forbidden Fairy Foam


This is a tooth fairy's greatest nightmare. She'll be working extra hard after the kids have eaten some of this forbidden fairy foam--a gorgeous gold dusted, pink spotted cloud of sugary deliciousness. The tooth fairy would never visit me when I had a bad tooth fall out as a child, so maybe she will get a chance to sit back and relax if you have a few...or make them for your daughter's birthday party and send the kids home bouncing off walls.
You won't believe it, but these faux-meringue creations are made of three simple ingredients, and would make a great  and fun project for when the kids are home and on school holidays. It's almost like a scrumptious science experiment, and best of all, they're made in the microwave, so you don't have to turn the oven on and heat up the whole house. They start off as a sticky, coloured marble, and billow up within moments into great fluffy clouds. Yes, there will be stickiness, lots of excitement, possibly some crumbly powdery stuff to sweep up. But the look on the faces of those kids crunching through this forbidden fairy foam is delightful. I had to hide them. My son would stop at nothing to get another, and another. He pulled the table cloth off the buffet just to bring them to his arm's reach, and quickly became a sticky, meringue flavoured little boy. All the better to kiss, I say.
And it wasn't just he who enjoyed this pretty stuff. They look so unique and elegant, you could easily serve mini ones at a high tea or girl's get together, topped with roses or some other feminine garnish. They would also be fabulous for a treat at a little girl's birthday party, with a touch of edible glitter on the tops (be sure to send the kids outside to eat them!)


FORBIDDEN FAIRY FOAM (adapted from Scrumptious)

1 egg white
1 tsp vanilla essence
3 cups icing sugar
a few drops of pink food colouring
edible glitter or edible gold dust (optional)

Place the egg white and the vanilla in a small bowl. Beat briefly, until the egg has broken down and there are no stringy bits. In a medium sized bowl, place the icing sugar, and make a well in the centre. Gradually add the egg mixture to the icing sugar, slowly incorporating the icing sugar into the wet mixture. You may not have to use all the egg, but combine until all the dry is mixed into the wet to make a thick, pliable icing, the consistency of thick dough. Add a little more icing sugar if it becomes too sticky, it should not leave residue on your hands when you handle it. Dab a little food colouring onto the mixture and twist it randomly through the icing until you have a marbled effect. Roll into walnut sized balls and place in the centre of 7cm round paper patty pans. (If you are using smaller pans, make the balls smaller, and lessen the cooking time accordingly). Sprinkle the tops of each with edible glitter or edible gold dust.
Place 6 at a time inside the microwave on the turntable, in a circle. This ensures they all cook at an even rate. Set the microwave on high and at a setting of two minutes, just to be on the safe side. Start the cooking, watching carefully. After about 30 to 45 seconds, the balls will melt, then start to billow at a rapid rate. They will stop billowing momentarily, then cook for a further 30-45 seconds. Each microwave has different powers so you will have to do a trial run to begin with to see if your fairy foams will have to be cooked for more or less time. The outer should be crisp and firm to touch on removing, as will the inside. If the insides are brown, you have cooked them too long.


Makes approximately 20.


Wednesday, October 10, 2012

Apple Custard Tart of Roses

Here's a wonderful recipe translated from Bulgarian with some alterations on my part. I love finding these interesting and exquisite recipes that are not found in English, because there's a certain feeling of specialty that comes with it. If I ever travel overseas, it will be to Europe to try all the delightful foods that are not commonly found in English speaking countries. There's something so good about European food, the way they cook, and the unprocessed ingredients used. You have no idea how tired I am of hearing the words "cool whip", "canned scone dough" and so forth when I look for recipes on the web. What is this stuff? What's in it? (did you know you can even get canned crispy bacon, and canned cheeseburgers? Yummy?)
It's refreshing to be able to make everything from scratch that doesn't involve any over-processed consumables.
This apple custard tart is delightfully European. It's laced with sweet white wine, and has wonderful zesty orange hints throughout, and boasts a shortbread crust, and an arrangement of pinkened apple rosettes on the top. Brushed with jam and cooked to golden perfection, this lovely tart is best served warm with a drizzling of thickened cream.


APPLE CUSTARD TART OF ROSES (Adapted From Delicious With Jolien)

Pastry:
125g butter, softened
3/4 cup icing sugar
1 tsp vanilla
1 tsp orange rind, grated
1 egg
100g ground almond (almond meal)
1 1/2 cups plain flour

Custard:
4 tbsp corn flour (corn starch)
6 tbsp. sugar
1 tsp vanilla
1 tsp orange rind, grated
3 egg yolks
400mls milk
100ml white wine (I used Moscato)

5-6 apples (I used Pink Lady apples)
1 tsp fruit jam (I used strawberry jam)

To make the pastry dough, place butter and sugar, vanilla and orange rind in a large bowl and incorporate briefly with the beaters. Add egg and almond meal and lightly beat again until the egg has broken down and is mixed through the butter. Add the flour and knead into a soft dough.
Spread into a greased and floured 24cm round flan dish. Using your fingers, press evenly into the base and up the sides of the flan dish. Refrigerate.
Meanwhile to make the custard filling, place the corn flour, sugar, vanilla and orange rind together in a medium saucepan. Add the yolks and a little milk and bring to a smooth, paste-like consistency. Place on a medium-high heat, and add the remaining milk and the wine. Whisking continuously, bring the custard to the boil and then for a further few minutes to thicken. (Custard will also thicken further in the oven).
Set the custard aside in a medium bowl to cool.
Heat the oven at 180C.
Take the apples and wash them. Using a potato peeler, make strips of apple form the peel and the flesh. The larger and wider the strips, the better.
When the custard has cooled, pour it into the base. Begin arranging the apple strips into rose shapes on the custard. (I found it helpful to start building the centre few layers of the rose in my hand before placing it in the custard, then building around it with larger strips. See photos below for a visual)
When the whole surface of the custard is covered in rose shapes, brush the top gently with a little warmed jam. Bake for 40-45 minutes, until the crust is golden and the apples have browned.

Serves 8-10

Building an apple peel rose:


Thursday, October 4, 2012

Creme de Menthe Chocolate Fudge Slice

I have a bit of a confession to make. I'm one of those people that is easily inspired to do things and then, like water on a firecracker, it often fizzles out before it really goes off. I have the best intentions of course. I suppose that comes with being sanguine in nature. As you can imagine, I'm a bit of a hoarder (so many possibilities in this!) and pintrest will be the death of me. My junk cupboard is filled with all sorts of unfinished projects--because half way through them, I get a huge inspiration for something else and have to start it before the inspiration I forget and lose the interest to do it. I don't know how that darling husband puts up with me.
Anyway, I'm pretty proud to say that my baking passion has not fizzled out (thanks to you all, and my "the way to a man's heart is through his stomach" theory--which happens to be true), and neither has this blog! Unlike so many of my interests, this has somehow stayed consistent, and happily, I find myself writing Lick The Spoon's 200th post. Yes I have a baby on my knee and am writing at a painful rate with one hand, whist she chews on the other with her not-so-gummy mouth. But it's still the 200th post!
Here's a recipe I had a dream about. Yes, that happens frequently, and then I just have to create it. Minty creme de menthe filling wedged between fudgy brownie base and a corrugated layer of thick, chocolate fudge ganache. Oh my! This is a lady killer. A man killer too, as a matter of fact. I couldn't quite get the intensity of mint flavour I wanted with the creme de menthe, so I intensified it by adding a little mint essence just to jack up the flavour a notch. You can substitute the creme de menthe for 1 tsp. mint essence if you don't have any of that sublime liqueur handy, and add a few drops of green food colouring in it too. There, there's a cheats non-alcoholic version for you. Enjoy!


CREME DE MENTHE CHOCOLATE GANACHE SLICE (A Lick the Spoon Original)

Base:
1/2 cup butter
1/2 cup cocoa powder
1 cup brown sugar, firmly packed
2 eggs
1/2 tsp. vanilla
1/2 cup plain flour
1/4 tsp salt

Filling:
1/4 cup cream
2 tbsp. green creme de menthe
3 cups icing sugar
1/2 tsp. mint essence (optional)

Fudge Ganache:
200g dark cooking chocolate
2 tbsp thickened cream
mint leaves to garnish (optional)

Preheat your oven to 180C.
Melt butter and remove from heat. Stir through the cocoa and brown sugar until combined.
Beat in the eggs and vanilla. Next, blend in the flour and salt. Spoon the batter into a greased and lined 18x18 square baking dish. Bake for 15-20 minutes. Remove from heat and set aside to cool.
Meanwhile, prepare the filling by placing cream, creme de menthe, icing sugar and essence in a medium bowl. Beat until well combined and at the desired thickness and flavour. The filling should be thick yet spreadable.
Spread over the top of the base layer. Refrigerate while making the ganache.
To make the ganache, gently melt the chocolate using your microwave, checking and stirring every 20 seconds or so until the chocolate is almost melted.  Stir to melt the last of the chocolate. Set aside to cool momentarily. Remove the slice from the refrigerator.
Working quickly, add the cream to the chocolate and stir thoroughly to combine. The mixture thickens quickly, so mix in a timely manner and immediately spread over the top of the filling. You can add a pattern to the top of the slice by using the tip of a butter knife.
Refrigerate until ready to serve, then cut into squares.


Tuesday, September 25, 2012

Strawberry Mousse Jelly Cake with Crumble Topping


I don't know about you, but I use cookbooks less and less frequently to look for foodie inspiration. I love my cookbooks, I have a huge and colourful pile. I love the glossy pictures, the feel of it and the smell of it. But if I'm looking for something in particular I mainly browse the internet for inspiration--probably because I'm lazy and its quick, and the mind is instantly injected with a million and one ideas.
I pore over my cookbooks when I'm sitting back and relaxing with a cuppa, but they're more occasionally used than internet recipes, sadly.
I love seeing a cookbook pried open in my shabby chic cookbook stand on my kitchen buffet, it always makes me want to bake and bake and bake. Every time I come into the kitchen I look at it and think of my next creation. There's always something in that stand waiting to be made. At the moment it's Margun Carless' cookbook Love Menu, spread at a page sporting gorgeous poached pears in champagne. I can't wait to make that on Wednesday night for hubby and our late dinner dessert.
But sometimes I want to make something that is an original of sorts. Something different and experimental and that has arisen from me. And then I come up with some sort of concoction. As I previously mentioned, this is the month of strawberries. I actually had a dream about this cake I came up with. On later research I saw similar cakes, sort of a combination between a  strawberry charlotte, and also those gorgeous pink mousse cakes with the jelly layer on top (Mirror cakes, I think they're called)
Anyway, I ignored all recipes and just went into the kitchen and started banging around. I had no idea how it was all going to work out, and actually thought I'd made a big fat flop while it was all setting...until I cut a slice out of that cake.
Oh my. It was delicious and visually as I had imagined it to be--layers of strawberry mousse, buttercake and a thick line of bright red jelly in the centre, topped with grilled crumble and roasted strawberries. Delicious!
You will need two different sized round pans for this recipe, the larger being a springform pan. The cake and the jelly layer are made in a smaller pan in order that the mousse sits around the cake and the jelly layer. 


STRAWBERRY MOUSSE JELLY CAKE WITH CRUMBLE TOPPING (A Lick the Spoon Original)

1 buttercake, made in an 18x18cm round pan
85g packet strawberry jelly (jello) crystals 
1 cup boiling water
3/4 cup cold water
800g strawberries, hulled
1 1/4 cup white granulated sugar
6 1/2 tsp gelatin powder
1/4 cup lemon juice
500ml thickened cream 
4 tbsp. sugar, extra 
85g strawberry jelly (jello) crystals, extra
1 cup boiling water, extra
3/4 cup cold water, extra 
1/4 cup brown sugar
1/4 cup plain flour
1/4 cup toasted muesli
1 tbsp butter or margarine
 roasted strawberries

To begin with, take one 85g packet of strawberry jelly crystals and combine it with 1 cup of boiling water in a medium sized bowl. Stir until the crystals dissolve, then add 3/4 cup cold water. Grease a 18cm x18cm round pan and line with plastic wrap, ensuring there is an overhang of 2 inches. Pour the liquid jelly mixture into this and place in the refrigerator to set.
Puree the strawberries in a food blender until fine and no lumps remain. Push puree through a fine mesh sieve to remove the seeds, discard residue.
Place the lemon juice in a small bowl. Evenly shower the gelatin over the top and set aside to soften for a few minutes.
Place puree and white granulated sugar in a medium saucepan and place on low heat, stirring occasionally, until small bubbles start appearing around the edges of the pan. Add the lemon gelatin mixture and stir until well incorporated into the puree and dissolves. Remove from heat and set aside, to cool to room temperature.
Meanwhile, whip the cream and extra sugar in a medium bowl, until firm peaks appear.
Take a 20x20cm round springform pan and grease the sides. Line the bottom and the sides with baking paper.
Cut the buttercake down the centre horizontally. Place the bottom half in the centre of the springform pan. Remove the jelly from the refrigerator, using the plastic wrap overhang to lift it from the pan. Gently position the jelly layer on the bottom layer of the cake. Place the top layer of the cake over the jelly layer.
Gently fold the strawberry puree mixture through the whipped cream until well combined. Pour this cream mixture over the top of the cake. (If you were like me and were too hasty and didn't let the strawberry puree cool down enough and it melted the cream, do not fret! It will be liquidy and the cake will "float" but it will still work just fine!) Cover with plastic wrap and place in the refrigerator to set, for two or more hours. When the mousse layer has set, take the extra jelly crystals in a medium bowl and pour the extra cup of boiling water over them. Stir until well dissolved and then add the extra 3/4 cup of cold water. Set aside until this mixture reaches room temperature, then pour over the top of the cake for the final layer of jelly. Place in refrigerator to set.
To make the crumble to top the cake, combine brown sugar, flour and toasted muesli in a bowl. Rub the butter into this mixture using your fingers until a crumbly dough forms. Lay this mixture on a lined baking tray under the grill on high for a minute, or until golden brown. Remove and cool, then add roasted strawberries.
When the final jelly layer has set on the cake, remove the side of the springform pan very gently. Carefully peal back the sides of the baking paper from the mousse. Serve chilled with a sprinkling of the strawberry crumble mix.

Serves 10-12


Friday, September 21, 2012

Chocolate Fudge Mocha Mousse Cake

If there are such things as clouds in heaven, they must taste and feel like this. Just with a subtle hint of coffee, and a base of chocolate fudge brownie, this mocha mousse cake will have you coming back for more for certain. It has a airy yet smooth and very light coffee mousse topped with cocoa powder, all resting upon a base of fudgey chocolate brownie.
Now here's a little word of praise to the person who inspired me to create this delicious dessert.
He's my little brother-in-law, and I find him most inspiring in the kitchen. He's only 15 and already a culinary whiz, making curries like a pro and thinking a little outside the box.
He spoke for a while about making a brownie based cheesecake, and it got my mind cartwheeling with ideas. Why hadn't I thought of that? Anyway, this is the cake that originally came to mind. Chocolate, coffee, fudge, mousse. I'm not sure flavour and texture combos get better than that.
It is meant to be.
And on another note, don't you just love this gorgeous stencil I used to make the pattern on the cake with cocoa? I found mine on ebay (the store doesn't sell them anymore though) but if you want to effortlessly jazz up you cakes you can find similar ones here! (or if you're crafty, make your own with a doily and starch. The doily must be made firm, for removal's sake.)


CHOCOLATE FUDGE MOCHA MOUSSE CAKE (A Lick The Spoon Original)

BASE:

1/2 cup butter
1/2 cup cocoa powder
1 cup brown sugar, firmly packed
2 eggs
1/2 tsp. vanilla
1/2 cup plain flour
1/4 tsp salt

MOUSSE:
2 tbsp. gelatin
1/2 cup cold water
1 cup chocolate chips
1 tbsp (or 3 tsp.) instant coffee
6 egg whites
1 cup caster sugar
2 cups cream
1 tbsp. cocoa powder to garnish

Preheat your oven to 180C.
Melt butter and remove from heat. Stir through the cocoa and brown sugar until combined.
Beat in the eggs and vanilla. Next, blend in the flour and salt. Spoon the batter into a greased and lined 20cm springform pan. (Make sure the sides are lined also right to the top of the pan.) Bake for 15 minutes. Remove from heat and set aside.
To make the mousse filling, place water in a small saucepan. Sprinkle the gelatin over the top and sit for 5 minutes to soften. Add the coffee and place on low heat, stirring until the coffee has dissolved. Turn off the heat and leave on the stove top. Ina  microwave proof bowl, place the chocolate chips. Microwave for 20 seconds at a time, removing to stir after each time until thoroughly melted. Add the melted chocolate to the coffee mixture and stir until incorporated.
In a medium bowl whip the cream into stiff peaks. Set aside.
In a large, clean and dry bowl, place the egg whites. Beat the egg whites until they form firm peaks, adding the sugar gradually along the way, until thick and glossy.
Fold the whipped cream into the egg whites.
Fold the chocolate coffee mixture into the egg white and cream mixture until well combined.
Spoon the mousse onto the brownie base and smooth the surface. Refrigerate for at least 2 hours, or until set.

Serves 10


Thursday, September 20, 2012

Little Miss Chatterbox Cake


 I had a very interesting comment a little earlier in the week. I deleted it (the privileges of being the author of a blog!) so don't go looking for it. It was hilarious though.
Someone basically had a go at me for sharing such unhealthy recipes, and directed everyone over to her healthy eating blog. Yes. You read right.
Here I am, just sharing, making peoples lives sweeter, and get chastised for giving this food to my friends and family and spreading the fat around, as I like to say. But I'm not sitting in the corner redfaced. No. I am grinning right back at you, healthy blogger.
I don't think I need to put warning signs up all over my blog for people who are not well educated in how to eat correctly. I'm all for healthy eating. I'm also all for balance and enjoying food. Sweets are on the food pyramid too...at the top, closest to heaven!
So sweet of you to be thinking of my weight, healthy blogger--it's very kind. But look at me. I obviously sit at home an eat everything posted on this site and have become obese. Don't you think?

My only crime is a twisted skirt...

Despite popular belief, I am not the blind witch that owns the gingerbread house that Hansel and Gretel stumbled across, once upon a time. I eat my veggies too!
Needless to say, no one should be living off this sort of food. I know I don't have to tell you that. Even though I just did.
There's no recipe with this post but there are a few general directions. Sometimes when I make a cake I am going to spend lots of time on just decorating, I take a shortcut and  bake a cake from the box *gasp*. I don't like doing that, but it makes life a bit easier sometimes. I have found a most delicious boxed cake mix that believe it or not, is one of the cheapest ones you can buy. I know. Sounds gross, and costs less than a dollar, just Black and Gold brand. But trust me, it tastes better than lots of those cake mixes that are quadruple the price. So I have a few up in the cupboard for occasions like this.


I made this Little Miss Chatterbox cake for my sister in law's 13th birthday party. As you might well imagine, she's the one person I know who can talk the leg off a chai, and hence, has gained the title of Little Miss Chatterbox.
I made the cake in an oven proof bowl, about 10cm wide and 8 deep. I then covered the cake, turned upside down, with buttercream icing. I used home made rolled fondant for the body, arms, legs and hair and facial features. I wanted the colours to be intense, as shown in the book of this little character. I recommend using a gel colouring for the intensity, although I used liquid food colouring, and it worked fine too. There was just a whole lot more icing sugar that had to be pounded into the fondant to make it dry enough to roll. The eyes and mouth I painted with black food colouring to get that intensity, otherwise it would have looked a bit faded. It dried quickly and worked perfectly.
Because the cake was so small, I sat Little Miss Chatterbox on a cake of her own. It was a marbled pink and white buttercake, topped with coconut buttercream. I coloured the coconut by placing it in a ziplock bag along with some green food colouring, and shaking to coat the coconut.


ROLLED FONDANT

1 tablespoon unflavored gelatin
1/4 cup cold water
1/2 cup glucose (can substitute light corn syrup)
1 tablespoon glycerin 
1 tablespoons butter
2 pound bag of icing sugar, sifted.
1 teaspoon flavoring
  
Pour water in a small saucepan. Shower the gelatin over the cold water so that the gelatin is evenly distributed.  Let gelatin soften in the water for five minutes.
Sift the icing sugar into a large bowl. When all sugar is sifted, make a well in the center of the bowl. Heat the water and gelatin over gentle heat, stirring, until the gelatin is dissolved. Mix in glucose (or corn syrup) and glycerin. Add the butter and mix until melted. Remove from heat and stir in desired flavouring. I used vanilla essence. 
Pour wet ingredients into the well of powdered sugar. Mix with a wooden spoon until cool enough to handle. 
Then use a lightly greased hand to knead the ingredients together. Knead in the bowl until most of the icing sugar is incorporated. 
Turn out on a lightly greased bench and knead until the fondant is smooth and pliable. If it feels sticky, add additional icing sugar. If it feels too dry and doesn't feel elastic, work in a small bit of butter. 
Shape into a thick disk shape and cover with a thin coating of butter. Wrap well in several layers of plastic wrap, and place in a large ziplock bag. The fondant can be used immediately, but works much better if its left to cure for at least 12 hours. The fondant will store at room temperature this way for three months, and can be frozen for up to 12 months. Add food colouring as desired.