Sunday, October 20, 2013

Mad Easy Jam Coconut Macaroons

Coconut, shmokonut, we all love it around here. Thanks to this subtropical climate I live in, such flavours are much desired and a great match for the other tropical fruits that grow locally here, such as mango and banana. But there's long been a combination I've desired to see together. I'm a terrible matchmaker-most matches I make end in tears, so I'm better of sticking with food rather than ill-suited couples. I give myself brownie points for trying though (lets make that dark chocolate fudgy brownie points).
The local Woolworth store here has these amazing coconut drops with strawberry jam on the top, and I have been long looking for a recipe. The coconut is sweet and moist, but the little drops hold together beautifully and hardly look cooked--how do they do it? Anyway, I have not been able to find any recipe to compare. But I'm back with the Secret Recipe Club after my post baby break, and I was given the blog A Couple In The Kitchen to cook from. They have a great 4 ingredient recipe for coconut macaroons--and I just had to try it. It's so simple, quick, and gluten free--exactly the type of recipe a new mummy like me needs between baby sleeping and waking. They're also strangely addictive, and are sure to disappear from the kitchen very quickly.

When you first inhale that warm coconut aroma, and the sweet scent of boiling strawberry jam, you will realise that eating these coconut jam drops straight out of the oven is well worth burning the tongue for.

I've adapted the recipe a little to see if I could make them anything like the Woolworth's coconut drops. (It turns out, to my absolute glee, that they are very much like those delicious morsels! They're soft, sweet and moist with a little crunch on the outer--divine!) My husband also has a strong aversion to almond essence, which was in the original recipe, so I made them just vanilla instead. I also did not have sweetened flake coconut (I don't think we even sell sweetened coconut here in Australia!) so I used dessicated coconut, and found that the sweetness from the condensed milk was enough to satisfy any sweet tooth. I think the addition of strawberry jam also added just a little more sugar, and made these darling little coconut jam macaroons the perfect addition to an afternoon tea platter or even a festive little treat for the Christmas table.
Please don't forget to check out  A Couple In The Kitchen's blog...they are recent award winning bloggers!


MAD EASY JAM COCONUT MACAROONS (adapted from A Couple in the Kitchen)

3 cups dessicated coconut (unsweetened)
300g sweetened condensed milk (approx. 3/4 can)
3 tsp vanilla essence
1/4 cup strawberry jam

Preheat the oven to 180C.
Line one large baking tray with non stick paper. In a large bowl, place the coconut, condensed milk and vanilla essence. Stir until well incorporated. Scoop amounts the size of a golf ball into your hand and gently form into a round shape. Using your index finger, make a small indentation to the top, and place on tray and lightly flatten. Repeat until all the mixture is used up. Then fill the indentations with a little jam. Bake for 10-12 minutes, until lightly browned. Allow to cool on the tray before removing.


Makes approximately 18


Thursday, October 17, 2013

Moist Apple Crumble Cupcakes with Cinnamon Icing

 Since my last post in which I mentioned stalkers, a few have come out of the woodwork. While I can't do much about keeping them away, we can all do something about keeping another person at bay.
An apple a day keeps the doctor away. Even better if it's an apple inside a cake, topped with cinnamon butter icing and delicious crumble mixture--even better if that cake happens to be moist and delicious and speckled with more cinnamon. Oh my. This is such a delicious treat for those random afternoon teas with friends, and it really is easy to put together.
My beautiful older sister used to make this as a tea cake without the icing and the crumble. I think it's traditionally an English tea cake called the Dorset Tea Cake. I have very fond childhood memories of this cake--I would literally crave it. And it's delicious which ever way you choose to make it.
I have not referenced the source of this recipe for one reason--It comes from the scrappy, torn and browned archives of the recipe drawer in the kitchen at home, handwritten by my mother. There's no knowing where it came from.


MOIST APPLE CRUMBLE CUPCAKES WITH CINNAMON ICING

1/2 cup butter
1/2 cup sugar
1 egg
1/2 cup milk
2 cups self raising flour
pinch salt
1 tsp cinnamon
5 small apples, peeled, cored and sliced

Preheat the oven to 180C.
Cream butter and sugar in a medium bowl. Beat in the egg and the milk. Add the dry ingredients and beat until a thick smooth mixture forms. Add the apple slices and incorporate. Spoon into greased cupcake liners and smooth the tops. Bake for approximately 3/4 of an hour or until golden and cooked through when skewered.

To make the icing:

1 tbsp butter, softened
1 tbsp brown sugar, heaped
1/2 tsp cinnamon
2 cups icing sugar
2 tbsp cream
water as needed

Add butter, brown sugar, cinnamon and icing sugar in a medium bowl with the cream. Whip with the electric beaters until thick and smooth, adding water if necessary to achieve the desired thickness. If your frosting turns out too runny, you can add more icing sugar to thicken it.

To make the crumble topping:

1 tbsp butter, softened
1 tbsp brown sugar
2 tbsp plain flour
pinch of cinnamon

Add all ingredients to a small bowl. Using your fingertips, rub the butter into the dry ingredients until it forms a sort of crumbly mixture. You may add more butter to reach the desired consistency if need be.  Dry this mixture out under the grill on medium for 1-2 minutes. Top the cupcakes with the icing and then scatter this crumble mixture over the tops.


Tuesday, October 1, 2013

Coconut Ice Domes with Roses

We've hit a million views. And that makes me want to come out and give a give hug to everyone who has ever been to visit the blog--unless you're some sort of creepy stalker type, then I will refrain. Politely.

Where have I been?
Am I alive?
Why am I posting less frequently?

There are a few reasons:

1. Every time I make or go to eat anything that could be classed as sweet, my husband reminds me I have to visit the dentist. (Random I know, but did you know the pickle in the cheeseburger is the only thing that stops it from being classed as confectionery?)

2. There's someone in this house that needs me more than my blog fans--oh yes, the precious new baby of the house! I would not miss those precious new born moments with her. Yes I am with her every waking hour, and do manage to cook a few things while she's sleeping every so often. So don't worry, I'm not going anywhere!

3. I wish baby weight melted away from eating lots of naughty food. I don't think I stand a chance. (Note to self: It's time to seriously start cooking for my husbands colleagues to keep the recipes rolling. The fat must be shared around.)

4. Blogger is posting my pictures with some sort of grainy, grey film over my shots...making them look super inedible. Slightly moldy, to be honest. (see pictures below for example) I don't know why or how to fix this problem--any ideas? The original shots are light and warm and just beautiful...why have they uploaded like this?

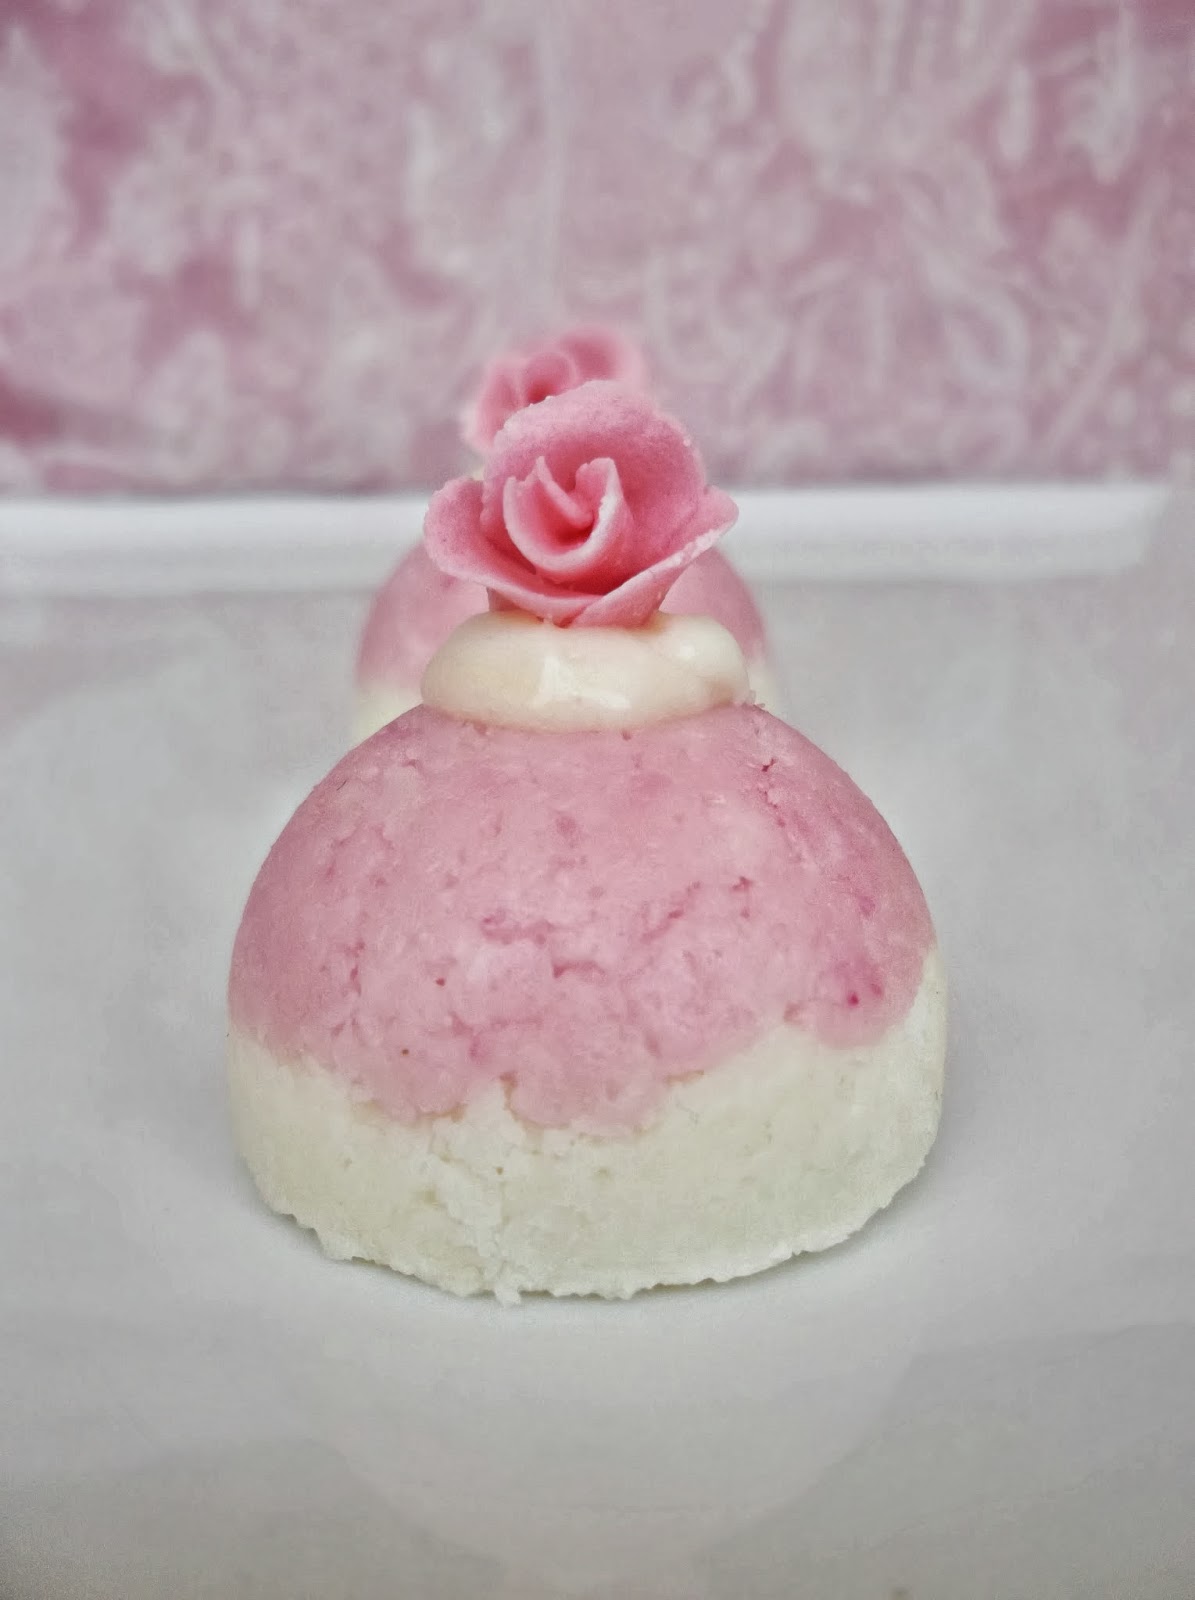
Anyway, now you know, I'm not among the deceased, and it's time to present a school fete favourite--Coconut Ice--all grown up this time, domed in shape and decked with pretty little fondant roses. These would make such a pretty addition to a high tea or girls party as they are definitely feminine and a bit of a show stopper, if I say so myself. They sport a vanilla infused coconut base, topped with a lightly strawberry flavoured pink dome (I had to find a way to use those gorgeous dome molds that have not been of much use so far...makes for a fancy looking dessert after all!) with a dollop of vanilla cream icing and a pink fondant rose. And they are incredibly delicious, and rich, and it is, I warn you, a little hard to stop at one...


COCONUT ICE DOMES WITH ROSES (Adapted from Delicious, October 2002 by Valli Little)

Domes:

2 cups icing sugar
pinch cream of tartar
395g can of sweetened condensed milk
1 tsp vanilla essence
3 1/2 cups dessicated coconut
1/2-1 tsp strawberry essence
15 small fondant roses (make your own here!)

Icing:

1/2 cup icing sugar, extra
a few drops vanilla essence, extra
2-4 tbsp. heavy cream

Sift the icing sugar and cream of tartar into a medium sized bowl. Add the sweetened condensed milk, vanilla and coconut and stir until well incorporated. Divide the mixture between two bowls. Add the vanilla essence to one, and the strawberry essence to the other. Mix until thoroughly incorporated.
In the bowl containing the strawberry essence, add a drop or two of red or pink food colouring. Stir again until the colour saturates the mixture. (If you find that the addition of this extra liquid has made the texture too wet, add a little more icing sugar to the mixture. You don't want it to be too damp, but able to hold its shape when you press it together in your hand.)
Liberally grease your dome molds. Spoon the pink mixture into 15 molds until the mixture is evenly distributed between them. Firmly press the mixture into each so that it is firmly compressed and flat on the top. Repeat with the white mixture on top of the pink, filling each dome to the rim, and pressing down again firmly. Refrigerate for two hours before gently removing with the help of a spoon if necessary.
To make the icing, place the extra icing sugar and extra vanilla in a small bowl. Combine with just enough cream to get a nice texture that will not drip when applied to the coconut ice domes. Dollop a small amount on the top of each dome, and then top with a fondant rose.

Makes 15 domes


NOTES: If you do not have a dome mold such as the one used in this recipe, you can easily make this in a 30x20cm slice tin and cut it into squares.

Sunday, September 15, 2013

How to Colour Sugar Crystals

I once had the pleasure of spending the afternoon at a fabulous hightea room on Mount Tambouine called Tea and Niceties. It was gorgeously set out in a shabby chic manner with the tables set with ornate silverware, beautiful blooming roses, tea pots, sugar cubes, and to-die-for cakes and pastries stacked on tall high tea stands. Everything was pink and gold and white and absolutely amazing and feminine. It was the perfect place for a bridal shower.
It's easy to make your own afternoon teas with the girls a bit more elegant with the tiniest bit of effort. When you break out the floral teapots that have become ornamental, and lay out some delicious nibblies, topping up the sugar bowl with pink crystals only seems fair. Making your sugar bowl pink is so much easier than you might think, and much less expensive than buying it at the store. You can use it to dust cakes, biscuits and cupcakes too for a little added glamour, and it looks fabulous on the table when you're throwing a high tea or shabby chic party. Makes me think of exotic blends of tea and jam and cream scones. Time to send out the invitations and throw a girly afternoon tea I think!


HOW TO COLOUR SUGAR CRYSTALS

You will need:
A plastic zip lock bag (a regular freezer bag will do the trick too)
Granulated sugar
Food colouring (I used red)

Place the granulated sugar in a zip lock bag. Add a few small drops of food colouring to the bag and close the bag. Using your fingers, move the sugar crystals around in the bag, spreading the colour throughout the entirety of it, until all the crystals are saturated.
Voila!


For the meringue recipe, visit here.


Friday, August 30, 2013

Fudgy Dulce de Leche Brownies

If there's any food I'll ever call wicked, it's probably this super fudgy dulce de leche brownie. Oozing with South American style caramel, and packed full of chocolate, this brownie is bound to satisfy any sugar or chocolate cravings within seconds. Thankfully for the waistline, it's a super rich brownie that can't be eaten in huge quantities at a time, but makes a large batch for sharing or freezing for future desserts--it's particularly delicious warmed up with a scoop of vanilla ice cream on the side. Absolute decadence!


FUDGY DULCE DE LECHE BROWNIES (Adapted from Delicious. More Please by Valli Little)

400g can sweetened condensed milk
200g dark chocolate, chopped
250g butter, chopped
1 3/4 cups brown sugar, firmly packed
4 eggs
1 1/3 cups plain flour
1/4 tsp. baking powder
1/3 cup cocoa powder

To make the dulce de leche, remove the paper label from the side of the sweetened condensed milk can. Immerse the can into the saucepan of water so that the water covers the top of the can. Place over a high heat on the stove and set the stove timer. Boil for three hours, checking frequently to top up the water to cover the can if it has evaporated. (It is important to keep the can covered, as failure to do so may result in the can exploding). Turn off the heat and allow the can to cool before removing and opening.Set aside to completely cool.
Meanwhile, preheat the oven to 180C. Grease and line a 22cm square cake pan with baking paper. Set aside.
Place the chocolate and butter in a medium saucepan over a low heat. Stir until the contents have melted and are well combined. In a bowl place the brown sugar and the eggs. Whisk until the eggs have broken down, then add the melted chocolate and butter mixture. Stir in the flour, baking powder and cocoa until well incorporated.
Pour half of this batter into the base of the lined baking tin, and smooth to evenly cover the bottom. A teaspoon at a time, scoop half the cooled dulce de leche from the can onto this batter in random areas. Cover with the remaining brownie batter, and repeat again with the rest of the dulce de leche. Gently swirl the caramel on the top layer  with the end of a spoon (do not break through the brownie batter though as this can spoil the brownie.)
Bake for 35-40 minutes or until set. The dulce de leche will be molten, so allow to cool in the pan before removing to cut into squares.

NOTES: You can buy prepared and authentic dulce de leche from some gourmet food stores.


Friday, August 23, 2013

Ultimate Meringue

Meringue. There's something nostalgic about meringue and it makes me think of white, fluffy fairy castles. I used to watch my mum piling that sticky, sweet goodness up into high mounds before baking it and turning it into a most impressive pavlova. "Pav" was always a favourite around our house when I was a child, and sinking my teeth into it makes me a little bit proud too, being a particularly Australian dessert.
Unfortunately when this little girl grew up into a woman and tried piling meringue fairy castles up for her own children, I was hit was huge waves of dissapointment.
Flat. Sticky. Weeping. Gooey inside.
The meringue, not me.
Although I felt a little how it all looked, sagging there on the kitchen bench in delicious disarray. (Good thing you can still put failed meringue to good use with an Eton Mess Dessert)
I blamed it on the humid, tropical climate I moved up to. Then my sister in law Liz told me her mum, who long resided in the same climate as I do, made the best pavlovas despite the humidity. That made me feel a million dollars. It was official--I was a failure at meringue.
So as you may well guess, I went crazy trouble shooting meringue and all the possible mistakes I could be making that made my meringues so temperamental. To my joy I found I was correct about the humidity and rain playing a roll in its failure, so be sure that if you want to succeed, chose a dryer day if you can to get baking. Having said that, it's winter here and still 70% humidity and my meringues, using the below recipe for the ultimate meringue, formed glorious, crisp on the outside, slightly chewy on the inside, non-weepy, non-gooey, non-sinky, gorgeous meringues. I think it might be fail proof. Finally.
I now have two favourite meringue recipes that have never failed me to this day. One I use for making Meringue Swans, and it does brown a bit, and has the most delicious crunchy outer and caramelly inner. But this recipe keeps its whiteness and I (almost) promise, you won't have any issues with it. Bon appetit!


ULTIMATE MERINGUE (From BBC Good Food)

4 large egg whites
115g caster sugar
115g icing sugar
a few drops of food colouring if desired

Preheat the oven to 100C (110C for a fan forced oven).
Line two or three trays with baking paper and set aside. In a medium to large, clean and dry glass bowl, add the egg whites. Beat on medium speed until the whites stand up in stiff peaks when the beaters are lifted and they resemble fluffy clouds.
Turn up the speed to high and begin to add the caster sugar, a tablespoon at a time with 5 seconds in between each addition. (If you add the sugar too quickly, the meringue may weep at a later stage) You may add some food colouring at this stage if desired.
The mixture should look thick and glossy when it is ready--do not over beat.
Divide the icing sugar into three parts. Add the first part, and fold it into the mixture with a rubber spatula or big metal spoon. Repeat with the two remaining parts. Don't over-mix at this stage, just fold until the mixture looks smooth and billowy, like a snow drift.
Y0ou can place the meringue mixture in a ziplock bag fitted with a piping nozel and pipe the mixture as desired, or simply spoon the mixture onto the tray, using another spoon to help ease it off.
Bake for 1 1/2 hours to 1 3/4 hours in a fan oven, or 1 1/4 hours in a conventional oven. Meringues are ready when they feel dry to touch and sound hollow when tapped underneath. Leave to cool on the trays for a few minutes, then remove to cooling racks. Meringues will store in an airtight container for up to 2 weeks, and can be frozen for a month.

Thursday, August 22, 2013

Dulce de Leche /Condensed Milk Caramel


SWEETENED CONDENSED MILK CARAMEL/ DULCE DE LECHE

1 can sweetened condensed milk
1 saucepan of water

Remove the paper label from the side of the can. Immerse the can into the saucepan of water so that the water covers the top of the can. Place over a high heat on the stove and set the stove timer. Boil for three hours, checking frequently to top up the water to cover the can if it has evaporated. (It is important to keep the can covered, as failure to do so may result in the can exploding). Turn off the heat and allow the can to cool before removing and opening. You can boil the can for a further hour if you wish the dulce de leche to be thicker and darker and more intense in flavour. 3 hours is a good amount of time if you wish to add this dulce de leche to cooking or baking, such as brownies. (images show sweetened condensed milk that has been boiled in the can for 4 hours.)


Thursday, August 15, 2013

Christening Cake and a New Lick the Spooner

I don't usually like to spill too many household beans here on the blog. But we have some exciting news! And I have been rambling on for a long time about expecting a new little bubba, so here we go, the beans are being spilled.
It's a girl! And all that test tasting in the kitchen went towards creating a beautiful pudding, weighing in at 4.4kg! Don't ask.
Needless to say I can see my toes again and am enjoying not having heart burn....and loving fat, warm baby cuddles!

Cecelia at 5 days old--not looking so newborn!

We had our Cecelia Marie baptised one week after she was born, and I somehow still made a Christening cake.


I made most of the decorations in advance--well, the fiddly time consuming bits like the roses. All the icing work was done with store bought rolled fondant (Orchard brand White Icing) and I dabbled in a little draped icing work which I can see being highly addictive in the future. This draped icing was coloured with a little pink liquid food colouring (no need to buy the powdered stuff, and the liquid is less expensive).
I didn't have the confidence or patience at the time to mold the baby myself (remembering melting figures in the past turning into fat blobs), so I used one of my daughters little dolls to top the cake. Of course she wanted it off immediately. Even now as she stands by me looking at the picture, she wants it off.
Overall, it was a very easy christening cake to make and I feel most people would be able to put something like this together even without experience. Give it a go! You may surprise yourself. It's amazing what a little icing and some rolling can do.

One week old. One more person to Lick The Spoon!