Wednesday, November 30, 2011

Toasted Coconut Marshmallow Slice

If ever I need a confidence boost with my blogging, I simply pop my 18 month old son on my lap and browse the blog. His little tongue comes out to lick his lips and he points to the pictures and says "mmmh mmmmh!" over and over. 
I tell you its therapeutic. 
His all time favourite is his Farm Animal Birthday Cake that was made for his first birthday, and he always requests a viewing by oinking like a pig. With his very limited vocab, he has informed me that he wants a "pen-un" (penguin) cake for his next birthday when I asked him.
Anyway, this little guy is my biggest (and smallest) fan. Yesterday I found him in the refrigerator licking hands covered in marshmallow and toasted coconut. There were hand trails throughout the slice. Goo on the fridge door, tell-tale remnants around his mouth...but a giant grin on his cheeky face.
I love that boy.


TOASTED COCONUT MARSHMALLOW SLICE (Taken from Better Homes and Gardens Magazine Dec 2011)

2 cups plain flour
1/2 cup brown sugar, firmly packed
185g butter, melted and cooled
1 tsp. vanilla essence
1/2 cup cold water
2 tsp. geletine powder
3/4 cup caster sugar
1/3 cup shredded coconut, toasted

Preheat the oven to180C.
Grease a 26x16cm slab pan and line with non stick baking paper.
Sift the flour into a large bowl. Add brown sugar and stir to combine. Add melted butter and vanilla and mix until a stiff mixture forms. Spoon into the prepared pan and flatten firmly with a fork until evenly spread.
Bake for 20 minutes or until lightly golden.
Set aside to cool completely.
Meanwhile, put 1/4 cup of the water into a microwavable jug and sprinkle gelatine over. Set aside for 5 minutes or until softened. Cook in microwave on high for 20-30 seconds until the gelatine has dissolved. Set aside to cool.
Put caster sugar and remaining water in a clean bowl and beat on high for 5 minutes until the mixture turns white. Add the gelatine mixture and continue beating for a further 10 minutes or until a thick white marshmallow forms.
Spread the marshmallow onto the biscuit base, then sprinkle with toasted coconut.Stand for one hour or until marshmallow has set. Cut into squares using a large wet knife, dipped into hot water between cuts. Serve.

Tuesday, November 29, 2011

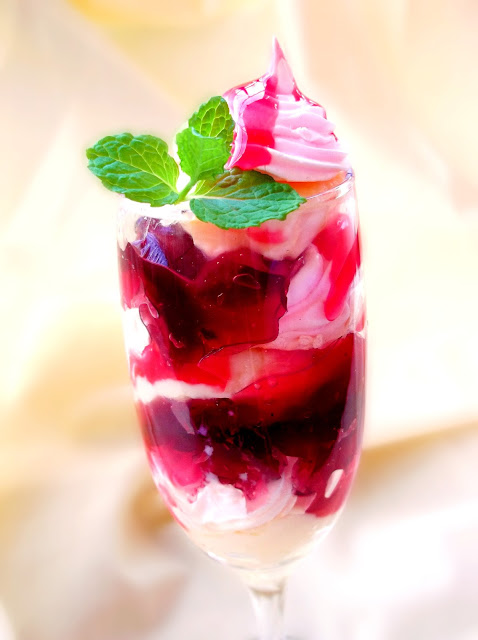
Eton Mess Inspired Parfaits

 I really struggle when it comes to making a good meringue. Something always seems to go wrong. It either ends up as a soft sticky mess, or it browns too quickly on the outside or the bottom. Well, if you're anything like me, you will love this recipe, because it doesn't matter how your meringue turns out.
Eton Messes traditionally are formed with strawberries, cream and broken meringue. In this version of the recipe, I have added extra decadence, removed the cream and piled it high with layers of deliciousness. I hope you enjoy it as much as we did!


ETON MESS INSPIRED PARFAITS

1 packet strawberry jelly crystals

1/4 cup strawberry topping or sauce (we used the kind that you pour over ice cream)
2 cups thick custard (suggested recipe to follow)

1 batch of meringues (suggested recipe to follow)
Sprig of mint to garnish


Follow the instructions on the jelly packet to make one batch of jelly. Refrigerate until firm.
Meanwhile, cook meringues, and then the custard in the following recipes. Alternatively the meringues and custard may be store bought.
To assemble, layer all ingredients in tall glasses immediately before serving., finishing off with a drizzle of strawberry sauce and a garnish of mint.

Serves approximately 4-6, depending on size of serving glasses

CUSTARD

2 cups milk
4 large egg yolks
6 tbsp sugar
3 tbsp corn flour
40g butter
1 tsp vanilla essence

To make the custard, bring milk to the boil. At the same time, in a separate saucepan, combine yolks, corn flour and sugar together and whisk over a low heat until the milk boils. Add a splash of boiled milk to the yolk mixture and begin to whisk vigorously. Gradually add the rest of the milk, continuing to whisk constantly, until thick and smooth. Remove from heat and immediately scrape the custard into a bowl and place in a basin containing a few inches of cold water. Add the butter in 3-4 installments. Add vanilla essence to flavour. Cool.

PINK MERINGUES

2 egg whites
1/2 cup sugar (preferably caster sugar)
1-2 drops of  red food colouring

Preheat the oven at 150C.
Line two trays with non stick baking paper. Separate the eggs and beat the whites in a clean dry bowl until peaks form. Gradually beat in the sugar, a tablespoonful at a time. Beat on high until thick, glossy peaks form and the mixture is left smooth with no sign of the grit from the sugar. Add a drop or two of red food colouring and mix to combine.
Pipe as desired onto the tray, and cook until crisp on top. Turn the oven off and leave ajar for an hour until the meringues become more firm.


Monday, November 28, 2011

We Interupt this Program for an Important Announcement!

So all food aside for a moment to welcome our new little girl into the world...
Vienna Rose who was born on Sunday the 20th November after a very speedy labour and birth!


We're all doing well with just a little jealousy on the side from our 18 month old son...lots of special cooking for him to tide him over this bump in the road!
More recipes will be coming soon! Stay tuned!

Monday, November 14, 2011

Banana Blueberry Muffins

While waiting for my new darling to arrive, I've been trying to get a few good freezables stocked up for my darling husband and those who might come over for a peek of our little bundle. No, not just lasagnes (although they do freeze particularly well), but some sweets too. Cake never goes astray! (not in this household anyway) And it usually stores quite well.
So here's a batch of banana blueberry muffins to tide everyone over the waiting period. No one can be living in such impatience as I! I wonder if they'll last? I may just have to make another batch. Somehow these muffins feel healthier than my usual posts.
Bring on the low carbs and antioxidants! (these may be neutralized by the icing....I wouldn't know! Feel free to indulge in them without the white drizzling...they're just as tasty.)


MINI BANANA BLUEBERRY MUFFINS
6 oz sugar
3 oz butter
2 eggs
2 ripe or over-ripe bananas, mashed
1/2 cup blueberries, frozen or fresh
7 oz Self Raising flour
1/4 level tsp. bicarb soda
1/2 level tsp. salt
extra blueberries for decorating
1 cup icing sugar
1-2 tbsp water

Beat the sugar and butter together until creamy. Add the eggs one by one, beating well between each addition.
Beat through the blueberries and bananas.
Place flour, soda and salt on top of this mixture and stir through until well combined.
Scoop batter into 35 greased mini muffin tray holes/patty pans. Bake at 180C for approximately 15-20  minutes until golden and firm. Remove and cool.
Combine icing sugar and a little water to make a thin icing paste. Drizzle over the muffins and serve with extra blueberries if desired.

NOTES: Makes approximately 35 mini muffins or 15 regular sized muffins. Instead of using icing to drizzle over the tops, you could substitute for a sprinkle of icing sugar or a swirl of melted white chocolate.


Saturday, November 12, 2011

Chilled Chocolate Rum and Raisin Custard

Recently we had a green energy meter installed at our house, which gauges how much electricity is being used at one time. The idea is to be more energy efficient and be able to see what uses the most energy, so as to cut back and save money.
I was surprised to see that the oven used as much power as our air conditioner! I had never really thought of any cost being involved in using the oven, for some strange reason. Of course with summer coming up, the oven won't be used as much, which should keep the heat down in the house anyway. Do you have a cost efficient oven? It's certainly something to think about. Makes me think twice about keeping mine on for long periods!
Here's a refreshing summer recipe that doesn't require the heat of the oven. It's a combination between a boozy chocolate custard and a mousse--it has a soft bubbly top, custardy centre and is topped with chocolate covered raisins and cream. Delicious!


CHILLED CHOCOLATE RUM AND RAISIN CUSTARD

1/2 can evaporated milk, chilled
1 1/2 tsp. gelatine powder
1/4 cup cocoa powder
1/4 cup boiling water
1/4 cup caster sugar
Rum, or rum essence to taste
Chocolate coated raisins to decorate
Extra cocoa to decorate
Cream to decorate


Dissolve the gelatine in water and leave to cool.
Meanwhile, beat the chilled evaporated milk with an electric beater until thick, like cream. (approximately 2 minutes)
Add the sugar, essence and cooled gelatine, and beat until combined. Mix cocoa powder through the mixture until well combined. Spoon into two dessert glasses.
Cover with plastic and refrigerate until set.
Beat the cream and pipe a design onto the centre of each glass. Decorate with raisins, extra cocoa powder and any preferred berries or chocolate shavings.


Serves 2


Thursday, November 3, 2011

Chocolate Crinkle Biscuits

These biscuits remind me of Christmas. I don't know if its that the icing sugar that covers these cute chocolate biscuits reminds me of snow, but there's something definitely festive looking about them. The name brings to mind crinkly old people, but brush the thought aside, these are anything but like wrinkly skin.
They're simply divine.
They smell like chocolate pudding when cooking and are so quick and easy to make. The minimal effort for the the huge taste just blows your socks off,I give this recipe a big five stars.
There is nothing fancy about the ingredients either, which I know some of my readers will rejoice over. Mind you, I don't feel like I have a gourmet pantry, but I suppose for the everyday cook some of the items I use may not be frequently at hand. Never fear, you will probably have all the ingredients for this one just hanging about in your pantries...so go and make these lovely little biscuits and experience the crisp outer layer, the soft melt in your mouth centres and that ever so irresistible chocolate fix you know you need. Go on, you know you do!


CHOCOLATE CRINKLE BISCUITS (adapted from Williams Sonoma)


1/2- 3/4 cup icing sugar
1 2/3 cup plain flour
1/2 cup cocoa powder
1 1/2 tsp. baking powder
1/2 cup butter, at room temperature
pinch of salt
1 1/4 cup granulated white sugar
2 eggs
1 tsp. vanilla essence

Preheat the oven to 180C.
In a large bowl, beat the butter and the granulated sugar until smooth and creamy. Beat in the eggs, one at a time, until well combined. Stir through the vanilla.
Place the flour, cocoa, baking powder and salt on top of this mixture, and gently stir to combine all ingredients.
Place the icing sugar in a shallow bowl. Form rough balls with the dough, the size of a walnut. Roll each liberally in the icing sugar to thickly coat.
Place the balls on greased and lined baking trays. Bake for 10-12 minutes, until they puff and have a cracked appearance on the top.
Remove from heat and let sit on the trays for a few minutes to cool, before placing on a cooling rack.

Makes 50

NOTES: For the best results, cover the dough balls in icing sugar immediately before placing in the oven. If you leave the raw dough to sit, the icing sugar tends to soak into the dough a little and the end result isn't quite as pretty.


Wednesday, November 2, 2011

Dutch Snykoek

Cinnamon. Ginger. Cloves. Nutmeg. The smell wafting through the house is intensely satisfying.
When we were kids we'd call it snake cake.
Straight out of the oven and lathered in butter--divinity to the taste buds.
Its a simply delicious spiced loaf cake called Snykoek from the Netherlands, otherwise known as Ontbijtkoek (Breakfast slice), and one of the only Dutch things we frequently had around the home when I was growing up. My mother is Dutch, but unfortunately speaking the language at home was not something that happened, as my mother was young when she moved here and therefore lost a lot of the language. So I clutch at the few things my mother did bring with her, and this is one. I haven't updated the measurements, but a quick conversion is all you need. It's worth it!


SNYKOEK

1 1/2 lb. plain flour
1 1/2 cups sugar
1/2-1 pint milk
1 1/2 level tsp. cinnamon
3/4 tsp ground nutmeg
1 tsp. ground cloves

1 1/2 tsp bicarb soda
1/2 tsp ground ginger

Mix all dry ingredients together in a large bowl. Add the milk until you get a smooth consistency, mix until well combined. Pour into three lined and greased loaf tins. Bake at 180C until cooked through. Serve warm with butter.

NOTES: There are 2 cups to a pint.