Wednesday, May 30, 2012

Individual Strawberry Jelly Cheesecakes

It's been a very exciting month here on Lick The Spoon. Welcome to all the new followers, I hope you thoroughly enjoy the ride, wading through lots of gooey sweets and scrumptious savories.
I am very grateful to have received news that I have reached the second level in the Gourmet Garden Cook Off!
It all began with a blog off, and the eliminations have taken place. Thankfully I was not eliminated! So where to from here? I am to go to the Brisbane Good Food and Wine show in November and have a cook off against another lucky blogger. I'm calling on a cheer squad to give me confidence! Will you be there?
Apparently I will be cooking-off against another foodie blogger on The Chopping Block Stage, and the final product is to be judged by celebrity chefs. I hope they are kind upon my savory efforts when the time comes. I have no more details as of yet, but I will certainly keep you all updated.
I didn't think I would honestly get this far, so I want to thank all the people who helped me: my husband Luke in supporting me (he even told me not to get my hopes up, the sweetie!), the family in taste testing, and also to my mother in law Geraldine for coming to look after my babies while I had a cooking marathon to prepare for the Gourmet Garden Dinner Party. Phew! Without you all I wouldn't have gone to level two. So many, many thanks. I'm counting on you all to be there on the day to cheer me on! (it's my last favour) I am going to need all the luck I can get. Whipping up something and having it plated within a half hour time span will be quite a fete.
Anyway, that's still six months away. I hope my excitement won't have cooled down too much by then.
Well, to keep us going for the next six months of waiting and growing impatient, I have a whole stack of great recipes coming up. Keep your eyes and ears open!
Here is somewhat of a re-post. Well, the recipe is re-posted, with some tweaks made to the physical form of the original. The post went down so well the first time, and it got me thinking of the endless possibilities with this delicious recipe. It was originally a jelly slice, but I love making individual desserts and they are less messy to cut. With the aid of my silicone 12 hole muffin tray from Chef's Toolbox, I made these lovely layered desserts. They have a crispy sweet base, a tangy lemon cheesecake-like filling, and are topped in delicious red jelly in a flavour of your choice. Life doesn't get much sweeter than this. It really doesn't.


INDIVIDUAL STRAWBERRY JELLY CHEESECAKES

BASE:

1 cup Self Raising flour
1/2 cup plain flour
1/2 cup brown sugar, firmly packed
125g butter, melted
1 tsp. vanilla essence

LEMON LAYER

1/2 can (200g) sweetened condensed milk
2 lemons, juiced
2 tsp. unflavoured gelatine
3/4 cup boiling water

TOP LAYER:

1 packet raspberry jelly
1 1/4 cups boiling water


Preheat the oven at 180C. To make the base combine flours and sugar in a bowl. Add melted butter and vanilla, and stir until well combined. Place a tablespoon of mixture into each of a 12 hole silicone muffin tray (or a well greased/lined metal muffin tin) Press down the mixture into each base using your fingertips, until compact and evenly covering the bottom of the tray. Bake for 15-20 minutes until golden. Remove from heat and set aside to cool. When cool enough to touch, press down the cooked bases with your fingertips to flatten.

To make the lemon filling, place the boiling water into a small bowl and gradually shower the unflavoured gelatine into it, so that it does not clump. Stir until dissolved. Add the lemon juice and condensed milk and stir until well combined. Spoon over each cooled base and cover with plastic wrap. Refrigerate until set.

When the lemon layer is firm, take the raspberry jelly crystals and combine with the boiling water. Stir until completely dissolved and sit aside to cool for 15 minutes. Gently spoon the raspberry jelly liquid over the lemon layer, evenly amongst the 12 holes. Cover with plastic wrap and refrigerate until set.
To remove the cheesecakes, smoothly run a butter knife around the sides of each cheesecake, careful not to pierce the silicone.  Dig the knife a little deeper until it is underneath the base and gently lift the cheesecake out, applying a little pressure to the tray base.
Garnish if desired, and serve.
NOTES: The above recipe makes 12 muffin sized cheesecakes. You can also use the Chef's Toolbox mini muffin silicone tray for a more miniature version, which are perfect to serve as petits fours. Use the 24 hole silicone mini muffin tray, only half the base recipe, the whole lemon layer recipe and half the amount of jelly.
If you want to purchase any Chef's Toolbox kitchen ware, head over to Pauline Phillip's facebook page and give her a holler! She's lovely.

Friday, May 25, 2012

Crocodile or Alligator Cake

Crikey! I know Queensland has been known to have crocodiles up north, but I never thought I'd have one in my kitchen. In fact, at this very moment it's in my pantry.
Did you know that homeless people have to sleep on the roofs of parked cars so they won't get eaten during the night? Where's Steve Irwin when you need him?
Now even home owners have to be on their guard. Where do I sleep when that thing is looking at me with its glistening yellow eyes and its white teeth flashing?
When I asked my son Ben what he wanted as a birthday cake, he told me he wanted a Croc (but you know toddlers, he can't say the R)
I thought it would be challenging, but with low self expectations I managed to create something he was thrilled with.Well, I figured that even if it turned out as a big blob of green with sharp teeth and called it a crocodile, he'd be thrilled. He's only two, after all.
But to my joy it turned out much better than anticipated, and was relatively easy! If someone else can do it, why can't you?
That's what I kept telling myself.
So you can make this beastly cake too. I decided this time to take photos as I went, and ended up with a camera covered in sticky fondant residue. As I was creating this at night, I apologise for the terrible quality of the photos. They were taken in very poor light, while I was in the middle of the creation (so now you can see how messy I get when I'm cooking!) The night is the only time I could whip this up without hands ploughing through the cake and icing! When I had finished, I left it on the kitchen bench and turned off the light. All I could see were glistening eyes and white teeth starring at me as I walked away. And yes, I had nightmares. But my son loved it.


CROCODILE CAKE

4 buttercake mixes
1 cup rice bubbles
200g spearmint leaves lollies
2 quantities of prepared rolled Fondant (get the recipe here)
4 cups icing sugar
1/3 cup milk (approximately)
green, red and yellow food colouring/dye

Draw out a plan. I ended up going for a square 20x20cm cake for the head (instead of a round one as drawn in picture above). 33x22.5 rectangular dish for the body and a 20x20 round tin for the tail (a bundt tin would be great here too). 
Bake the cakes, using one cake mix for the head, one for the tail and a combined two for the rectangular cake that will make the body of the crocodile. Cut out a pattern with baking paper as to the basic outline of the body. Place the cakes on a flat surface in the freezer for about 2 hours until semi frozen but still malleable.
When the cakes are firm enough to cut without having all that crumbly-business, place the paper patterns on your cake and cut off the superfluous pieces.
When all the main body parts are cut to the pattern, you can start using the cake scraps to build up areas on the cake, such as the face of the crocodile. It doesn't have to look neat, remember this is "stuffing" and crocodiles have a rough bumpy look to them anyway.
Don't forget side views matter too! Doesn't look pretty though, does it?
Carve all the desired details on the body and tail before the cakes completely thaw. Piece together to make sure everything looks in proportion, and is positioned where you want it on the cake board. I ended up cutting a chunk off the tail after this photo, it was too long and wavy.
Start mixing up food dye colours, until you get the right shade.
I arrived at this colour by mixing 4ml of green dye with 1 ml red, and 10 drops of yellow. Make sure you note your quantities! I ended up making about three batches of colour to paint the whole crocodile.
Combine the icing sugar and milk to make a thin icing (hubby bought chocolate icing sugar but it doesn't matter what the flavour is). This acts as a glue to hold down the rolled fondant. Smear over the crocodiles head and clean up any pooling residue. Roll out the fondant and gently lay over the cake. Press gently around the stuffing in the face for more definition. Cut off the excess fondant. (In hind-site I would have texturised the crocodile's face also as shown in the next step, with rice bubbles)

For the body and the tail, add texture with the Spearmint leaves lollies and rice bubbles. You can add as many or as few as you desire. Press the lollies firmly in position before laying the fondant layer on top, as they may fall over if not well secured. When the fondant is laid over the rice bubbles and lollies, gently press around them to add definition. The texture will really come through when you paint the fondant.
Repeat this process for the tail. (as you can see I got impatient and started painting the head and body already!)
If you're as impatient as I am, you will want to see the crocodile in green as soon as you can. You can start painting it as soon as the fondant is in place, if desired. I used a flat pastry brush to liberally apply the food colouring to the whole body. It sits in all the little cracks and crevices that come with the fondant stretching and adds to the texture. So amazing.
Check out that body! Ewww...who would want to be a slimy crocodile? Just loving the way the dye is sitting on this creature and pooling in the crevices.
Add the eyes from yellowed fondant cut out to desired shape and size. Add teeth and any final touches that are desired (I thought the coloured nostril holes were a nice finishing touch)

Do you think he was pleased to see this in the morning? I told you I get my kicks out of other people's pleasure in what I bake!
Sadly the lighting detracts from the creature and takes out a bit of the texture.


Monday, May 21, 2012

Millionaire's Nuggets

So after a marathon of lots of tasty savory delights for the blog for the Gourmet Gardens Herb Blog off, I am back with a super scrumptious sweet. It's that time of the month again, reveal day for the Secret Recipe Club. Erin from Making Memories  had me looking at her page for weeks, I couldn't decide what to make for this month's reveal. Erin has an interesting blog filled with fun ideas for things to do with your kids, including some very yummy looking recipes. I found amongst it all a recipe for millionaires nuggets, and thought it looked like my sort of affair. Caramel-y, gooey, sweet, covered in chocolate...maybe some marshmallows in there too. I have been meaning to make Millionaire's tarts for quite a while now, and realised this would probably give me my millionaire's fix. Oh so tasty.
I couldn't for the life of me find caramels in the store, so I made my own basic caramel instead. Erin from Making Memories melted down a 14oz bag of caramels to pour over the rice bubbles ("Rice Krispies" in USA I'm guessing!) but I think my caramel worked out really well in the end as a substitute.
Eureka!
I also splashed them with a bit of edible gold dust to jazz those babies up a bit. A little gold bling never goes astray.


MILLIONAIRE'S NUGGETS (Adapted from Making Memories)

1/2 cup brown sugar
2 tbsp. honey
2 tbsp. butter
3/4 cup marshmallows, chopped (or use mini marshmallows)
1 1/2 cup Rice Bubbles (or Rice Krispies)
2 cups dark chocolate buttons
edible gold dust to decorate, if desired

Place the sugar, honey and butter in a small saucepan over a low heat. Stir occasionally, until the butter melts and the mixture boils and bubbles. Remove from heat. Stir the marshmallows through immediately. Then add the rice bubbles and combine.
Scoop tablespoons full of hot mixture into a silicone mini muffin tray (or a well-greased tin mini muffin tray). Press mixture down until even. Place in refrigerator for 5-10 minutes. Remove from tray and place on baking paper. Melt the chocolate in two batches. In a microwave proof bowl, heat for 30 seconds at a time, stirring after each time, until smooth and well melted. Dip each nugget into the chocolate until well-covered, and replace on the baking paper. Repeat with remaining nuggets and chocolate. Sprinkle with gold dust if desired.

Makes 16

NOTES: You can also roll the mixture into balls, if preferred. Prepare your hands firstly with a generous amount of cooking oil before beginning, as the mixture is quite sticky (and may be hot!) You can buy edible gold dust  in decorating stores, or online (I bought mine from a cake decorating place on eBay)

Friday, May 18, 2012

Luke's Spicy Meatballs with Plum Sauce


My neighbours have a herb garden. I know this because sometimes when I go out to hang my washing, the most divine aromas waft towards me from their yard. There's a small patch they have by the fence and often I can smell they have been freshly clipped, undoubtedly for an addition to some delicious meal. I admit to having thoughts of jealousy and being tempted to nick a bit. It conjured up some lovely memories I made with my brother Peter about 20 years ago. As little kids, 4 and 6, we would duck through the neighbour's fence and pilfer strawberries from the old woman's garden. She was too decrepit to tend to it, but a large crop of strawberries thrived there every year, surrounded by a dome of netting. They were safe from the birds and so grew big and luscious, but they were far from safe from ravenous thieving little mouths and grubby hands such as ours.
I thought about how awesome that memory made me feel and then decided it wouldn't have half the thrill at the age I am now. Sigh.
My husband and I attempted a patch of our own, but it seems we have everything but green thumbs. There is always some critter that beats us to the delicious herbs we plant, and never quite enough to go around. Is there anything quite like fresh herbs? Well, I would say that Gourmet Garden's herb pastes come pretty darn close, and are super handy to have sitting in the fridge for when the caterpillars have curled up to live in all your fresh basil leaves (Don't get me started).
As part of Gourmet Garden's Cook Off, I have created or adapted a series of recipes to blog about to showcase the versatility of their herb pastes, and hopefully to shed a little inspiration to my readers.
I held a five course Gourmet Garden Dinner Party to celebrate my quarter-of-a-century birthday that hit on the 19th of this month. I invited my board of delightful reviewers and taste testers (aka the guinea pigs/ In-laws) and we had a delightful feast. I hope you enjoy the visual banquet as we had it, and get the opportunity to try a few for yourself sometime.


Course 1:

LUKE'S SPICY MEATBALLS WITH PLUM SAUCE (A Luke Original)

700g beef mince
2 tsp. Gourmet Garden hot chilli paste
2 tsp. Gourmet Garden coriander paste
2 tsp. lemon juice
1 tsp. Gourmet Garden garlic paste
1 tsp. garam masala powder
salt and pepper to taste
3 eggs

Place all ingredients in a large bowl. Mix thoroughly until well combined. Roll into walnut sized balls, and fry until cooked through. Serve alone or with plumb sauce.

Makes approximately 30 meatballs

PLUM CHILLI SAUCE

1 tsp. Gourmet Garden Hot Chilli paste
 1/2 cup plum sauce

Combine the chilli with the plum sauce in a small bowl.
Stir to combine. Serve with hot meatballs.


Silky Thai Sweet Potato Soup


For our Gourmet Garden Blog Off dinner party, we had a sublime Thai inspired sweet potato soup for the entre. I had invented this previously but with the simple addition of coriander powder, but when I was sent the delectable Thai Paste via Gourmet Garden, I knew I just had to try it in this silky soup.
This soup is all about textures and subtle flavours. It's an exquisite feast for the senses and is not to be eaten in haste, but relished and savored so as to experience all the flavours that come through along with the satiny smooth consistency. In addition to the soup, we enjoyed home made Garlic Bread Knots, hot from the oven and spread with butter, which tied in magnificently with the other flavours. Does food get any better? There's nothing quite like a delicious soup paired with hot, home made bread.


Course 2:

SILKY THAI SWEET POTATO SOUP (A Louise Creation)

2kg sweet potato, peeled and cut into chunks
600ml coconut cream
4 cubes of dry chicken stock (I use OXO brand)
2 tbsp. Gourmet Garden Thai paste
1 cup hot water
salt and pepper to taste (optional)
fresh or ground coriander to garnish (optional)

Peel the sweet potato and cut into large, rough chunks. Place in a large saucepan and fill the pot to the 3/4 mark with water. Place over high heat until the sweet potato is tender when pierced with a knife.
Drain away the liquid, and place the sweet potato in a large bowl.
In a small bowl, place the crushed dry chicken stock with the boiling water and stir until dissolved.
Stir the coconut cream until well combined and thick. Add to the sweet potato, along with the thai paste and chicken stock liquid. Blend with the electric beater until well combined. Taste and season with salt and pepper if desired.
In batches, blitz in a food blender until a silky smooth consistency is reached. Return all soup to the pot and reheat. Serve with coriander as a garnish, if desired.

Serves 8-10 as an entre.


Herb & Garlic Bread Knots

 We enjoyed these lovely, fresh and hot out of the oven garlic and herb bread knots as an accompaniment to the Thai Sweet Potato soup for our second course of our Gourmet Garden dinner party. They are best eaten straight out of the oven and lathered in butter, and dipped into that silky goodness we had as an entre.


An accompaniment to Course 2:

HERB AND GARLIC BREAD KNOTS (adapted from Swapna's Cuisine)

DOUGH:

3 cups bread flour
1 tbsp. sugar
2 tsp. dry yeast
1 1/4 salt
2 tbsp.oil
1/4 cup milk
1 cup lukewarm water

GLAZE:

3 tbsp. Mediterranean seasoning or selection of mixed herbs
1 1/2 tsp. Gourmet Garden Garlic paste
2 tbsp. seasoned olive oil

Place flour, sugar, yeast and salt in a large bowl. Stir to combine, and then add the oil, milk and water. Mix the ingredients with your hand until a dough forms. Kneed the dough for 8-10 minutes with your hands in the bowl until the dough is soft and pliable, and forms a ball. Brush a little oil over the surface of the dough and place in bowl. Cover with plastic wrap and sit for 1 hour until it has doubled in mass.
Take the dough and make into ten even portions. Roll each piece into a ten inch long rope and tie a knot in the middle. Take the end laying above the knot and fold it underneath and back into the centre. Take the end underneath the knot and fold it over the top and into the knot centre. Place on lined baking trays and cover with a clean tea towel for a further 45 minutes until puffy.
Preheat the oven to 175C. Combine the ingredients for the glaze. Brush over the tops of each roll with a pastry brush. Bake until lightly browned, approximately 15-18 minutes. Served warm with butter.

Makes 10 rolls

NOTES: These rolls are best eaten on the day they are baked.

Beef and Red Wine Casserole

Wanting to appeal to the variety of different taste buds at our Gourmet Garden dinner party, I decided to go for two different main meals. One was the delicious Moroccan dish Aubergine Tagine, and the other was Beef and Red Wine Casserole for the meat-cravers among us. This is a Massey family favourite which I've adapted. I made it in the slow cooker and marinated the beef overnight to make the meat nice and tender. It was really delicious! The sauce is rich and hearty, thick with flavours of tomato and red wine, mushrooms and herbs.


Course 3:

 BEEF AND RED WINE CASSEROLE (An adapted Massey family favourite)

700g beef, diced
3/4 cup red wine (I used Merlot)
2 rashers bacon, diced (rind left on)
1 medium red onion, diced
2 cups sliced mushrooms
3 tbsp. flour
30g butter
1 3/4 cup water
1 heaped tbsp. tomato paste
2 cubes of beef stock (I use OXO brand)
1 1/2 heaped tbsp. Gourmet Garden basil paste
1 1/2 tsp. Gourmet Garden Thyme paste
1 1/2 tsp. Gourmet Garden oregano paste
1 level tbsp. Gourmet Garden Garlic paste

Place the diced meat in a zip lock bag. Add the wine and seal overnight in the refrigerator.
Drain the wine from the beef and set aside for the sauce.
Brown the beef and bacon lightly. Remove from heat and place in the slow cooker bowl. Cook the onion until softened and add to the beef. Brown the mushrooms and add to the beef.
Place the butter and flour in the hot saucepan. Cook, stirring, until well combined and golden. Take off the heat and gradually add the water and the reserved wine, stirring to form a smooth paste. Return to heat and add crushed stock cubes, tomato paste and herbs. Stir until thick and then pour over meat in slow cooker.
Cook on low for 8 hours. Serve over pasta or cous cous, garnished with fresh basil, parsley or oregano if desired.

Serves 6

NOTES: You can cook this meal without a slow cooker. Place all prepared ingredients in a casserole dish instead of the slow cooker bowl. Cover and cook in the oven at 180C for 1 1/2 hours. Marinating the meat over night is also optional, but we found it made the meat more tender and infused the meat beautifully.


Aubergine Tagine

Finally, a wonderful excuse hit me to take my wonderful red tagine down from it's nook in the kitchen corner. Moroccan has always been a favourite for us on those cooler night, and it certainly has been a cold May in Queensland! That combined with the fact that Gourmet Garden had sent me a variety of delicious herb and spice pastes was enough to get me looking for a wonderful main meal to whip up in this fabulous earthenware pot. We enjoyed this vegetarian dish as a meat-less alternative to Beef and Red Wine Casserole at our five course Gourmet Garden Dinner Party, and it was a big hit all around. It features a lovely combination of aromatic spices including cinnamon and turmeric and Gourmet Garden's very own garlic paste, coriander, and hot chilli paste. Paired with warm cous cous, this veggie packed meal was a real crowd-pleaser, and it's so healthy too.


Course 3:

MOROCCAN AUBERGINE TAGINE (Adapted from 500 Main Courses, Jenni Fleetwood, 2011)

1 medium aubergine, diced (1 cm cubes)
2 zucchinis, thickly sliced
4 tbsp. oil
1 large onion, sliced
1 tbsp. Gourmet Garden Chunky Garlic Paste
2 cups mushrooms, sliced
1 tbsp. Gourmet Garden Coriander paste
1 tbsp. cinnamon, ground
2 tsp. turmeric, ground
2 1/2 cups passata
1 heaped tbsp. tomato paste
1 flat tbsp. Gourmet Garden Hot Chilli paste
1/3 cup dried apricots, chopped
1 cup chickpeas, drained and rinsed
salt and pepper to taste
fresh coriander to garnish

Sprinkle salt over diced aubergine and zucchini. Set aside in a bowl for 30 minutes. Heat the grill on high and place the aubergine and zucchini on a tray underneath. Grill until tender and golden, turning occasionally to prevent burning, for about 20 minutes.
Meanwhile, heat the remaining oil in the tagine, or heavy based pot. Cook the onion and garlic until softened, stirring occasionally. Add mushrooms and saute until tender; then add the spices. Stir through for 1 minute until aromatic and well combined. Add passata, tomato paste and 2/3 cup water. Cover and cook for 10 minutes. Add the aubergine, zucchini, chickpeas and apricots and chilli paste. Cook, partially covered, for a further 15 minutes, adding a little extra water if the tagine becomes too dry. Serve with cous cous and garnish with fresh coriander if desired, and serve.
Serves 6


Lemon & Lime Basil Sorbet

 Truth be told, when the idea came up of making a palate cleanser as one of the courses for our Gourmet Garden dinner party, I wasn't sure where to position it in the order of things. I decided to place it at the end of the main meals, and to wean everyone of all  things savory before dessert was served (as the dessert to me, of course, is the be all and end all). I love my sweets. Any wonder I couldn't go on the herb blog-off without incorporating sweets into the deal?
My mother in law found this delightful and refreshing recipe in her ice cream maker cookbook. I adapted it a bit, as I ran out of lemons (where is a lemon tree when you need one? Oh wait. That's right, I kill everything I try to grow.) I used the few limes to make up the rest of the lemon juice required, so now it's citrus and basil sorbet instead of lemon basil sorbet. Which reminds me, lemon basil is incredible...If you ever happen to get your hands on some, its beautiful in both sweet and savory dishes. Don't ask what happened to my lemon basil plant, please.
You will love how refreshing this sorbet is and how wonderfully the fresh citrus flavours intermingle with the basil. Did I mention basil is my favourite herb? I cut some from the garden (practically the only leaves that had not become inhabited by my creepy crawly fiends) to garnish, and the smell lingered in the house for hours. So refreshing!


Course 4:

LEMON & LIME BASIL SORBET (Adapted from Cuisinart ice cream recipe book/manual)

3 cups water
2 cups granulated sugar
2 tbsp. lemon zest
1 tbsp. Gourmet Garden Basil paste
 pinch salt
2 1/2 cups lemon juice, freshly squeezed
1/2 cup lime juice, freshly squeezed

Place the water, sugar and zest in a medium saucepan, over a medium heat. When the sugar has dissolved, remove from the flame and set aside to steep for half an hour. Add the citrus juice and strain the mixture through a fine sieve. Discard the remnants caught in the sieve.
Set the juice aside in the refrigerator over night, or for 3 hours at least.
Pour mixture into the frozen ice cream bowl and follow the instructions for your ice cream maker. The sorbet should churn for about 15-20 minutes, or until it reaches desired consistency. Freezing for 2 or more hours will give a firmer consistency if desired. Remove from freezer 10 minutes before serving to thaw.
Makes 8-10 cups

NOTES: You can substitute the basil paste for 1 1/2 cups packed fresh basil leaves. Lime juice is also optional. 3 cups of lemon juice is just as good!


Chocolate Chilli Mousse Cups

Good things come in small packages, right? You will completely fall in love with this dessert made with Gourmet Garden's Hot Chilli paste. Paired with a smooth, velvety chocolate mousse, the chilli infused oil gives a warm kick at the back of your throat, making a delicious end to the meal on a cold night. Who would have thought that chilli would be such a delightful addition to a dessert? I made them in small shot glasses, because this mousse is super decadent and rich. It has hints of orange that are savored just before the warm surprise of the chilli hits, and the deliciousness of chocolate delights the whole way through. In one word it's scrumptious. It certainly was the grand, albeit petite, finale to an evening of gourmet herb and spice taste testing. You could sink into a hole of gluttony with this recipe. Beware.


Course 5:

CHOCOLATE CHILLI MOUSSE CUPS (Adapted from Taste.com)

300g good quality dark chocolate
3 eggs, separated
1/2 cup mild cooking oil
2 tsp. Gourmet Garden hot chilli paste
2 tsp. orange essence or 1 tbsp. Cointreau

Place oil and chilli paste in a small saucepan. Heat on low for 5 minutes and remove from flame. Set aside for a few hours to completely cool. When cooled, pour the infused oil through a strainer or sieve into another bowl. Using a teaspoon, mash the chilli that has been retained in the strainer so that some small fragments pass into the oil. Discard the rest of the chilli.


Melt the chocolate gently in a microwave proof bowl, checking and stirring regularly to ensure it does not burn.
Set aside to cool slightly. In a clean, dry bowl, beat the egg whites until firm peaks form. Add the yolks, one at a time, beating well after each addition until well incorporated. Gradually add the melted chocolate to the egg mixture, beating well until smooth. Add the oil gradually while beating, and lastly, incorporate the orange flavouring.
Place mixture in a piping bag and pipe into 12 small tumblers (I used disposable shot glasses) Serve chilled, decorated with chocolate curls.

Makes 12 shot glasses of mousse


Wish me luck! Judging is taking place on the 22nd of May 2012. Cross your fingers and toes for me!

Monday, May 14, 2012

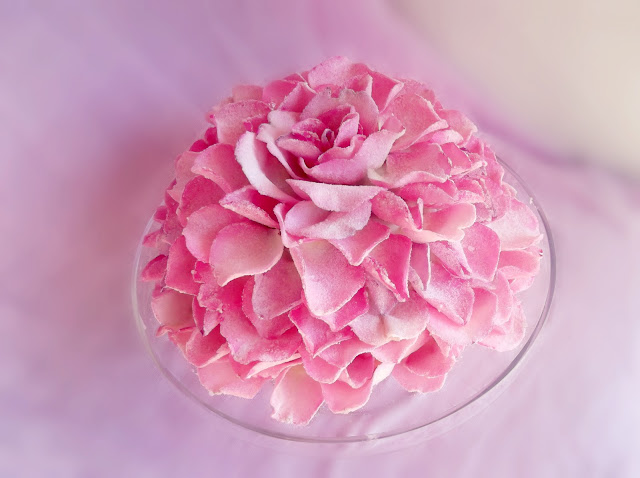
Giant Sugared Rose Petal Cake

When I think of all the things that got me interested in cooking, the first thing I think of is my mum. She claims to be a "basic" cook and doesn't think too much of her own meals, but she doesn't know her own worth or skill when it comes to the kitchen. She may not have had all the time in the world for fancy flourishes and trying new things constantly, but she is consistently great at what she does. And she was brave, letting a seven year old loose in the kitchen to cook from her head with all the ingredients she could wish for. Yes, that little child was me. I remember being so proud when my first creation came out of the oven. It was a spongy sort of cake compiled of lots of eggs and coloured sprinkles, baked in a slice pan. I believe it tasted solely of egg, and was probably sneaked into the bin after a few attempts to enjoy it, but I would never have known. It must have created an interest in me.
So here's one for the wonderful Mums in my life, for Mother's Day. I have been blessed with two: My mum Sue, and my mother in law Geraldine. (Now how many people can say they have a great mother in law?) They're the best mums a girl could have.


 I cheated a little with the cake making as I knew I wouldn't have the time to whip one up from scratch and decorate. So I used a packet butter cake recipe, coloured soft pink. I made it in a oven proof bowl to get a more domed shape, but the original cake was made in a regular spring-form cake tin, and looked pretty much the same. I liked the dome effect though, so if you have an oven proof bowl, try it! The measurements of this bowl were 10cm high, 18cm wide across the top lip. The finished cake is on a 25cm round cake stand.
It honestly took me about 4-5 hours to complete this cake with frequent interruptions in between. Make sure you have a child free morning or afternoon when you attempt it. Also, just a note about feeling discouraged. The cake doesn't look like a rose until the very end, so keep working on those rows and rows of petals. The final touches are so exciting and satisfying!
What does it taste like? Heaven. Imagine subtle hints of Turkish delight in every sugar coated, crunchy bite. Imagine rose water. They're surprisingly delicious, and the sugared petals also make pretty additions to cupcakes and other desserts, placed individually as decoration. Roses are edible of course, but be sure that your roses have not been sprayed with pesticides. Home grown roses are the best to use if you are unsure.


A special thanks to my husband, who brought me home roses and saw me tear the heads off and dismantle them with great gusto. You're a true gem.
GIANT SUGAR ROSE PETAL CAKE

1 bunch of pink roses (about 10 heads)
1 egg white
2 cups caster sugar
1 butter cake packet mix
1 tsp. pink food colouring
2 cups icing sugar
1/8-1/4 cup milk
1 tbsp butter or margarine, softened

Preheat your oven a advised on the cake box. Grease and line your cake tin (20x20cm) or oven proof bowl. Make the cake batter as directed in your recipe, or on the cake packet instructions. Add the pink dye to the batter and lightly swirl through.Scoop batter into the prepared tin.
Cook as directed. Cool on a wire rack before commencing the decorating.
Place the egg white in a small bowl and lightly whisk to break up the albumen.
Place the caster sugar in a shallow dish. Line several trays with paper toweling.
Very gently remove the stems from your roses, so that you have just the heads. You can either take the rose petals off individually or pierce the very bottom of the rose with your nail where it joins to the receptacle, removing all the petals at once. Discard any blemished, broken or bruised petals. The more open the rose, the better, as the further in towards the centre of the rose, the more curled and small the petals become.
With a pastry brush, smooth egg white over the whole petal, then coat in caster sugar. Lay the sugared petal on the paper toweling and repeat with the remaining rose petals. Any petals which are too curled at the edges, lay flat on their faces so that the curved edges are pushed flatter. A little curve is nice and gives definition, but too much can ruin the way the petals sit together on the cake. Leave all the petals to dry. (Depending upon weather conditions such as humidity etc, petals may vary in drying time. I set my trays on the stove with a little heat in the oven and they dried within the hour.)
Place the icing sugar in a medium bowl with the butter or margarine. Add enough milk to get a good icing consistency (the consistency of lightly whipped cream). Smooth carefully over the cake, creating as smooth a surface as possible.
Working from the bottom edge upwards, begin to place the petals on the cake, slightly overlapping each petal with the one besides it. Keep working your way around and around the cake in this manner. As you get towards the top of the cake, the petals will naturally start to stand upright and begin to form the shape of the middle. Work your way into the centre, continuing the previously mentioned overlapping. Place a single, more curled sugared rose petal in the centre to finish off the cake.