Showing posts with label bread. Show all posts

Monday, December 14, 2015

Slider Buns -Mini Burger Buns

I've been quite unwell the last 6 months, so I have refrained from doing any new projects. If you've noticed my lull, I appologise-new babies and health problems don't mix well with food blogging. With Christmas on the radar, I am back into cooking! So much of the mirth around Christmas time revolves about food, dinner tables shared with family and friends and an added emphasis on gourmet foods and drinks.
Recently we had a fundraising beer tasting session which I volunteered to cater for to raise money for St Philomena's School in Park Ridge. It's a blossoming little Catholic school where my eldest son is starting prep next year. (Yes, I'm feeling sad already!)
I made lots of scrumptious finger food and thought how well the same food might go at a Christmas party or gathering with friends on Boxing Day.
I did a quick poll on facebook about what foods people would like at the beer tasting, and slider buns came out on top. You know those adorable miniature hamburger buns you sometimes see in magazines and on blogs? Well I couldn't for the life of me find where to get hold of them  (apparently Coles sells them but I'm thinking that might be a grand old myth.)
Well they're the perfect entertaining bread roll. And I needed them.
So I made them from scratch and they were fabulous. Cute even.
Hubby cooked up a pork roast and we shredded it, and threw on a bit of lettuce with mayo for the centres too. Scrum-diddly-umptious!
They were a hit! The favourite of the night by quite a few accounts.
And just on a side note, the beer presenter and connoisseur Matt Kirkgard was nothing short of fabulous. If you ever get the chance to go to one of his tastings, run to it! I don't even like beer and completely enjoyed myself listening to him from the kitchen. It was fascinating and funny and everyone had a wonderful time.
So try out these gorgeous home made mini burger buns. They're perfect for entertaining and will be a big hit on your Christmas table for friends and family big and small. Merry Christmas!


SLIDER BUNS-MINI BURGER BUNS (adapted from Cook Republic)

7g dried yeast
250ml (1 cup) lukewarm water
400g bread flour, extra for dusting
1/2 tsp salt
2-3 tbsp. sesame seeds
1 egg, beaten

Preheat the oven to 250C and line and grease two cookie trays with non stick paper.
In a large bowl, combine yeast and water, and set aside until foamy, approximately 5-10 minutes.
Add the flour and salt. Lightly flour a clean surface. Gently mix the contents of the bowl, and dump this loose dough onto the prepared surface. Kneed for 10 minutes until soft and elastic and well incorporated. Roll the dough into a smooth ball.
Lightly grease a glass bowl and place the dough inside. cover with cling wrap and let it sit to rise for 30 minutes.
It should double in size.
Knock back dough and divide into 24 golf ball sized rounds. Roll them a little bit in your palms to get a nice shape.
Place them on the prepared trays with a generous gap between them to allow for spreading. Cover the trays with clean tea towels and allow them to double in size, about 10-15 minutes.
Beat the egg and blush this egg on the tops of each uncooked roll. Sprinkle with sesame seeds. Place in the preheated oven. Spay the bottom of the oven with water and cook for 10-12 minutes.
Serve warm with your choice of filling. You can also freeze these for 2 months.


Makes 24


Monday, October 27, 2014

Banana Raspberry Bread with Lime Cream Cheese Icing

When a dash of love is added to cooking, it is instantly transformed into something infinitely more palatable. I think real cooking is love-it's giving. When I say real cooking, I mean throwing a wad of 2 minute noodles into boiling water doesn't count. It must involve some effort, some portion of your time, some giving--as all love does require.
Just think about it-when you cook, you cook for friends, family, yourself. Often it's performed because you have to, because there are rumbling tummies and tiny (or big) wailing mouths. But even when it's done through necessity, it is done because you love those people. Some people cook for themselves, preparing amazing dishes, for the love of food. Others cook for the love of money, and so forth, but basically, good  food and love revolve around each other.
When I was studying teaching at University before I met my husband, I lived with two other girls in a quaint little townhouse on the skirts of Melbourne. We all fended or ourselves food wise, never cooking for anyone but ourselves as we all had varied schedules. We were three very different people, all living different lives, and looking back on how we ate doesn't surprise me. One held a part time job, and basically lived off 2 minute noodles, ice cream and those cream and jam filled sweet buns. The other was a student like myself and it was toast and bought sushi for her. I lived off 8 cups of coffee a day and various blends of pasta and jarred sauce. Ugh!
None of us loved food enough to bother to make any effort. We had no one to cook for and didn't even love ourselves enough to at least make an effort to eat healthily.
It was only when I met my husband that I started taking an interest in food, especially as he was a big fan of everything I made. It was such an encouraging thing that it became an addiction, and I couldn't keep my mind off food and what I was going to make for him the next time he visited. Well, I married that man, and I also simultaneously married my food addiction. Now I actually eat. And I actually get hungry. And I limit myself to one coffee a day, just to kick start me in the morning. Jarred pasta sauces are not off limits, but used sparingly, only for those wild and woolly days, where you get to the end of the day looking like you were just thrown out of a hurricane and the kids are literally ripping the hair out of your head. I love my family too much to do that to them regularly-but sometimes, necessity calls for quick and fuss free!
Well, this banana raspberry bread with lime and cream cheese icing is certainly made with love, time and thought. I love how all these flavours come together to make for a delightful treat for the senses-the sweet moistness of the banana, the slight tart accents of raspberry, the creaminess of the cream cheese icing with a zingy hint of lime zest.We couldn't get enough of this delicious cake! The icing really was what took it up several notches, and I almost wish I had made more icing! If you're a big fan of cream cheese icing, you could double the icing recipe and cover the whole top of the bread. You will not regret it!


BANANA RASPBERRY BREAD WITH LIME CREAM CHEESE ICING (A Lick the Spoon Original)

6 tbsp butter, room temperature
1 cup brown sugar, lightly packed
2 eggs
4 mashed bananas
1 cup Self Raising flour
1/4 level tsp bicarb. soda
pinch of salt
1/2 cup frozen raspberries
50g cream cheese, room temperature
1 tbsp lime juice
1/4 cup icing sugar
1 tsp lime zest, finely grated

Preheat the oven at 180C. Line a loaf pan with baking paper and set aside.
In a medium bowl, beat the butter and the sugar until light and fluffy. Add the egg gradually, beating well between additions. Add the mashed banana and beat again.  Add the flour, bicarb soda and salt and stir through until well combined. Lastly fold in the raspberries.
Bake in the oven for 1 1/4 hours until nicely browned on top. Cool in the pan for 20 minutes or so before gently removing and placing on a wire rack.
To make the icing, beat the cream cheese, lime juice, icing sugar and zest together in a small bowl until smooth. You may add a little more icing sugar if you prefer the consistency to be thicker, or a little more lime juice if you find it too thick.
Pipe or spread over the top of the cooled bread before serving.

Makes one loaf.


Tuesday, October 29, 2013

Best Ever Banana Bread

When I was a kid and heard the phrase "no flies on him", I just presumed the person spoken about had good personal hygiene and didn't smell like a garbage can. It's interesting that people frequently associate bad smells with flies, and I suppose flies generally are attracted to the grosser things in life. That's why I was a bit surprised that when my house filled with the heavenly aroma of this banana bread baking in all its golden glory, flies flocked to the fly wire over the windows, trying to find a way inside. The whole house was filled with the most delicous banana and cinnamon smells as that banana loaf cooked away.
Its by far the best banana bread recipe I've ever tried. It's golden on the outside, the crust sweet and slightly crunchy on the outer. The bread itself and moist and giving, the perfect texture and is well balanced in flavours--the banana-ey goodness, the spice of the cinnamon, the sweeter outer crust. Its glorious served warm with a slathering of butter--or even made decadent with the addition of cream cheese icing. I myself decorated the top with fresh banana slices before it went into the oven, and it came out looking like cafe style banana bread. It got thumbs up from all family members...I wonder if it would have got such high reviews if my husband had known that I used his shirt as a backdrop in the photos? Ha!


BEST EVER BANANA BREAD (Adapted from All Recipes)

1/2 cup butter
1/2 cup brown sugar, packed
1/2 cup white sugar
2 eggs
4 over ripe bananas, mashed
1 tsp vanilla essence
2 tbsp milk
1/2 tsp bicarb soda
1 1/2 cups Self raising flour
1 tsp cinnamon
1 extra banana for decorating, optional

Preheat your oven to 190C. Greae and line a loaf tin.
In a large bowl, place the butter and the sugars and beat with an electric mixer until light in colour. Add the eggs one at a time, beating well between additions. Add the mashed banana and vanilla and mix until combined. In a cup, mix the milk with the bicarb soda, and add the flour and this mixture alternately to the main bowl, mixing until just combined. Add the cinnamon are stir through the batter.
Pour into the lined and greased loaf tin. Place slices of the extra banana on the top of the batter, and place in the oven. Bake for 45 minutes, or until the cake springs back when touched in the centre. Cool before removing from the tin.

NOTES: I doubled this recipe and got a hightop loaf and 12 good sized muffins.


Sunday, June 16, 2013

Cinnamon Pumpkin Pull Apart Bread

I'd like to think I'm a risk taker. But in reality, I'm probably not at all. I think using pumpkin puree in a sweet bread sounds risky, almost too risky for me. Here in Australia, pumpkin isn't used as a sweet--but I know that Americans are quite used to the idea of serving pumpkin pie as a dessert.
Pumpkin certainly does have that sweet element, but to me it's still a veggie and it would never cross my mind to use it in anything but a savory dish.
So I stepped right out of my comfort zone with this month's Secret Recipe Club reveal and made Cinnamon Pumpkin pull-apart bread with a delicious caramely glaze. It was amazing and I was ever so pleasantly surprised by how beautifully all the flavours came together and the lovely soft texture of the bread itself. It consists of soft folds of sweet bread paired together with cinnamon sugar, sweetened by the deliciously sticky glaze. (I think I made my glaze a little thick, and would probably thin it next time. I also mucked up the cutting and stacking of the dough process so mine doesn't look quite as pretty as it might have if I had paid more attention to the recipe. Still tasted great though...sometimes looks aren't everything he he--says the woman blogging in her pj's with hair all amess.)
The recipe was discovered on Mommy's Menu, and this wonderful blogger is a stay at home mummy of seven little people. Amid all the business every day life presents for us stay at home mums, she still manages to cook up and blog some pretty amazing affairs! Bravo! Lets hope I'm still blogging and cooking up amazing things when I have seven!


CINNAMON PUMPKIN PULL APART BREAD (Adapted from Mommy's Menu)

Bread:

2 tbsp butter
1/2 cup milk
2 1/4 tsp dry yeast
3/4 cup pumpkin puree
1/4 cup sugar
pinch salt
2 1/2 cups plain flour
Extra flour for kneading and flouring surface

Filling:

1 cup brown sugar
1 heaped tsp ground cinnamon
pinch ground ginger
pinch ground cloves
3/4 tsp ground nutmeg
2 tbsp butter, melted

Glaze:

2 tbsp butter
2 tbsp brown sugar
1 1/2 tbsp milk
1/2 tsp vanilla essence
3/4 cup icing sugar


To make the bread, in a large bowl, combine the butter and the milk. Microwave until the butter has melted, then set aside to cool until just warm. Add the yeast and set aside for 10-15 minutes to proof. The mixture will begin to foam when ready.
Add the puree, sugar and salt and stir to combine. Gradually add the flour 1/2 a cup at a time, mixing until well incorporated. Knead the dough with your hands for 6 minutes, adding 1 tbsp of extra flour at a time if too sticky. The dough should end up just slightly tacky by the end of the kneading, and be smooth and elastic.
Lift the dough from the bowl and spray with a thin layer of cooking oil. Replace the dough and cover. Set aside in a warm place to rise for 60-90 minutes, or until doubled in size.
Meanwhile, to make the filling, place the brown sugar, cinnamon, ginger, cloves and nutmeg together in a bowl. Mix until well combined.
When the dough has risen to twice its original size, turn it out onto a floured surface and punch it down with your fist. Knead for 2 minutes, then roll out into a 20x12 inch rectangle. Brush the surface with the melted butter, then evenly sprinkle on the prepared sugar and spice filling.
Using a pizza cutter or smooth bladed knife, cut the dough into 36 squares (6 rows horizontally by 6 rows vertically)  Stack the squares of dough three high, so you end up with 12 stacks of 3. Stack the piles of dough vertically in a 9x 15 loaf tin. Cover the tin with a clean tea towel and set aside to rise for 30-40 minutes.
Meanwhile preheat the oven to 180C.
Once the dough has risen, bake for 30-40 minutes until a deep golden brown. Remove and cool for 10 minutes before turning out on a wire rack to finish cooling.
To make the glaze, place the butter, brown sugar and milk in a saucepan. Bring to the boil, then remove from heat. Stir in the vanilla and the icing sugar to form a paste, then pour over the cooled bread. Serve.

The first stages of the bread making: melted butter and warm milk with the yeast form a foamy substance when left to sit for a while. Addition of puree and flour make a soft dough.

More flour is added little by little to make the dough less sticky, and it forms a smooth ball. It is left to rise and then is turned out onto a floured surface, punched down and lightly kneaded before rolling out.

A slathering of butter then covers the dough and a mixture of sugar and spices is evenly spread on the surface. The dough is then cut into rectangles, stacked in the tin and left to rise. Then it is cooked, and drizzled with a glaze when cooled.


Monday, May 20, 2013

One Hour Coffee Cinnamon Scrolls

It's a chilly wind that blows here today. There are few things that I enjoy more on days like this than baking bread and having that heavenly scent fill the house. But being a busy mum, it's sometimes hard to get time to fully enjoy the process of bread making, because it can span over the best part of the morning or afternoon and get in the way of other household duties. That's only one reason why I love this recipe--it only takes one hour of your time from the very first addition to the clean bowl to the removal from the oven. One hour! And only 10 minutes of that is kneading time, so I don't think we can complain too much there, especially if you have a mixer that will do the job for you. I don't--I don't think I would feel I had really made the bread if I hadn't done some of the kneading by hand.
I halved the original recipe and it still makes oh so many delicious scrolls! There's only one problem--the original recipe calls for three eggs, so halving the recipe means dividing one egg in half. I don't know if the half egg makes much difference or not, but I've never had any qualms about dividing an egg and throwing half of it down the plug hole. Maybe if you have extra large eggs you could just use the one (as I have stated in the recipe). It's up to you--skip the half egg or add it, or make the entire amount and dally out the delicious sticky loot among your friends (there's no way one family can get through the amount the original recipe makes, as these are best eaten on the day of making).


ONE HOUR COFFEE CINNAMON SCROLLS (Adapted from Valley Ridge Recipes)

DOUGH:

1 3/4 cup warm water
1/3 cup granulated sugar
1/4 cup oil
3 tbsp. dry yeast
1 1/2 tsp salt
1 extra large egg (alternately 1 1/2 regular eggs)
5 1/2 cups plain flour

Place the water, sugar, oil and yeast in a large bowl and mix together. Let this mixture stand for 15 minutes.
Then add the salt, egg and the flour. Mix together into a soft dough and knead for 10 minutes, adding a little more flour if necessary so it does not stick to your hands. Lightly oil the bottom of the bowl, and let the kneaded dough sit in there for 10 minutes.
Lightly cover your work area with a little oil. Place the dough on this prepared surface and roll out into a rectangle about 1 cm thick.

CINNAMON FILLING:

1/2 cup granulated sugar
2 tbsps cinnamon
1/4 cup butter, melted

Heat the oven at 200C.
Combine the sugar and cinnamon in a small bowl until well incorporated. Brush the melted butter over the surface of the rolled dough, and evenly sprinkle with the cinnamon sugar. Firmly roll the dough into a roll beginning with the long side. Cut the dough into 12 even portions. Arrange neatly on a lined baking tray about 2-3 cm apart from each other. You can let them sit and rise a little for 10 minutes if you want, or put them straight in the preheated oven. Cook  for 12-15 minutes until very lightly browned on top. Remove and cool on tray.

COFFEE ICING:

1-2 tbsp instant coffee
boiling watericing sugar
2 tbsp thickened cream

In a small bowl, place the instant coffee granules with enough boiling water to dissolve it, about 2 tablespoons. When dissolved, stir through 1/4 cup icing sugar and the cream. Gradually add more icing sugar until you reach a desired consistency. Some people prefer it thick, but I like mine a bit runny. Add water if necessary until it is the way you prefer. Drizzle over the cooked scrolls and serve.


Sunday, March 31, 2013

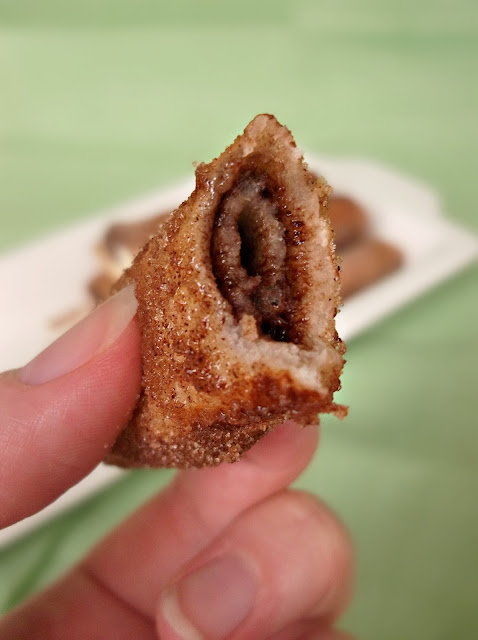
Nutella French Rolls with Cinnamon Sugar

It's been a little quiet around here. I'm always suspicious of silence. I find myself floating, floating, feeling relaxed, and then I think "what the heck is happening? It's actually quiet. Something's up!" Well that's the way you have to think when you have kids. You go and check what they're up to and nine out of ten times they're doing something they shouldn't be doing, like stuffing crayons up each other's noses.
It's a crazy time of the year and nothing should be this quiet. So today I am sharing with you a total gem of a recipe. I'm almost loathed to share it. It's sort of one of those wow recipes that requires absolutely no effort or skill in anyway, and has people wondering how you made it. Once the secret is out however it's a no-brainer. It's so easy and so delicious, you wont be able to stop at one. And the sky's the limit when it comes to filling choices. Here we have nutella filled french toast rolls coated in a delicious golden layer of cinnamon sugar. Imagine them oozing with caramel or strawberry jam? Talk about the perfect breakfast in bed!


 NUTELLA FRENCH TOAST ROLLS WITH CINNAMON SUGAR  
(Adapted from Cinnamon Spice and Everything Nice)

10 slices soft white bread
10 tsp nutella
1 large egg
1 1/2 tbsp milk
1/2 cup caster sugar
1 heaped tbsp ground cinnamon

Remove the crusts from the slices of bread. Discard the crusts.
Take each piece of bread and roll flat with a rolling pin.Spread each piece of flattened bread with one teaspoon of nutella, in a portion measuring about one inch wide and the length of the bread, one inch from the edge of the bread. Roll the bread up tightly.
In a shallow dish, combine the egg and the milk and whisk to combine the two and break down the egg. In another shallow dish, combine and the sugar and cinnamon.
Heat a little butter (or oil) in a frying pan. Dip each roll briefly in the egg mixture until well coated, and then place in the hot frypan. Lightly fry until golden-brown all over, then roll in the cinnamoned sugar. Serve immediately.

Makes 10

Friday, March 22, 2013

Glazed Raspberry Swirl Scrolls

Oh dear...there is no turning back now.  For one, you've stumbled across this page. For another, if you're anything like me, this is enough to make you baking crazy. I can't stop making bread!
This is a really fun recipe and a total crowd pleaser. Well, I would have been a bit happier if I had taken these easy raspberry scrolls from the oven a little earlier, they would have been less dry, but that was my fault and not the recipe. My house smelled like a bakery and I swooned around in it for several hours and wished it to always smell that good. Where was my husband to see these new found baking skills and smell his house when he should have? At work. And that's where these beauties got shipped off in the morning, after a wee taste test. Okay, I stashed a few away in the freezer, because this recipe's great like that. Got to love things that freeze well! But of course there's nothing quite like a fresh raspberry swirl roll, warm from the oven, drizzled in a little bit of delicious glaze...


GLAZED RASPBERRY SWIRL SCROLLS (Adapted from Sally's Baking Addiction)

Dough:
1 cup milk
2/3 cup granulated sugar
1 1/2 tbsp active dry yeast
1/2 cup butter, room tempeature
2 large eggs
pinch salt
4 1/2 cups plain flour, plus extra for dusting

Filling:
2 cups frozen raspberries (not thawed)
1/4 cup heaped granulated sugar
1 tsp corn flour

Glaze:
1 cup icing sugar
3 tbsp cream

To make the dough, warm the milk in a bowl in the microwave until lukewarm (about 35C to be precise).
Add the sugar and the yeast and stir to combine. Cover with a clean tea towel and set aside for 5-10 minutes or until the mixture has become puffy or foamy.
When the yeast mixture reaches foaminess, add the softened butter, eggs and salt to this mixture. Using a flat bladed knife gradually stir the flour into this mixture until well combined, and it forms a soft dough. Use your hands to combined the dough more thoroughly until it forms a ball.
Turn onto a well floured surface and knead for 10-12 minutes. Lightly grease a glass bowl, and place the dough in a ball shape inside. Cover with a clean tea towel and set aside in a warm place for 1-2 hours or until doubled in size.

With baking paper, line a 9x13 inch baking tray, with longer edges on the sides.
With a measuring tape, mark out a 10x 24 inch rectangle on the work bench, and cover this area in flour.
Turn the risen dough onto the floured surface. Evenly roll the dough in this area until it fills the floured space. Trim any uneven edges, so you have straight, even rectangular rolled dough.

In a medium bowl, combine frozen raspberries, sugar and corn flour.
Evenly sprinkle this mixture over the entire surface of the dough until covered. Take the long side of the dough and tightly roll the dough to form a 24 inch log. Cut this log into 16 even portions, about 1.5 inches wide each. Neatly arrange these rolls in the prepared tray, cut side up. Cover the tray with a clean tea towel and place in a warm area for 2 hours until puffy and well risen. (You can also cover the scrolls at this stage and leave them at room temperature overnight, and bake in the morning.)

Half an hour before the end of the rising time, preheat the oven to 200C.
When the two hours has passed since covering the cut rolls, bake in the preheated oven for 25 minutes or until the berries are bubbling and the dough begins to turn golden.
Remove from the heat and cool for 15 minutes before serving with a drizzling of glaze.

To make the glaze, combine the icing sugar and cream in a small bowl and combine thoroughly, until it forms a smooth paste. You can add more icing sugar to thicken it, or more cream to thin it, depending upon your preferences. Drizzle over your cooked scrolls, and enjoy!

NOTES: Baked and unglazed rolls can be frozen for up to 1 month, and warmed to enjoy later stage.
Makes 16

Foamy Yeast, Mixing dough with knife, and kneaded dough in oiled bowl
Dough risen after two hours and placed on floured surface. Dough being rolled flat. Raspberry mixture being made and spread evenly over dough surface. Dough being rolled with filling inside.
Rolled and filled dough being cut. Portions being arranged on tray. Scrolls during rising, and then when risen enough. Scrolls just out of oven.


Tuesday, March 19, 2013

Indian Roti Bread

 You know that feeling, when you start cutting out sugar? It feels like you won't live another day without it, and if you do, you'll be pining for it all of the next day. Well, I haven't been cutting out sugar, but I've been reducing it, and I'm not craving it so much any more. Don't worry, once Easter hits, my body with thaw from this sugar-free stupor and need chocolate again. And all those gooey, gory delightfully chocolate dripping desserts and sweets will be flowing freely again on the blog. But in the mean time, I've been entertaining my more savory side. I don't think I really have a flare for the savories.  When I see my husband in the kitchen cooking up a storm, it makes me feel inadequate when it comes to savories. He has a creative eye for savories and I have a creative eye for sweets I suppose. Here he was the other night cooking up Bajis and Rogan Josh like a pro, and I just knew I had to add my two cents. So I made Roti bread, and it was most satisfying. There are several different types of Indian bread that can be served with curries and the likes--naan bread, roti and chapati. Roti is flatter and less bready than naan bread, and chapati I believe are a flatbread much like roti (I'm not sure what the difference is). What I do know is roti is a lovely in-between sort of bread, and can be used like wraps as well, filled with curry or whatever you may desire.


INDIAN ROTI BREAD (Adapted from Cooking Curries, Murdoch Books)

1 1/2 cups plain flour, plus extra for dusting
1/2 tsp salt
1 tbsp softened ghee or oil (I even used butter)
1 egg, lightly beaten
1/2 cup warm water

Sift the flour in a large bowl and add the salt. Rub in the ghee or oil with your fingers. Add half of the beaten egg to the bowl, reserving the rest of the egg for later. Add the warm water and mix together with a flat bladed knife, such as a butter knife, until you form a moist dough.
Turn out onto a well floured surface and knead for 10 minutes, or until you have a nice soft dough, adding flour as needed to keep from sticking to your work surface.
Form this dough into a smooth ball and brush with oil. Place this dough in the bowl and cover with a clean tea towel for 2 hours to rest.
Lightly flour the work surface again, and turn out the rested dough. Form into a log and divide into 6 even pieces. Roll into even sized balls. Take each ball, and working with a little oil on your hands, hold the dough up and stretch the edges out evenly until a 2mm x 15cm round is formed. Lay on a lightly floured surface and cover with plastic wrap so that it doesn't dry out, and proceed to do the same with the rest of the pieces of dough. 
Heat a large frying pan on high and brush with some oil or ghee. When hot, gently lower one of the stretched rounds onto the fry pan. Brush teh top side with remaining beaten egg. Cook for approximately 1 minute on each side until slightly golden. Transfer to a plate and cover to keep warm, then proceed to cook the other rotis in the same way.

Makes 6


Monday, March 18, 2013

Lemon Curd Stuffed Doughnuts

I've been dreaming of home made bread. Casseroles and stews cooking all day in the slow cooker, issuing a pungent, herby smell. Puddings. Risottos. Soups with hot garlic bread. All those things which feel so good on a cool Autumn or Winter night. Did I mention home made, custard filled doughnuts in that reverie? Or better yet, warm, fresh out of the oven homemade doughnuts filled with lemon curd.
Okay, I waaaay overdid it on the sugar coating part, and mine didn't come out as pretty and professional looking as Annie's from Annie's Noms from the Secret Recipe Club did. But it was fun and seriously, it was on a par with (what I imagine) dying and going straight to heaven (is like), sinking my teeth into the first hot doughnut out of the oil. I admit, there was a little trial and error involved. First of all I made a large doughnut and didn't wait long enough for it to cook through. It looked so perfectly golden so I took it out of the oil (too early) and the centre was still doughy. I figured my oil was too hot. After some trialing and lowering the oil temperature, I came up with some super yummy, cooked through doughnuts and filled the centres with lemon curd. I used my own lemon curd recipe because I knew that would make too much, and I'm such a sucker for lemon curd on croissants. Listen up! Croissant tutorial coming next week! Keep your eyes peeled!


LEMON CURD STUFFED DOUGHNUTS (adapted from Annie's Noms)

Doughnuts:

7g packet dry yeast
2 tbsp warm water
3 1/4 cups plain flour, plus extra for dusting
1 cup milk
1/2 cup butter, room temperature
3 egg yolks
2 tbs caster sugar, plus extra for rolling
oil for frying

In a small glass, add the yeast and water together and combine. Sit aside for 5 minutes until it becomes foamy. Meanwhile, in a medium bowl, sift the flour, then add the milk and butter, sugar and yeast mixture. Mix for 2 or 3 minutes until a soft dough forms and the ingredients are well incorporated. Form into a ball. Lightly flour the bowl and the top of the dough and place it back in the bowl. Cover with a clean tea towel and leave to rise in a warm place for 1 1/2 hours. The dough should double in size.

Meanwhile make the lemon curd. (recipe below)

Once the dough has risen, turn it onto a lightly floured work surface. Roll it into a 2-2 1/2 inch diameter log. Cut the dough into ten 2 inch pieces. Shape each piece into even rounds and place on a lined tray. Set aside to proof for 1/2 an hour.
Heat 2 1/2 inches of oil in a small saucepan to about 180C. (you may have to adjust the temperature over time to a lower setting depending on the thickness of your doughnuts. If they are nice and golden on the outside and still doughy inside, reduce the oil heat).
In a small bowl, place about 1/2 a cup of caster sugar. You may have to top this up over time, as the dipping of the doughnuts can cause some clumping after a while.
Set up a wire cooling rack topped with paper towel just beyond the bowl of sugar for placing the hot sugar coated doughnuts.
When the dough has proofed, it should feel slightly wobbly. Drop the first doughnut into the oil and cook at a low heat until nicely golden. Turn the doughnut and cook the other side in like manner. Each side should take from 1-2 minutes. The cooked through doughnuts should sound light and slightly hollow when tapped.
Remove the cooked doughnut from the oil with a slotted spoon and immediately roll in the sugar bowl until coated. Place on the cooling rack.
Repeat this process with the remaining uncooked doughnuts.
When cool enough to handle, take a knife and poke a hole into the side of the doughnut and twist a little to make a hole.
Fill a piping bag with the lemon curd, set with a long nozzle that will fit into the hole. Fill the doughnuts until the curd appears on the outside of the doughnut. Serve and enjoy!
Store any remaining doughnuts in an airtight container.

Best Lemon Curd:

(This recipe makes twice as much curd as is needed to fill the doughnuts. However, it is difficult to halve the recipe due to it requiring three egg yolks. But if you're like me, you'll use the rest on toast, croissants and through other desserts! YUM!)

1 cup caster sugar
1/2 cup cornflour
1/2 cup (125ml) lemon juice
1 1/4 cups water
2 tsp finely grated lemon rind
3 egg yolks
60g butter or margarine

Combine the sugar and cornflour in a medium saucepan. Gradually add the lemon juice and water while stirring continuously until mixture is smooth. Place saucepan over medium heat and cook, stirring, for 3-4 minutes or until mixture boils and thickens. Reduce heat to low and cook, stirring, for 30 seconds. Remove from heat. Add the lemon rind, egg yolks and butter. Continue stirring until the butter has melted and mixture is well combined. Remove from heat and set aside to cool.


Anything that leaves a trail of sugar has to be good!

Friday, May 18, 2012

Herb & Garlic Bread Knots

 We enjoyed these lovely, fresh and hot out of the oven garlic and herb bread knots as an accompaniment to the Thai Sweet Potato soup for our second course of our Gourmet Garden dinner party. They are best eaten straight out of the oven and lathered in butter, and dipped into that silky goodness we had as an entre.


An accompaniment to Course 2:

HERB AND GARLIC BREAD KNOTS (adapted from Swapna's Cuisine)

DOUGH:

3 cups bread flour
1 tbsp. sugar
2 tsp. dry yeast
1 1/4 salt
2 tbsp.oil
1/4 cup milk
1 cup lukewarm water

GLAZE:

3 tbsp. Mediterranean seasoning or selection of mixed herbs
1 1/2 tsp. Gourmet Garden Garlic paste
2 tbsp. seasoned olive oil

Place flour, sugar, yeast and salt in a large bowl. Stir to combine, and then add the oil, milk and water. Mix the ingredients with your hand until a dough forms. Kneed the dough for 8-10 minutes with your hands in the bowl until the dough is soft and pliable, and forms a ball. Brush a little oil over the surface of the dough and place in bowl. Cover with plastic wrap and sit for 1 hour until it has doubled in mass.
Take the dough and make into ten even portions. Roll each piece into a ten inch long rope and tie a knot in the middle. Take the end laying above the knot and fold it underneath and back into the centre. Take the end underneath the knot and fold it over the top and into the knot centre. Place on lined baking trays and cover with a clean tea towel for a further 45 minutes until puffy.
Preheat the oven to 175C. Combine the ingredients for the glaze. Brush over the tops of each roll with a pastry brush. Bake until lightly browned, approximately 15-18 minutes. Served warm with butter.

Makes 10 rolls

NOTES: These rolls are best eaten on the day they are baked.

Thursday, April 5, 2012

Giant Rustic Hot Cross Bun (re-post)


I doubt that our neighbours cook very much. "What are you burning now?" has resounded angrily from one particular house more than once. I often hear them talking of buying pizza or KFC for dinner, and the kids protesting because they're sick of it. No matter--each to their own. But how nice it is to come home to a delicious aroma issuing down from the kitchen through the garden! I love walking down the street and on occasion coming across some delightful baker's house issuing strong smells of hot vanilla muffins or a great BBQ on a summer afternoon. Unfortunately its not something you come across all that often. Imagine how great the villages a hundred years or so would have smelled! Fresh bread baking every morning from every house! Ahhhhhh bliss.
I don't think much beats the scent of freshly baked bread. My brother used to bake bread and it was simply to die for when it came out of the oven, with a slathering of butter--it was all too good. I have the best memories of his bread, and I shall soon bribe him for the recipe and perhaps a cooking class on how to get it so incredibly delicious and irresistible.
In the mean time, I try a few things when I have the time to try and replicate that fresh bread smell. Here's a great one for Easter morning...its great toasted with butter too!


GIANT RUSTIC HOT-CROSS BUN (adapted from taste.com)

200lm milk
1 tsp caster sugar
7g sachet dry yeast
400g SR Flour
2tsp ground cinnamon
1/2 tsp ground nutmeg
1 tsp salt
50g brown sugar
175g mixed dried fruit
50g butter, melted, cooled
1 egg, lightly beaten
2 tbs plain flour
2 tbs caster sugar, extra

Heat the milk in a saucepan over a medium heat until lukewarm. Combine the caster sugar, yeast and 100g flour with the warm milk in a bowl and stir until smooth. Cover with a clean tea towel and leave in a warm place for 25 minutes.
Grease a 18cm spring form pan.
In a large bowl, sift together cinnamon, nutmeg, remaining flour and salt. Stir in the brown sugar and dried fruit, then add the yeast mixture, egg and cooled melted butter. Bring the mixture together with your hands, kneading for 2-3 minutes until combined. Transfer to a lightly floured surface and knead thoroughly for 5-6 minutes or until you have a smooth dough. Shape the dough into a round and place in the pan. Set it in a warm place, covered with a clean tea towel, for 1 1/2 hours. The dough should ride to just above the rim of the pan.
Preheat the oven to 200C.
For the cross decoration, combine the plain flour with 2 tablespoons of cold water and stir into a paste. Pipe a cross onto the uncooked bun just before placing in the oven. Bake for 30-35 minutes until cooked through. Cool slightly in pan before turning onto a wire rack to cool. For the glaze, combine the extra caster sugar with2 tablespoons of water in a saucepan and boil until the sugar dissolves. brush onto the cooling bun. Serve warm with butter. Any remaining bun can be toasted the next day.


Monday, February 20, 2012

Cinnamon Toast Scrolls

After a little break (which was perfect timing for me, due to the birth of my little daughter) The Secret Recipe Club is back. I was assigned an amazing blog this round, Kitchen Belleicious with the lovely Jessica, who sounds as obsessed with creating food stuff as I am...and also has a newborn in the house like myself.
Busy mums need those quick and delicious recipes that can be whipped out at top speed and with little hassle, and my eyes where immediately drawn to a fabulous idea that Jessica had discovered. It was all those things I needed as a mum with a newborn in the house.

Time saver. Interesting. Delicious. Amazing in its simplicity. Ingenious. 

Besides being completely quick and delicious, these little guys are practically foolproof...and you will probably have everything required for this recipe right at your fingertips. White bread? Cinnamon? Sugar? Butter?
That's all you need to create these delightful little cinnamon scrolls, twists, or rolls. Get creative and make them just the way that tickles your fancy. I even got a little bit naughty and drizzled some thin white icing and crushed nuts over them...mmmh!
This one's marked down in my memory, ready to draw out in all those stolen moments in the kitchen when the baby is sleeping for half an hour--and there are visitors expected! Not only will you have a delicious treat to serve with tea and coffee, but you will have the delightful aroma of cinnamon wafting through the house (overtaking the smell of a freshly changed nappy, perhaps)


CINNAMON TOAST SCROLLS (from Kitchen Belleicious)

12 slices of fresh white bread
melted butter
1 cup granulated sugar
3 tbsp cinnamon powder

Preheat the oven to 190C (375F).
Combine the sugar and cinnamon in a small bowl.
Cut the crusts off each slice of bread. Using a rolling pin, roll each slice as thinly as you can. Spread both sides of the piece of bread with melted butter. Coat one side of the buttered bread with the cinnamon sugar, ensuring that it is generously covered. Roll as desired (be as creative as you like) and fit the cinnamon roll into a greased mini muffin tray. (I used a silicone mini muffin tray that saves even more time)
 Repeat with the remaining slices. Bake for 15-20 or until golden brown. Cool in tray a few minutes before removing. Serve warm, as is, or with a little drizzling of icing sugar and crushed nuts.
Makes 12

Notes: These freeze well! To reheat, thaw in microwave and place in oven at a low heat until warm and crisp.