Showing posts with label Marshmallow. Show all posts

Thursday, May 7, 2015

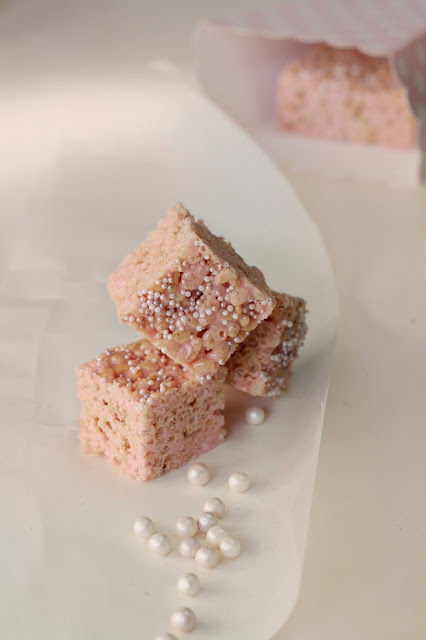
Pink Ricebubble Marshmallow Squares (Like ICMs)

I've just read a whole stack of blog posts from different authors about how hateful their Mother's Day gifts have been in the past. I sit here gobsmacked. I'm serious, mums are knocking their husbands for organising the likes of massage vouchers, lingerie, wine and chocolate and flowers bought from the service station (seriously who cares where they are purchased?) While people piped up that the articles were satire, I couldn't help but cringe. I'm getting slippers for Mother's day and I'm pretty damn pleased about it. Every time I slip my feet into those warm fuzzy pink things I will remember that hubby and my three little darlings all trotted off and picked them out for me, and that my 5 year old was so excited that he couldn't contain himself and told me what my present was as soon as they got home.
My swollen pregnant feet get so cold in the mornings that I just can't wait to slide into those babies. I've even secretly checked them out while putting away hubby's shirts. Shhh!
So shrinking husbands who don't know what to do get your wives, and who happened to read those blog posts, just remember your wife is not your mother, so anything you buy her in my books, is a win. You don't even have to spend money to make sure Mum gets a memorable Mother's Day. Sometimes I think the best gifts are the ones which are hand made and home made by the kids-the paintings, the weird cutout cardboard thingies and the not so perfect baking.
But here's a foolproof and fail-proof recipe for some yummy treats to spoil mum with that will definitely be appreciated. They're a hit with the young and the old and only have three ingredients. They're quickly put together, are no cook, and are a great recipe for the kids to get involved in.
They're chewy and sweet and look so pretty wrapped up in cellophane and given as a gift. How could you go wrong?
I sprinkled mine with tiny edible pearls. You can leave them plain, trust me they taste just as good!


PINK RICEBUBBLE MARSHMALLOW SQUARES

4 cups marshmallows (I used 2x 180g bags)
1 tbsp butter
5 cups of ricebubbles
tiny edible pearls (optional)

Grease and line a 20x20cm dish with a little oil and baking paper. Ensure the sides of the paper come up higher than the sides of the dish for easy removal.
Place the marshmallows and the butter in a large saucepan. Stirring continuously over medium heat, melt the two ingredients until smooth. Pour in the ricebubbles and stir until well combined. Quickly pour the mixture into the lined dish. Wet your hands with cold water and press the mixture down evenly into the dish until the top is flat. Sprinkle with edible pearls if desired. Refrigerate for 2 hours or more before cutting into squares.



Sunday, January 26, 2014

Marshmallow and Strawberry Jam Slice

I expect my husband's former colleagues will now be free to withdraw from their gym memberships. Those yoga buffs in the Botanical Gardens will have to go elsewhere to seek their clients. (Seriously yogis and personal trainers, we could go into business here--I keep them eating and you keep them working it off. Win win situation) Belts will once more be able to be tightened, notch after notch.
Seriously, I'm going to have to start finding other places to off load the goodie boxes. At least until all the "I will not indulge in sweet food" new years resolution wears off, and people begin to succumb once more to the beckoning of the truffles and slices and cakes.
Is there anyone out there that hasn't decided to eat more healthily this year? I'll take that as a no. Don't worry, the pictures of recipes on this blog are all completely fat free--if you can resist the temptation to make them.
Even the queen of sugar here has been painstakingly closing her eyes to the come-hither look that comes at me from the slice box every time I open the refrigerator. Marshmallow and jam slice lays cut into squares within, just waiting to be eaten.
Truth be told, I almost didn't send this slice along to Luke's work for morning tea with his collegues. "Luke" I said "I dont know if I can send this slice, it may just have to stay home with me. I just cut it up, and it looks pretty messy."
I left the kitchen and returned some ten minutes later to find the slice on the bench somewhat reduced in size. "I think we may have--mice"
The tell tale strand of sticky marshmallow trialling down my husband's chin made me laug, and then he said "You have to let me take this to work!"
So reluctantly I put the messy looking slice into the catering box and shipped it off with hubby the next morning. He returned to tell me it had been a hit, and I must put up the recipe on the blog--so here it is.
Fear not the stringy sticky mess! I found out the next day, while cutting the remainder of the slice, that if I had only let it cool down a little more before dipping the blade into it, I would have come out with neatly cut squares. After refrigeration, the marshmallow had reset and it was simple and mess free to cut. Unfortunately I took the photos of the slice after cutting it the first time, so it does look a little oozy...but oh so good!


MARSHMALLOW & STRAWBERRY JAM SLICE (Adapted from Coles Recipes)

1/3 cup sugar
1 cup unsweetened dessicated coconut
1 cup plain flour3
Weet-Bix, crushed
150g butter, melted
2/3 cup strawberry jam
400g marshmallows (I used Pascal's berry swirl marshmallows)


Preheat the oven to 180C (or 160C if your oven is fan forced). Grease and line a  18 x 28cm slice or lamington tray with baking paper and set aside.
In a large bowl, combine the sugar, coconut, flour and crushed Weet Bix. Combine well, then stir the melted butter in until well incorporated.
Using the back of a spoon or fork, flatten this mixture into the lined tray and press down until there is an even layer on the bottom.
Bake for 20-30 minutes, until golden.
Remove from oven and spread the warm base with the jam. Arrange the marshmallows on the top of the jam to cover the entire surface. Return to the oven for about 7 minutes until marshmallow begins to soften. Place underneath the grill on high for 30 seconds to 1 minute for a slightly browned top.
Cool completely before cutting.

NOTES: For clean cuts, use a wet blade. Slice is best served the day it is made, or the day after. Ensure it is stored in an air tight container.


Thursday, May 26, 2011

Marshmallow Lamingtons

Entertaining doesn't have to be difficult or stressful, or even time consuming. Of course you can always dash down to the store for a mud cake and lamingtons for your morning tea with the girls...or even better, whip something up in the nick of time that is even tastier and more unique. I think the best things in life are always the simple things, the small things. After all, when you think about what made your day, its probably your baby grinning cheekily at you over that caramelly gateaux oozing with chocolate and cream and all sorts of yummy gore.
Anyway, too often Mums and housewives like us look for some way to make things quicker, easier and as fuss free as possible. There's never enough time when you're a housewife, especially with kids, and a simple, effective and delicious recipe is always welcomed. And yes, I'd say its foolproof too. Who doesn't want that?
We called them Snowballs when we were kids, but back then they where much larger...these little guys are easier on the stomach and the hips, and you only need three ingredients. They can be made for an elegant afternoon tea with the mother in law, or a kids birthday party in bright coloured truffle cases and will go down just as well with both crowds. I assure you.


MARSHMALLOW LAMINGTONS

1/2 bag marshmallows
Approximately 350g cooking chocolate
1 cup shredded coconut

Melt the chocolate in a small bowl. Fill another small bowl with the coconut. Using a fork, dip each marshmallow into the chocolate and proceed to roll in the coconut until covered using another fork. Place the marshmallow on some greaseproof paper to dry or straight into a paper truffle case. Voila!