Tuesday, September 25, 2012

Strawberry Mousse Jelly Cake with Crumble Topping


I don't know about you, but I use cookbooks less and less frequently to look for foodie inspiration. I love my cookbooks, I have a huge and colourful pile. I love the glossy pictures, the feel of it and the smell of it. But if I'm looking for something in particular I mainly browse the internet for inspiration--probably because I'm lazy and its quick, and the mind is instantly injected with a million and one ideas.
I pore over my cookbooks when I'm sitting back and relaxing with a cuppa, but they're more occasionally used than internet recipes, sadly.
I love seeing a cookbook pried open in my shabby chic cookbook stand on my kitchen buffet, it always makes me want to bake and bake and bake. Every time I come into the kitchen I look at it and think of my next creation. There's always something in that stand waiting to be made. At the moment it's Margun Carless' cookbook Love Menu, spread at a page sporting gorgeous poached pears in champagne. I can't wait to make that on Wednesday night for hubby and our late dinner dessert.
But sometimes I want to make something that is an original of sorts. Something different and experimental and that has arisen from me. And then I come up with some sort of concoction. As I previously mentioned, this is the month of strawberries. I actually had a dream about this cake I came up with. On later research I saw similar cakes, sort of a combination between a  strawberry charlotte, and also those gorgeous pink mousse cakes with the jelly layer on top (Mirror cakes, I think they're called)
Anyway, I ignored all recipes and just went into the kitchen and started banging around. I had no idea how it was all going to work out, and actually thought I'd made a big fat flop while it was all setting...until I cut a slice out of that cake.
Oh my. It was delicious and visually as I had imagined it to be--layers of strawberry mousse, buttercake and a thick line of bright red jelly in the centre, topped with grilled crumble and roasted strawberries. Delicious!
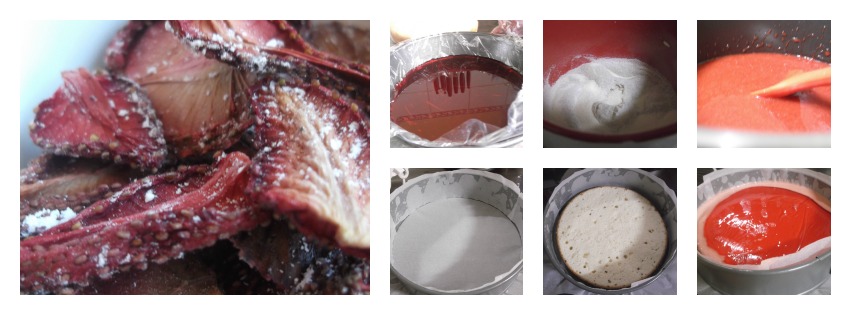
You will need two different sized round pans for this recipe, the larger being a springform pan. The cake and the jelly layer are made in a smaller pan in order that the mousse sits around the cake and the jelly layer. 


STRAWBERRY MOUSSE JELLY CAKE WITH CRUMBLE TOPPING (A Lick the Spoon Original)

1 buttercake, made in an 18x18cm round pan
85g packet strawberry jelly (jello) crystals 
1 cup boiling water
3/4 cup cold water
800g strawberries, hulled
1 1/4 cup white granulated sugar
6 1/2 tsp gelatin powder
1/4 cup lemon juice
500ml thickened cream 
4 tbsp. sugar, extra 
85g strawberry jelly (jello) crystals, extra
1 cup boiling water, extra
3/4 cup cold water, extra 
1/4 cup brown sugar
1/4 cup plain flour
1/4 cup toasted muesli
1 tbsp butter or margarine
 roasted strawberries

To begin with, take one 85g packet of strawberry jelly crystals and combine it with 1 cup of boiling water in a medium sized bowl. Stir until the crystals dissolve, then add 3/4 cup cold water. Grease a 18cm x18cm round pan and line with plastic wrap, ensuring there is an overhang of 2 inches. Pour the liquid jelly mixture into this and place in the refrigerator to set.
Puree the strawberries in a food blender until fine and no lumps remain. Push puree through a fine mesh sieve to remove the seeds, discard residue.
Place the lemon juice in a small bowl. Evenly shower the gelatin over the top and set aside to soften for a few minutes.
Place puree and white granulated sugar in a medium saucepan and place on low heat, stirring occasionally, until small bubbles start appearing around the edges of the pan. Add the lemon gelatin mixture and stir until well incorporated into the puree and dissolves. Remove from heat and set aside, to cool to room temperature.
Meanwhile, whip the cream and extra sugar in a medium bowl, until firm peaks appear.
Take a 20x20cm round springform pan and grease the sides. Line the bottom and the sides with baking paper.
Cut the buttercake down the centre horizontally. Place the bottom half in the centre of the springform pan. Remove the jelly from the refrigerator, using the plastic wrap overhang to lift it from the pan. Gently position the jelly layer on the bottom layer of the cake. Place the top layer of the cake over the jelly layer.
Gently fold the strawberry puree mixture through the whipped cream until well combined. Pour this cream mixture over the top of the cake. (If you were like me and were too hasty and didn't let the strawberry puree cool down enough and it melted the cream, do not fret! It will be liquidy and the cake will "float" but it will still work just fine!) Cover with plastic wrap and place in the refrigerator to set, for two or more hours. When the mousse layer has set, take the extra jelly crystals in a medium bowl and pour the extra cup of boiling water over them. Stir until well dissolved and then add the extra 3/4 cup of cold water. Set aside until this mixture reaches room temperature, then pour over the top of the cake for the final layer of jelly. Place in refrigerator to set.
To make the crumble to top the cake, combine brown sugar, flour and toasted muesli in a bowl. Rub the butter into this mixture using your fingers until a crumbly dough forms. Lay this mixture on a lined baking tray under the grill on high for a minute, or until golden brown. Remove and cool, then add roasted strawberries.
When the final jelly layer has set on the cake, remove the side of the springform pan very gently. Carefully peal back the sides of the baking paper from the mousse. Serve chilled with a sprinkling of the strawberry crumble mix.

Serves 10-12


Friday, September 21, 2012

Chocolate Fudge Mocha Mousse Cake

If there are such things as clouds in heaven, they must taste and feel like this. Just with a subtle hint of coffee, and a base of chocolate fudge brownie, this mocha mousse cake will have you coming back for more for certain. It has a airy yet smooth and very light coffee mousse topped with cocoa powder, all resting upon a base of fudgey chocolate brownie.
Now here's a little word of praise to the person who inspired me to create this delicious dessert.
He's my little brother-in-law, and I find him most inspiring in the kitchen. He's only 15 and already a culinary whiz, making curries like a pro and thinking a little outside the box.
He spoke for a while about making a brownie based cheesecake, and it got my mind cartwheeling with ideas. Why hadn't I thought of that? Anyway, this is the cake that originally came to mind. Chocolate, coffee, fudge, mousse. I'm not sure flavour and texture combos get better than that.
It is meant to be.
And on another note, don't you just love this gorgeous stencil I used to make the pattern on the cake with cocoa? I found mine on ebay (the store doesn't sell them anymore though) but if you want to effortlessly jazz up you cakes you can find similar ones here! (or if you're crafty, make your own with a doily and starch. The doily must be made firm, for removal's sake.)


CHOCOLATE FUDGE MOCHA MOUSSE CAKE (A Lick The Spoon Original)

BASE:

1/2 cup butter
1/2 cup cocoa powder
1 cup brown sugar, firmly packed
2 eggs
1/2 tsp. vanilla
1/2 cup plain flour
1/4 tsp salt

MOUSSE:
2 tbsp. gelatin
1/2 cup cold water
1 cup chocolate chips
1 tbsp (or 3 tsp.) instant coffee
6 egg whites
1 cup caster sugar
2 cups cream
1 tbsp. cocoa powder to garnish

Preheat your oven to 180C.
Melt butter and remove from heat. Stir through the cocoa and brown sugar until combined.
Beat in the eggs and vanilla. Next, blend in the flour and salt. Spoon the batter into a greased and lined 20cm springform pan. (Make sure the sides are lined also right to the top of the pan.) Bake for 15 minutes. Remove from heat and set aside.
To make the mousse filling, place water in a small saucepan. Sprinkle the gelatin over the top and sit for 5 minutes to soften. Add the coffee and place on low heat, stirring until the coffee has dissolved. Turn off the heat and leave on the stove top. Ina  microwave proof bowl, place the chocolate chips. Microwave for 20 seconds at a time, removing to stir after each time until thoroughly melted. Add the melted chocolate to the coffee mixture and stir until incorporated.
In a medium bowl whip the cream into stiff peaks. Set aside.
In a large, clean and dry bowl, place the egg whites. Beat the egg whites until they form firm peaks, adding the sugar gradually along the way, until thick and glossy.
Fold the whipped cream into the egg whites.
Fold the chocolate coffee mixture into the egg white and cream mixture until well combined.
Spoon the mousse onto the brownie base and smooth the surface. Refrigerate for at least 2 hours, or until set.

Serves 10


Thursday, September 20, 2012

Little Miss Chatterbox Cake


 I had a very interesting comment a little earlier in the week. I deleted it (the privileges of being the author of a blog!) so don't go looking for it. It was hilarious though.
Someone basically had a go at me for sharing such unhealthy recipes, and directed everyone over to her healthy eating blog. Yes. You read right.
Here I am, just sharing, making peoples lives sweeter, and get chastised for giving this food to my friends and family and spreading the fat around, as I like to say. But I'm not sitting in the corner redfaced. No. I am grinning right back at you, healthy blogger.
I don't think I need to put warning signs up all over my blog for people who are not well educated in how to eat correctly. I'm all for healthy eating. I'm also all for balance and enjoying food. Sweets are on the food pyramid too...at the top, closest to heaven!
So sweet of you to be thinking of my weight, healthy blogger--it's very kind. But look at me. I obviously sit at home an eat everything posted on this site and have become obese. Don't you think?

My only crime is a twisted skirt...

Despite popular belief, I am not the blind witch that owns the gingerbread house that Hansel and Gretel stumbled across, once upon a time. I eat my veggies too!
Needless to say, no one should be living off this sort of food. I know I don't have to tell you that. Even though I just did.
There's no recipe with this post but there are a few general directions. Sometimes when I make a cake I am going to spend lots of time on just decorating, I take a shortcut and  bake a cake from the box *gasp*. I don't like doing that, but it makes life a bit easier sometimes. I have found a most delicious boxed cake mix that believe it or not, is one of the cheapest ones you can buy. I know. Sounds gross, and costs less than a dollar, just Black and Gold brand. But trust me, it tastes better than lots of those cake mixes that are quadruple the price. So I have a few up in the cupboard for occasions like this.


I made this Little Miss Chatterbox cake for my sister in law's 13th birthday party. As you might well imagine, she's the one person I know who can talk the leg off a chai, and hence, has gained the title of Little Miss Chatterbox.
I made the cake in an oven proof bowl, about 10cm wide and 8 deep. I then covered the cake, turned upside down, with buttercream icing. I used home made rolled fondant for the body, arms, legs and hair and facial features. I wanted the colours to be intense, as shown in the book of this little character. I recommend using a gel colouring for the intensity, although I used liquid food colouring, and it worked fine too. There was just a whole lot more icing sugar that had to be pounded into the fondant to make it dry enough to roll. The eyes and mouth I painted with black food colouring to get that intensity, otherwise it would have looked a bit faded. It dried quickly and worked perfectly.
Because the cake was so small, I sat Little Miss Chatterbox on a cake of her own. It was a marbled pink and white buttercake, topped with coconut buttercream. I coloured the coconut by placing it in a ziplock bag along with some green food colouring, and shaking to coat the coconut.


ROLLED FONDANT

1 tablespoon unflavored gelatin
1/4 cup cold water
1/2 cup glucose (can substitute light corn syrup)
1 tablespoon glycerin 
1 tablespoons butter
2 pound bag of icing sugar, sifted.
1 teaspoon flavoring
  
Pour water in a small saucepan. Shower the gelatin over the cold water so that the gelatin is evenly distributed.  Let gelatin soften in the water for five minutes.
Sift the icing sugar into a large bowl. When all sugar is sifted, make a well in the center of the bowl. Heat the water and gelatin over gentle heat, stirring, until the gelatin is dissolved. Mix in glucose (or corn syrup) and glycerin. Add the butter and mix until melted. Remove from heat and stir in desired flavouring. I used vanilla essence. 
Pour wet ingredients into the well of powdered sugar. Mix with a wooden spoon until cool enough to handle. 
Then use a lightly greased hand to knead the ingredients together. Knead in the bowl until most of the icing sugar is incorporated. 
Turn out on a lightly greased bench and knead until the fondant is smooth and pliable. If it feels sticky, add additional icing sugar. If it feels too dry and doesn't feel elastic, work in a small bit of butter. 
Shape into a thick disk shape and cover with a thin coating of butter. Wrap well in several layers of plastic wrap, and place in a large ziplock bag. The fondant can be used immediately, but works much better if its left to cure for at least 12 hours. The fondant will store at room temperature this way for three months, and can be frozen for up to 12 months. Add food colouring as desired.

Monday, September 17, 2012

Roasted Strawberry Poppy seed Salad

I told you I had strawberries coming out of my ears, didn't I? Forget 4 kg of berries...the quantity eventually exceeded that, and I fear this whole month will be comprised of strawberry recipes due to us all wading through those fat, shiny and delicious berries here in Queensland.
I don't hear anyone complaining.
And I certainly wasn't complaining when I discovered a delightful Strawberry Poppyseed Salad through The Savvy Kitchen. I missed out on being part of the Secret Recipe Club last month but I'm back in the game with this tantalizing and festive looking combination of leafy greens, poppyseeds and fruit. I admit, it's an unusual medley, and something that has been on my to-make list for a long time. Thankfully my husband enjoys the occasional blind-date with a new and unusual gourmet creation of mine, so I put it to the test with him 1.) knowing that he hates small seeds such as poppy seeds and strawberry seeds in anything because they are hard to get out of your teeth, and 2.) that he comes from a line of people who do not have fruits or nuts in their salads.
The outcome? "That's really good! surprisingly good!" says he as we stabbed our forks around that colourful bowl of salad.
And so it was. The textures and the flavours were beautifully balanced--the nuttiness of the slivered almonds, the crunch of the onion, the tanginess of the strawberries, and the sweetness of the dressing were all a feast for the senses. Not to mention how pretty it looked. To top it off,  neither of us ended up with any demon seeds in our teeth.
I made this recipe with a little twist, as I had been experimenting with strawberries at an earlier point. I decided on baking a tray of sliced strawberries for a few hours in the oven and arrived at a very interesting new garnish. I thought these roasted strawberries would go beautifully in this salad. The roasting process seems to infuse the air with the sweetest strawberry aroma, removing that sweetness from the berry and leaving a very tangy crisp strawberry chip at the end. I think it went beautifully in the salad, but if you cant afford the time in strawberry roasting, fresh berries would be equally as delightful.


ROASTED STRAWBERRY POPPY SEED SALAD (adapted from The Savvy Kitchen)

2 tbsp. sugar
1 tbsp. mayonnaise
2 tbsp. milk
1 tbsp. poppy seeds
1 tbsp. vinegar
1 bag mixed lettuce
1 cup roasted strawberries
3 tbsp. slivered almonds, toasted
1/2 small red onion, sliced thinly

In a small bowl, combine sugar, mayonnaise, milk, poppy seeds and vinegar. Whisk to combine thoroughly.
Ina large serving bowl, place the washed lettuce leaves. Spinkle the strawberries, almond slivers and onions over the lettuce. Dollop the poppy seed dressing onto the salad and serve.

Serves 6 as sides


Oven Roasted Strawberries

Buying in bulk can result in storage problems, particularly when it comes to storing fresh produce. You either admit you've bought too much and let it sit and rot, or you eat your way through it...yes, every mean shall be strawberries! Strawberries, Strawberries, STRAWBERRIES!
September has been the month of strawberries, if you hadn't guessed. They're so cheap that I took liberty of the fact and bought a huge amount. Maybe it was just so I could feel like that famous chef for a moment, wheeling a trolley of stawberries to the counter. I can't remember who (I still have the word "strawberry" going over and over in my head) but she used to buy bulk, and then was forced to get creative in the kitchen with it before it went bad.
Well, with strawberries to spare I went home and decided I wanted to discover what a roasted strawberry was like. I dont remember where the idea came from, but I had to do it.
It's so easy, it's more a method than a recipe.
The result amazed me. For hours there was this overwhelming, very sweet strawberry scent wafting through the house. I've never been high (nor intend to) but I can imagine getting high off this smell. (A bit like that feeling you get when you've been painint a little too long and the fumes get to your head.)
The sweetness is extreme, delicious. It's potency will knock you off your feet. It's almost as if the sweetness of the berry is released into the air and when you taste the final product, a faded strawberry chip, there is nothing of the sweetness remaining. There is a delightful tangy flavour that hits the taste buds, and is compelling and addictive.
They make pretty garnishes and are about to be placed in a gourmet salad I'm planning to make. The possibilities are endless. Keep your eyes peeled for them popping up all over the blog!


ROASTED STRAWBERRIES

You will need:

quantity of strawberries
icing sugar (optional)
non-stick paper-lined tray

Heat the oven at 100C. Slice the strawberries lengthways into four pieces each. The larger the strawberry, the better, but if you have little berries, cut into three thicknesses per berry. This is just a guideline, you can cut them as thick or as thin as you like, but the above is what worked for me.
Line a tray with non stick baking paper. Sprinkle the paper with a coating of icing sugar (sometimes known as confectioner's sugar. This is optional)
Place a single layer of the berries on the tray  with a cm or so between the berries. They tend to stick to each other if stacked and don't dry out as well. Bake for 4-5 hours, checking every hour until they reach desired crispness. Remove from heat and allow to cool before removing.


What are you going to use your roasted strawberries for? Here's a few suggestions!


You could also eat them on their own as snacks, on an apple crumble, through your breakfast muesli...the possibilities are endless!

Thursday, September 13, 2012

Strawberry and Pear Crumbles

 Spring has sprung, and all those hearty warm recipes are going to the back of the "must make" pile. There's nothing quite like having a hot oven on in a house that has been at 30C all day, taking that temperature gauge up another notch. Some of you may know, I hail from a much cooler climate than the sub-tropical one I now reside in, and although I love a warm summer's day, I'd be happy if the temperature never exceeded 27C.
And humidity can go jump too. Ever heard the expression, "sweating like a pig"? Hm, then you know what I'm talking about.
So before it really heats up, I'm squeezing in the last of the puddings, crumbles and all those warm comfort foods that are so good on a chilly night. I love baked desserts, so I'm combining the first of the spring berries with the last of the winter goodies with this pear and strawberry crumble that serves two.
Imagine layers of pears and strawberries topped with strawberry cream and buttery, cinnamoned crumble with the crunch of toasted muesli. Doesn't get much better than when its drizzled with a splash of cream or a ball of melting vanilla ice cream.


STRAWBERRY AND PEAR CRUMBLES

1 ripe pear
150g fresh strawberries
1/2 cup cream
1 tbsp butter, softened
1/4 cup plain flour
1/4 cup brown sugar
1/4 cup toasted muesli 
1/2 tsp cinnamon

preheat the oven to 180C.
Peel, core and slice the pear thinly. Take 50g of the strawberries and hull, then slice thinly also.
Layer the two fruits into two ramekins, pears on the bottom, then strawberries, then pears, and so forth until all the fruit is evenly divided between the dishes.
Take the remaining 100g of strawberries and hull, then place in a food processor with the cream. Blitz for 20 seconds. Pour this mixture over the top of the layered pears and strawberries, evenly  between the two ramekins.
In a medium bowl, place butter, flour, sugar, muesli and cinnamon. Combine using your fingers until a crumbly dough forms. Divide the mixture between the two ramekins, covering the cream.
Cook for 30 minutes, remove from oven and set aside for 10 minutes before serving with vanilla ice cream or cream, if desired.

Serves 2

Wednesday, September 5, 2012

Strawberries and Cream Mousse Pie

Buying fresh fruit and vege is one of my favourite foodie experiences. I love all the different fruity aromas that float around as you drift and sift through the piles of green and red, yellow and orange for the best of the best produce (I wonder how many others have handled the same fruit?) Of course there's the occasional paw paw that you bypass (I tend to think fresh paw paw smells a bit like vomit) but on the whole it's a thoroughly enjoyable experience for someone like me. Especially when you hit upon a super I-can't-go-past-that sort of bargain. Monster strawberries, 99c for 500g. Yes please!
Now I don't know if youre familiar with monster strawberries. 4kg of them later, I stood staring at them sprawled all over my kitchen bench, wondering what fabulous recipes there going to result from this bunch. Then it hit me. Why were they all so deformed, so gigantic? They're mutants! Would they sprout arms and bare teeth and start stomping around like something out of a Pnau video clip?
So I had to go and research them before they passed anyone's lips. Not that I didn't trust that they were edible, but I had to know the ins and outs of these massive red strawberries that had looked like they were joined to at least four others.
To my joy, it turns out that monster strawberries form simply out of a weather incompatibility, nothing more. They were delicious, mind you--fat, juicy and flavoursome, and just had to fill this heavenly tart--a light biscuit base, topped with airy strawberry cream mousse, finished off with a garnishing of fruit and lime jelly glaze.


STRAWBERRIES AND CREAM MOUSSE PIE WITH LIME JELLY GLAZE (Adapted from Martha Stewart)

8-10 Nice biscuits
3 tbsp. lime juice
2 3/4 tsp unflavoured gelatin
500g fresh strawberries
1/2 cup plus 2 tbsp sugar
2 cups heavy cream, chilled

Lime Jelly Finish:

1/2 cup boiling water
2 tbsp lime juice
1 tbsp unflavoured gelatin

Grease and line a 20x20 square glass or tin dish, leaving an inch or so of baking paper overhanging at the sides for easy removal of pie.
Lay the Nice biscuits on the base of the dish, breaking biscuits if necessary to cover the bottom evenly.
In a small bowl, place the lime juice and shower the gelatin over the top of it. Leave it aside to soften for 5 minutes. Meanwhile, place 400g of the strawberries in a food processor, and blend into a fine puree. Push the puree through a fine mesh sieve into a small saucepan, and discard the seeds. At a medium setting, heat the puree along with 1/2 cup sugar, stirring occasionally, until bubbles begin to form around the sides of the saucepan. Add the gelatin and cook until the gelatin dissolves, stirring continually. Remove from heat and transfer to a small bowl. Cool to room temperature.
In a large bowl, whip the cream and the extra 2 tablespoons of sugar for about 4 minutes until firm peaks form. Gently fold the strawberry puree into the cream with a spatula until well combined. Smooth this mousse mixture over the top of the Nice biscuit base. Slice the remaining strawberries lengthways and arrange on the top of the mousse as desired. Cover in plastic wrap and refrigerate until set.
To make the lime jelly finish, Place the boiling water in a small bowl with the lime juice. Shower the gelatin on the water and sit for a few minutes to soften. Stir occasionally to ensure the gelatine dissolves, then cool to room temperature. Pour onto the mousse pie and refrigerate until set. Serve.
HUGE!

Tuesday, September 4, 2012

Zucchini Boats

Have you ever come across someone that says they don't like eating something particular, and then you find out that they have never tasted it in their life? Have you ever wondered what makes people dislike certain  things they know nothing about? Just because an eggplant is called an eggplant doesn't mean it tastes like egg. Just because a chocolate icing looks brown like mud doesn't mean it tastes like mud!
You would think I'm talking solely about little children, but I'm talking adults here too. Well, I'm included there, I often find myself feeling prejudice against the poor old cauliflower, the parsnip and spinach. I think it comes down to families and what is frequently eaten and not eaten in the home. I love when people say they don't like something in particular because it sets me on a mission to convert them over.
This instance I converted myself!
Besides my zucchini soup which I love, I found it hard to prepare zucchini in a way that didn't repulse me. How could this stuff be cooked in a way that made it delicious? Well I was delighted when I came across this recipe for Zucchini Boats, and they look gourmet too (Something that never goes astray in my books). They're very easy to prepare and don't use many ingredients, but they pack a punch of flavour.
My little son and I found some cherry tomatoes that had grown in our very neglected vegie patch--somehow surviving the deathbed that it grew up in. We picked them, sliced them and put them on this garlic and lemon seasoned zucchini half, amongst the cheese that was then grilled and browned into a sizzling, delicious, golden crust.


ZUCCHINI BOATS (adapted from Proud Italian Cook)

4 small zucchinis
1 tbsp crushed garlic
3 tbsp olive oil
dash of lemon juice
pinch of salt and pepper to taste
1 punnet (approximately 16) cherry or grape tomatoes
1/2 cup grated mozzarella cheese
sprinkling grated Parmesan cheese

Set the oven at 180C.
Slice the zucchinis lengthways and arrange on a baking tray. Slice a slither off the bottoms if they do not lay evenly. Using a teaspoon, scrape the seeds out of each zucchini half, and discard.
In a small bowl, combine crushed garlic, oil, lemon juice, salt and pepper and stir to combine. Brush the tops and ridges of the zucchinis with this mixture, then place the tray in the oven for 20 minutes.
Remove the tray from the oven and sprinkle the mozzarella in the zucchini ridges. Top with halves cherry or grape tomatoes, then sprinkle with a little Parmesan. Place underneath a hot grill or broiler and cook until sizzling and the cheese has browned. Serve immediately.

Makes 8 zucchini boats


Sunday, September 2, 2012

Strawberry Heart Cupcake Toppers

I've probably mentioned it before, but one of my all-time favourite ingredients in the kitchen is gelatine. I have a bit of a love-hate relationship with the terminology though. Most of my viewers are American and over in US the popular term is jello (for the flavoured gelatine at least). I don't know how many times I've been asked wheat "jelly" is--well, it's jello! And gelatine is unflavoured jello. Gelatine or gelatin comes in powder form, and jelly in crystal form due to the added sugar, colouring and flavouring. In this recipe I use both, so I hope it's not too confusing for everyone!
I discovered this recipe over at Six Sister's Stuff and the author made these funny little gelatine nibbles for her little son as a snack. It' great, because they don't have to be refrigerated like normal jellies to stay firm, because the gelatine is so concentrated. I had a hard time removing these from my silicone molds, but it helps if you ease one side from the edge with the help of a butter knife, then just push the jelly out and voila! It is so gelatinous, it won't tear with your efforts. Get those biceps in there!
I made these cute little cupcake toppers in a silicone heart mold for an engagement party. They looked really cute and unique atop these chocolate fudge cupcakes that were drizzled with pink tinted white chocolate ganache. Unfortunately all the little kids at the party got to them before they could be appreciated by the adults. A winner at a little girl's party too, I'm guessing. You can add a little edible glitter to the mixture before pouring them into the molds too if you like a little glitz and glimmer in your food. Now that would go down well at a little girls princess party!


STRAWBERRY HEART CUPCAKE TOPPERS (from Six Sister's Stuff)

1/3 cup boiling water
1 packet (3oz) flavoured jelly crystals
2 tbsp. unflavoured gelatin

Place the water in a small saucepan over medium heat. Shower the jelly crystals and the gelatin over the water and stir until dissolved. Quickly pour the mixture into heart shaped silicone molds and refrigerate for about half an hour until firm.