Showing posts with label no bake. Show all posts

Wednesday, June 8, 2016

To Die For Snickers Bar Cake


It's almost been a year since I made this crazy decadent Snicker's bar cake for my hubby's birthday. I lost it's photos among the craziness that  followed two weeks later-the birth of my youngest son. Sometimes I feel like that newborn phase creates a mayhem that no one who hasn't been through it understands. For me that usually lasts the first year after baby is born. I'm coming out of the fog, people! Paddy is almost one, and while I still don't get any more than two hours sleep in a row max, I'm seeing the light at the end of the tunnel (through droopy eyes.)
Baby experience or not, you may have a "food baby" after eating this cake, which is just a giant replication of your good old Snicker's Bar. It is seriously one of the richest most decadent things I have ever eaten, and I can't believe that my husband and I tackled this thing on our own. This is really the type of cake you could have at a party, it goes a long way because you cant eat too much at one sitting.
If you're not throwing a party, you could consider cutting this in half and freezing a portion. I had to feed half of this to the birds in the end because it took us that long to work our way through it that the custard began to go bad-it was such a shame I had not thought to freeze part of it!
It's insanely impressive in appearance and in taste, with decadent layers of Snickers, chocolate ganache, caramel, peanut butter custard, chocolate custard and biscuit. To die for!


SNICKERS BAR CAKE (Heavily adapted from Baker's Royale)

2 packets of rectangle Arnott's Milk Coffee Biscuits
12-14 mini sized snickers bars, chopped

Pudding:
2/3 cup corn flour (corn starch)
1 cup granulated sugar
pinch salt
6 cups cold whole milk
1 tbsp vanilla extract
3/4 cup dark chocolate, chopped
3/4 cup smooth peanut butter

Ganache Pouring Sauce:
2/3 cups dark chocolate
1 tbsp heavy cream
4 tbsp icing sugar (powdered sugar)
4-5 tbsp warm water

Caramel Sauce:
2 tbsp honey
2 tbsp butter
1/2 cup brown sugar

To make the pudding and assemble the main:
In a large heat proof bowl, place the corn flour, sugar, salt and milk. Beat with electric beaters until well combined. Transfer to a heavy based saucepan. Over a very low heat, stir continuously until thick enough to coat the back of the spoon and leave ribbons when drizzled on itself.
Add vanilla and stir through to combine. Divide the mixture in half. Add the chocolate to one half, and the peanut butter to the other half. Stir both separately to combine thoroughly. Line a 8x8 pan or two 4x8 loaf tins with grease-proof paper, with the sides of the paper hanging over the edges for easy removal. Line the bottom with a layer of the biscuits laid side by side, breaking any biscuits that don't fit to make a good base. Spread a thin layer of the chocolate pudding over this biscuit base. Make the second layer of biscuit over this. Spread with a layer of the peanut butter pudding. Continue until the pudding is used up, and finish the top with the final biscuit layer. Cover in plastic wrap and place in the freezer for 3-4 hours. Half an hour before removal make the ganache pouring layer.

To make Ganache Pouring Sauce:
Place heavy cream and chocolate in a bowl over another bowl of hot water. Let sit for 5 minutes before stirring through until smooth. Add the powdered sugar and mix until until smooth. Add the water a tablespoon at a time until pouring consistency is reached.
Remove the cake from the freezer. Pull the paper sides to release the cake from the tin. Place on a serving platter. Pour the ganache over the top biscuit layer to cover. Sprinkle with the chopped snickers bars. Then make the caramel sauce to finish the cake off.

To make the caramel sauce:
Place honey, butter and sugar in a small saucepan over a low flame. Stir as the butter melts, continuing until the mixture boils. Cool for a minute or two before quickly drizzling over the top of the cake (this dries quickly in the pot, so make haste)
You can return the cake to the freezer to firm up before cutting, or serve straight away. Semi freezing is advised for nice neat cuts.


Thursday, May 7, 2015

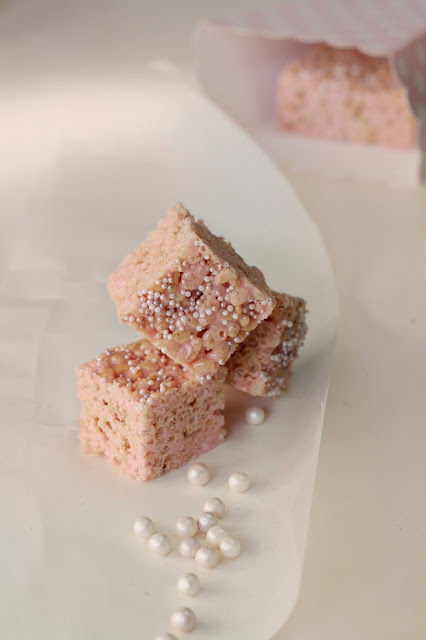
Pink Ricebubble Marshmallow Squares (Like ICMs)

I've just read a whole stack of blog posts from different authors about how hateful their Mother's Day gifts have been in the past. I sit here gobsmacked. I'm serious, mums are knocking their husbands for organising the likes of massage vouchers, lingerie, wine and chocolate and flowers bought from the service station (seriously who cares where they are purchased?) While people piped up that the articles were satire, I couldn't help but cringe. I'm getting slippers for Mother's day and I'm pretty damn pleased about it. Every time I slip my feet into those warm fuzzy pink things I will remember that hubby and my three little darlings all trotted off and picked them out for me, and that my 5 year old was so excited that he couldn't contain himself and told me what my present was as soon as they got home.
My swollen pregnant feet get so cold in the mornings that I just can't wait to slide into those babies. I've even secretly checked them out while putting away hubby's shirts. Shhh!
So shrinking husbands who don't know what to do get your wives, and who happened to read those blog posts, just remember your wife is not your mother, so anything you buy her in my books, is a win. You don't even have to spend money to make sure Mum gets a memorable Mother's Day. Sometimes I think the best gifts are the ones which are hand made and home made by the kids-the paintings, the weird cutout cardboard thingies and the not so perfect baking.
But here's a foolproof and fail-proof recipe for some yummy treats to spoil mum with that will definitely be appreciated. They're a hit with the young and the old and only have three ingredients. They're quickly put together, are no cook, and are a great recipe for the kids to get involved in.
They're chewy and sweet and look so pretty wrapped up in cellophane and given as a gift. How could you go wrong?
I sprinkled mine with tiny edible pearls. You can leave them plain, trust me they taste just as good!


PINK RICEBUBBLE MARSHMALLOW SQUARES

4 cups marshmallows (I used 2x 180g bags)
1 tbsp butter
5 cups of ricebubbles
tiny edible pearls (optional)

Grease and line a 20x20cm dish with a little oil and baking paper. Ensure the sides of the paper come up higher than the sides of the dish for easy removal.
Place the marshmallows and the butter in a large saucepan. Stirring continuously over medium heat, melt the two ingredients until smooth. Pour in the ricebubbles and stir until well combined. Quickly pour the mixture into the lined dish. Wet your hands with cold water and press the mixture down evenly into the dish until the top is flat. Sprinkle with edible pearls if desired. Refrigerate for 2 hours or more before cutting into squares.


Monday, October 20, 2014

Deconstructed No Bake Nutella Cheesecakes

Yes, food is in fashion like never before, and it looks like it is here to stay.  The Foodie Nation report states that cooking shows have inspired two thirds of us to have dinner at home over dining out or take away meals. Simple meat and three vege is so 1990's. While shows like Masterchef have increased the popularity of gourmet home cooking, it just brings to light how little so many people do know about cooking. Don't get me wrong, I'm no expert, and I am always learning from my mistakes, but the sheer lack of basic knowledge  from some adults makes my head spin. I agree, TV shows make the art of cooking look easy! Effortless even. But there's nothing like a flurry of questions on a food blog to make you realise just what people don't know about the very basics of even beginning to cook. They are tackling moderate to advanced recipes without even having ever boiled an egg before or made a cake from the box. They don't think in terms of food and how it works (there's a science to it.) Thumbs up for being enthusiastic and willing-I think its great people are thinking in terms of good and well presented food, but I think you need to start at the very beginning- it's a very good place to start!
I guess what spurred me to write this, or pushed me over the brink, was an adult person asking how to make chocolate dipped strawberries. It was a question posed on my friends cooking facebook page. They were simple chocolate dipped strawberries, no joke, and she asked my friend for the recipe! Astounded, I turned to my 4 year old son and asked him how he would make chocolate dipped strawberries. "You get the chocolate, melt it, and dip the strawberries in it." He said. Four year old logic. I had to have a quick look at this woman who didn't know how to dip strawberries in chocolate, and she was middle aged an regular looking. How she has survived until now, I do not know. Who could live without choc dipped berries, after all?
Anyway, we all have to start somewhere. Here are a few things I have learned about beginning to cook, which I have collected over the 20 years I have been baking:

1. Read the recipe before you begin, then read it again. There's nothing like getting half way though a recipe only to realise you needed plain flour and you only have Self Raising flour, or you have no idea what the soft ball stage is.

2. Utilize online forums and search engines like google if you have any doubts, and use conversion calculators or charts. So many questions I get after recipes are out of sheer laziness. "How many tablespoons is 50g butter?" Please google this and stop being lazy. You could have your answer within seconds. Having a printed conversion table is also a good plan.

3. Measure. So many people I have spoken to say that they simply throw the ingredients into the bowl, a bit of this, a bit of that, no specific measurements. This is recipe for disaster. You may be able to get away with this carefree style of cooking with a stew, but don't expect to succeed if you only put 3/4 cup flour in to that cake instead of 1 level cup. Precision isn't always key, but it is in most cooking for most ingredients.

4. Stick to your level unless you've been there for a while and are ready to take things up a notch. For example, if you have never cooked before, making macarons probably isn't the best way to start off. Get the basics down-pat first.

5. Don't mess with the recipe if you're a beginner! Maybe Jamie Oliver can substitute a carrot for a chicken and have it taste awesome, but it's best to stick to the recipe and not leave anything out or add anything if you're a beginner. Successful experimenting comes later.

6. Do the prep work, such as lining trays, preheating the oven and sifting flour. Every step is there for a good reason.

7. Don't stress if you fail! There is always next time.

And here's an easy beginner level  dessert for two that is impressive as well as delicious! it's non bake too, so it's pretty hard to be unsuccessful with these deconstructed nutella cheesecakes. They're perfect for hot summer nights when you don't want to turn on the oven, and are very quick and simple to put together. They also look elegant in tall glasses, topped with berries or shavings of chocolate.


DECONSTRUCTED NO BAKE NUTELLA CHEESECAKES (Adapted from Sweet & Savory by Shinee)

4 chocolate biscuits, crushed
1/4 cup hazelnuts, crushed (optional)
1 heaped tsp. butter, melted
100g cream cheese, room temperature
4 tbsp. sweetened condensed milk
3 tbsp. nutella

Place the crushed biscuits and hazelnuts together in a small bowl. Add the melted butter and stir to combine. Divide this mixture between two dessert glasses, reserving a teaspoon for garnishing if desired. Place in the refrigerator.
In a medium bowl, beat the cream cheese, sweetened condensed milk and nutella together until smooth and thick. Fit a piping bag with a large star nozzle and fill with the cream cheese mixture. Pipe the mixture into the glasses, garnish with the reserved crumb mixture, and refrigerate for at least 30 minutes before serving.

Serves 2


Thursday, October 16, 2014

Strawberry Creme Fingers

Last night I took my little daughter on a mummy-daughter date. We went shopping and had a baby chino and mini strawberry macarons together. My husband had set a meeting point for 8pm, and while heading there after our little girlie outing, I happened across a cute kitchen store that had these lovely omelet fry-pans with a non stick finish in a variety of colours. I couldn't resist, and bought a red one for my husband, knowing he would love it. Plus, his sunday omelets are to die for, and that was to be encouraged. We've been meaning to buy new fry-pans for a while and it just hasn't happened until now. I knew he'd appreciate it.
I saw him at a distance, waiting at the agreed upon spot. As I drew nearer I noticed he had a red no stick omelet fry-pan in his hand. My son ran up to me and said "Mummy! Look what we bought for you!"
Great minds think alike, right? Even the same colour!
The women at the store had a good old cackle when I took my purchase back to the store. They couldn't believe it! And I have a shiny new red fry pan.
It sort of reminded me of the idea that people and their pets begin to look alike after a long time of being together. My husband and I now think it unison. Or something like that.
Onto more exciting things, today we have Strawberry Creme Fingers for your viewing pleasure. I've been testing out my new softbox for the first time, as well as shooting in manual mode for the first time where food is concerned, and I'm rather happy with the whole combination. For the first time I have not had to edit my photos! (maybe I should have for a few, but hey, practice makes perfect.)
These elegant little fingers are perfect for a hasty, no bake afternoon tea for when you're thinking you have nothing to serve guests. I had these left over savoiardi fingers up in the cupboard after making a tirimisu. I had no idea what I was going to do with them, so I created a strawberry filling to wedge them together, and topped them with a berry (I only had some rather wizened looking frozen berries, of course fresh ones would look infinitely better) You can purchase these firm sponge fingers crusted in sugar crystals in the specialty section of most grocery stores, and last almost forever in an airtight container until you're ready to fill them. You can also use any flavoured jam in the filling, and any berries to garnish. Decadent!


 STRAWBERRY CREME FINGERS (A Lick the Spoon Original)

1 tbsp. butter, melted
2 tbsp. strawberry jam
1 tbsp. heavy/thickened cream
1 cup icing sugar
30 saviovardi sponge fingers
1 tbsp extra icing sugar to dust
15 fresh berries to garnish

Melt the butter in a small bowl. Add the jam, cream and a little of the icing sugar to the butter. Stir, gradually adding the remaining icing sugar. Beat on high with an electric beater or mixer until thick, smooth and creamy. Fit a piping bag with a small star nozzle, and spoon the filling into the bag. Pipe lines of this mixture along the centre of half of the sponge fingers. Place the uniced sponge fingers on top of the iced ones to form pairs. On one end of each pair, pipe a small star, and top with a fresh berry. Dust with the extra icing sugar before serving, if desired.

Makes 15


Step by step photos: