Showing posts with label Christmas idea. Show all posts

Sunday, December 21, 2014

Homemade Limoncello

If you were to ask what the most exciting thing I have made and tasted this year it would be this-heavenly, liquid gold. Lemony, sweet, alcoholic, utterly refreshing and served ice cold straight from the freezer, this home made limoncello is definitely a case of saving the best till last. It's a recipe with history, passed around Italy. I nabbed it from the glorious hardcover Italian cookbook Limoncello and Linenwater by Tessa Kiros, and she writes

 "This recipe is from Massimo, Giovani's friend, and he got it from his Sicilian friend's grandmother." 

Don't you just love recipes that have been passed on through numerous people and generations? You just know there's something special about it, something coveted. It just adds to the flavour.
This drink really is a labour of love. But food and drink always does taste better with lashings of passion and love poured into it, I am certain of it. I had blisters on my hands after spending hours peeling the lemon yellow off the pith with a potato peeler-but it was so worth it. I can not stress how worth it it was. Thankfully we made a double batch of this lovely drink, so that we could gift it to friends and family this Christmas. It's the ultimate homemade Christmas gift for anyone who enjoys a good drop and is a foodie lover.
We had been saving interesting liqueur bottles over the years for this very moment-after weeks of soaking the peel and waiting for it to settle, we finally got to bottle our very own home brewed limoncello. The feeling of satisfaction was beyond what I expected, especially after we had chilled it in the freezer and taken our first sips. Ahhhhhhhhhh! The perfect beverage to have on a hot summer's day.
Just to test how good our limoncello was, we poured a comparative shot glass of limoncello we had purchased from a well known boutique liqueur store in the Sunshine Coast hinterland. Theirs is a clear pure colourless liquid scattered with gold leaf and set in a cello shaped bottle. Fancy!
Ours is a clear, lemon coloured liquid, brilliant to the eye. In comparison, ours smells and tastes much more lemony, sweeter, with an alcoholic warmth at the end. The store bought one is less aromatic, and perhaps more alcoholically potent. The first impression is "Wow, strong alcohol! Mmmh, lemon."
It's the exact reverse for the home made limoncello.
I'm pretty biased, but I prefer our batch, as does my husband. That dash of love sure is a tasty addition. We hope to carry on our home made liqueur tradition to many future Christmases.And you may ask, what am I going to do with all those peeled lemons? Make old fashioned cloudy pink lemonade of course!


HOMEMADE LIMONCELLO (From Limoncello and Linenwater, by Tessa Kiros. pg. 17)

8 lemons
1 litre (4 cups) pure alcohol
1 kg sugar
1 litre (4 cups) water

Wash and scrub the lemons very well.
Pare them with a potato peeler, removing only the yellow of the skins (any white pith will make the limoncello bitter, so just skim off the yellow). Put the yellow skins in a wide mouthed glass carafe  with about a 3 litre capacity.
Pour the alcohol over the top and seal. Keep covered for one week, shaking occasionally to make sure all the peel is soaking.
Put the sugar in a saucepan with the water and stir until the sugar has dissolved. Bring to the boil and simmer for just under 10 minutes. Remove from the heat. Using a fine strainer or sieve, filter the alcohol into a jug and discard the lemon peel.
Slowly pour the strained alcohol into the hot sugar syrup and stir to combine thoroughly.
Cool completely.
Pour back into the carafe. Cover again and leave for 10-15 days.
Serve well chilled. You can even keep it in the freezer.

NOTES: We used vodka as the alcohol in this recipe. Most pure alcohols are between 96-98%. Makes about 2.25 litres. We made a double batch, and spent about $100 on vodka, sugar and lemons, and got about 4.5 litres of pure Italian bliss. (8 varied sized bottles!) You can store this in the freezer permanently for a super chilled drink-the alcohol cannot freeze.


The process in pictures:


 Just to show you how thinly you need to peel the rind from the lemon, the first slice I took out of the first lemon looked like the above. The peel had lots of white on the bottom, so skim lightly and peel like the rest of the lemon pictured above.


 Your peel should look like this. In the beginning, until I got the knack of peeling well, some of my peel had white on it. This makes the limoncello bitter, so try to avoid it. My small dose of white didn't seem to affect the flavour noticeably.


 All the peel place in glass container.


 Vodka is added to the peel.


 Bottle is sealed and left to sit for a week. Careful when you go to inhale from the bottle, it will burn your nostils!

 
After that the lemon is removed and water and sugar is boiled together to create a hot sugar syrup. This is added to the vodka. It then sits for 10-15 days before bottling.


 Hubby bottling the limoncello.


Voila! Chill and serve.

Saturday, December 6, 2014

Cupcake Christmas Wreath

In celebration of Cupcake Day and that of Christmas, I have utilized a stack of left over cupcakes to create an edible wreath. What a great activity to do with the kids in the lead up to Christmas! If you're looking for things to do with kids in the Christmas holidays, here's a memorable and yummy activity that is bound to keep them busy and get them excited.
All you need is a number is small cupcakes-enough to make a circle, and perhaps an inner circle to make the wreath thicker. Then you will need enough green coloured icing mixture to cover the cupcakes, as well as a large "grass" nozzle. A grass nozzle has several holes in the end to create a grass effect, or in this case, a rough pine needle look. You can most likely pick one of these nozzles up from your local cake decorating store. To the finished wreath, I also added a large gold bow, and some artificial red berries to make it look more festive. The kids went wild for it!


CUPCAKE CHRISTMAS WREATH

Basic butter cake recipe for cupcakes (makes 12 or 24 mini cupcakes. I used mini ones for the wreath):

125g butter
2/3 cup sugar
1 tsp vanilla
1 egg
1 cup SR flour
1/2 cup corn flour
2/3 cup milk
2 egg whites

Preheat the oven to 180C.
Line a 12 hole cupcake tin with 12 cupcake cases. Beat the butter and the sugar until pale and fluffy. Add the vanilla and egg and beat until combined.
Sift the self raising flour and the corn flour and fold into the butter mixture along with the milk. Beat the eggwhites in a clean bowl until soft peaks form. Fold into the milk mixture (don't worry if the mixture looks a little curdled.)
Divide the mixture between the 12 cupcake cases. Bake for 20-25 minutes or until golden and just firm to touch. Leave for 5 minutes before transferring to a cooling rack. 

Basic Butter cream icing:

250g butter
2 1/2 cups icing sugar
2-3 tbsp milk
1 tsp vanilla essence
green food colouring

Beat the butter until creamy. Sift the icing sugar into the butter mixture and whisk, along with enough milk to get a nice thick texture. Add the vanilla and the food colouring, and thoroughly combine. You may want to add a little more icing sugar if your icing does not hold shape.

Assembly:
Take all the wrappers off the completely cooled cupcakes. Arrange one circle of cupcakes, then use the remainder to add another inner circle Fill a ziplock bag fitted with a grass nozzle with the butter cream icing. Pipe onto the cupcake wreathe using until the tops are well covered. Decorate as desired with ribbons and holly to complete.


Check out other bloggers involved in cupcake day!

Wednesday, December 11, 2013

Christmas Food

My camera has just died, right before Christmas. It became damaged in the last foodie photo shoot it will ever take. Yeah, I'm an extreme photographer--you know, the type that snaps a shot of the Christmas cake while I'm hanging off the ceiling. No really, it did stop functioning in my last photoshoot. Somehow it got jammed between the fly wire door  and the ledge between the door and the house while I was rearranging a plate of food, and BAM! the lens now does not open at all. Blasted wind.
I have been totally lost without my camera and it makes me realise how frequently I'm snapping things. Well--at least there's something my hubby can pop under the tree now, and I'm definitely in need of an upgrade anyhow. In fact, one of my readers has recently informed me that my camera just "isn't doing the job". Gee thanks for that feedback. Being camera-less however means a nasty halt to any new blog posts, which is never good news. But because I love you all, I've thrown together a collection of some of my previous Christmas recipes and favourite festive food to help deck your Christmas table, from spiced Spaculaas to chocolate dipped cherries to gingerbread and gold dust! Enjoy! I wish you all a very merry Christmas--may it be blessed and filled with good cheer, lots of wine and the best of food  xo


Sunday, November 17, 2013

Caramel Popcorn Balls

 My son will not eat corn, hence he will not eat popcorn.
"Mum," he says "if it's corn, it's a veggie." And we all know how hard it is to get the kids to eat their veggies, even if it is in the form of popcorn. Yes, this is the three year old that knows his chocolate custard from his chocolate mousse, and isnt hesitant to make it known. "This isn't custard Dad--I think it's chocolate mousse!" While I beam with pride that my son knows the difference, part of me thinks, we probably conume more mousse and custard than we should.
My two year old daughter on the other hand, is more of the experimental type, and corn in any form does not faze her. In fact, she can't get enough. She went crazy for this popcorn when I made it. Her eyes almost popped out of her head with glee when she saw me pouring hot caramel over the fresh popcorn, and she started clapping excitedly. This recipe for caramel popcorn is from Danielle's blog, Hugs and Cookies XOXO. Danielle is the owner of a delightful blog just bursting with all sorts of scrumptiousness--and I found it hard to choose just one recipe to recreate for this months Secret Recipe Club Reveal. The caramel recipes alone left my keyboard rather drooled upon. Anyway, I've been looking for Christmas recipes for a long time, and when I came across the caramel popcorn it brought back vivid memories of Christmases gnawing away at caramel popcorn in the form of a ball.
My parents ended up making a rule against gift giving among my siblings--there are ten of us kids, so you can imagine the mountains of presents surrounding the tree and everyone getting stressed over what to buy and the lack of coin, especially among the younger ones. So my parents would give us all presents, and we would in turn, add something to the day--the Christmas tree, the wine, the pudding, the candy canes for the tree--whatever we wanted. For many years in a row I recall making caramel popcorn balls tied with ribbon, and hanging them on the tree like baubles as my little gift for the day. It's very economical and fun, and easy enough for children to make. They would make great DIY teacher's Christmas gifts for the end of school as well, tied up with ribbon in a clear cellophane bag. They would also be a great treat to sell at a school fete--cant you just see all the little ones munching away?
Now will my son eat corn?
Only if it's popped kernels covered in caramel and made into a ball shape. Somehow now, it's not a vegetable.


CARAMEL POPCORN BALLS (Adapted from Hugs and Cookies XOXO)

6 cups already popped popcorn
1/2 cup butter
1 cup brown sugar, packed
1/4 cup honey (golden syrup or light corn syrup and great substitutes)
1/2 tsp salt
1/4 tsp bicarb soda (aka baking soda)
1/2 tsp vanilla

In a large bowl, place the popped popcorn. Set aside.
Melt the butter in a medium saucepan, then add the sugar, honey and salt. Stir to combine, then let boil without stirring for 4 minutes. Remove from heat and stir in the bicarb soda and vanilla. Pour this hot caramel over the popcorn. Stir thoroughly, then set aside for 5-10 minutes to cool. The caramel is extremely hot, so cautiously test the caramel with your finger to make sure it's cool enough to handle. While it is still warm, scoop handfuls of caramel popcorn and form them into balls, about fist size. Make sure you use some pressure, so that the ball holds together firmly. Set aside to cool before tying with ribbon.

Makes approximately 6


Monday, December 19, 2011

Chocolate Dipped Strawberries

 My favourite days of the month are The Secret Recipe Club's reveal days, when all those delightfully gourmet photographs appear at once on club members pages. It's the time I feast my eyes on other people's creations and marvel at the  new windows of opportunity opening around me.  So much deliciousness, so little time!
This month I was privileged to receive an assignment to work from the blog Simply. Food.
I am always fascinated by other people's food blogs and the way they go about their kitchens and their food lives. Simply Food is a blog dedicated to vegetarian cooking, keeping it simple and delicious. The blog is full of delightful recipes and I had a hard time choosing, once again. As you may know, my "food life" is sweet and perhaps sometimes a bit too complicated, so it was refreshing to see so many simple yet effective (and obviously mouth watering) recipes on this blog.
I decided to take that simplicity and make it festive, for the Christmas season ahead of us, with Simply. Food's Chocolate Dipped Strawberries.
I had bought quite giant strawberries grown in Victoria, so I halved the recipe from the original...be sure to check out Simply Food's version! And enjoy!


CHOCOLATE DIPPED STRAWBERRIES

12 ripe strawberries, room temperature
200g white chocolate
Edible gold dust or other decoration (such as sprinkles, edible stars, coconut)
12 Toothpicks or skewers

Melt the white chocolate in a microwave-safe bowl, checking and stirring frequently to prevent burning.
Insert one toothpick into each centre of the green leafy part of each strawberry. Dip the strawberries one by one into the melted chocolate, then dipping into your choice of decoration while still slightly wet. If you are using edible gold dust, use a small brush to sprinkle the powder over the chocolate. Lay aside to set before serving.


Saturday, December 17, 2011

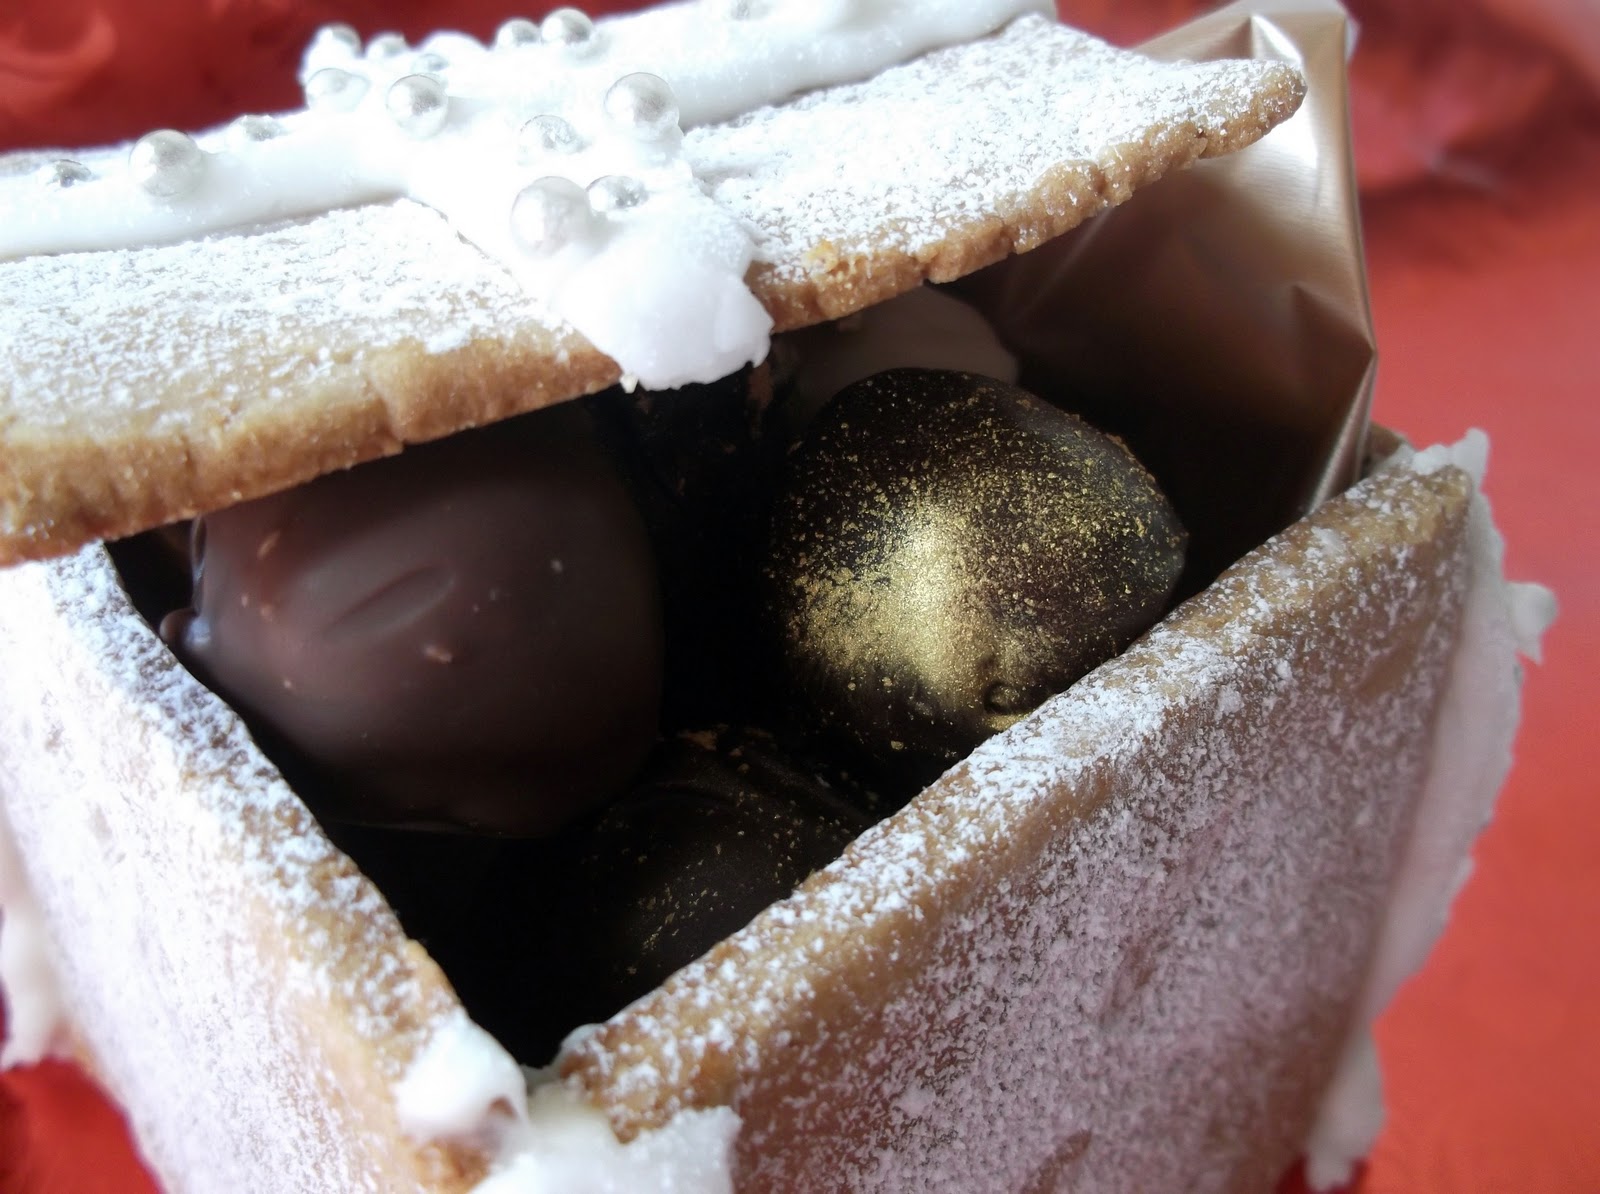
Gingerbread Christmas Boxes

If you're looking for a different and tasty way to wrap up small gifts this Christmas, you might be interested in this gingerbread alternative to cellophane or gift wrap.
These little edible boxes are ideal for those little gifts for friends like homemade biscuits, truffles and chocolates. They are adorable and are sure to bring oohs and ahhs all around.


GINGERBREAD CHRISTMAS BOXES (reworded from the Coles Christmas Magazine 2011)

125g butter, chopped
1/2 cup brown sugar, firmly packed
1/2 cup golden syrup
1 egg, separated
2 1/2 cups plain flour
1 tbsp ground ginger
1 tsp bicarbonate of soda
1 cup white chocolate chips, melted
1 3/4 cups icing sugar
Cachous to decorate

Preheat the oven to 180C.
Beat butter and sugar until light and creamy. Add syrup and egg yolk and beat until combined.
Add sifted flour, bicarb soda and ginger. Stir through with a butter knife until a dough forms.
Gather dough together and turn out onto a sheet of non stick baking paper. Divide into two even amounts.
Wrap one portion in cling wrap and set aside.
Roll the other portion out into a rectangle about 26cm x 18cm and trim the sides to neaten. Cut dough into 12 even pieces (four rows of three). Transfer squares to a greased and lined baking sheet with a little room for spreading. Place tray in the fridge to chill while you repeat this method with the remaining dough.
Bake the first tray for 10 minutes while chilling the second tray. Leave the squares on the tray for 5 minutes to cool before removing.
Place the melted white chocolate in a piping bag and use to "glue" the edges to form boxes. Leave to set.
Whisk egg white until frothy, then gradually add sifted icing sugar to form a stiff paste. Place in a piping bag and use to fill any gaps in the joins of the gingerbread boxes. Decorate with cachous. Pipe a cross on the lid of each box. Leave to set before filling.


Thursday, November 3, 2011

Chocolate Crinkle Biscuits

These biscuits remind me of Christmas. I don't know if its that the icing sugar that covers these cute chocolate biscuits reminds me of snow, but there's something definitely festive looking about them. The name brings to mind crinkly old people, but brush the thought aside, these are anything but like wrinkly skin.
They're simply divine.
They smell like chocolate pudding when cooking and are so quick and easy to make. The minimal effort for the the huge taste just blows your socks off,I give this recipe a big five stars.
There is nothing fancy about the ingredients either, which I know some of my readers will rejoice over. Mind you, I don't feel like I have a gourmet pantry, but I suppose for the everyday cook some of the items I use may not be frequently at hand. Never fear, you will probably have all the ingredients for this one just hanging about in your pantries...so go and make these lovely little biscuits and experience the crisp outer layer, the soft melt in your mouth centres and that ever so irresistible chocolate fix you know you need. Go on, you know you do!


CHOCOLATE CRINKLE BISCUITS (adapted from Williams Sonoma)


1/2- 3/4 cup icing sugar
1 2/3 cup plain flour
1/2 cup cocoa powder
1 1/2 tsp. baking powder
1/2 cup butter, at room temperature
pinch of salt
1 1/4 cup granulated white sugar
2 eggs
1 tsp. vanilla essence

Preheat the oven to 180C.
In a large bowl, beat the butter and the granulated sugar until smooth and creamy. Beat in the eggs, one at a time, until well combined. Stir through the vanilla.
Place the flour, cocoa, baking powder and salt on top of this mixture, and gently stir to combine all ingredients.
Place the icing sugar in a shallow bowl. Form rough balls with the dough, the size of a walnut. Roll each liberally in the icing sugar to thickly coat.
Place the balls on greased and lined baking trays. Bake for 10-12 minutes, until they puff and have a cracked appearance on the top.
Remove from heat and let sit on the trays for a few minutes to cool, before placing on a cooling rack.

Makes 50

NOTES: For the best results, cover the dough balls in icing sugar immediately before placing in the oven. If you leave the raw dough to sit, the icing sugar tends to soak into the dough a little and the end result isn't quite as pretty.


Tuesday, December 21, 2010

Delectable Christmas Treats

It seems permissible to gorge ourselves with goodies for just one day of the year...Christmas..and maybe, just maybe, you can get away with Easter as well. If you're not into shortbread or fruity Christmas puddings, you may like to do something a little less traditional and create this super easy, super quick Rocky Road. You can wrap the pieces individually, take a plate of them to the in-laws, whatever your heart desires...I  formed my rocky road into Christmas trees, wrapped them in cellophane and tied them up with ribbon as gifts.


CHRISTMAS ROCKY ROAD


500g dark cooking chocolate
125g unsalted cashew nuts
300g pink and white marshmallows, torn
200g cherry ripe, chopped

Grease a lamington tin and generously line with non-stick baking paper.
Place all the chocolate into a microwave proof bowl and place on high, checking and stirring regularly, until smooth. Arrange cashews, cherry ripe and marshmallow pieces in the lamington tin.
Pour hot melted chocolate over the top of the marshmallow mixture until even and well-covered. Set in refrigerator before turning out and cutting into squares.


Rocky Road Christmas Tree


To create the Rocky Road Christmas tree, prepare squares of rocky road on a smooth surface (I used a piece of cardboard covered in aluminum foil). Start with a wide base, adding less and less squares to achieve a pyramid effect. To ensure the rocky road stays in position, pour some extra melted chocolate over the top. you may sprinkle coconut over the melted chocolate or add other decorations if preferred. Coloured glace cherries would look festive!
Wrap with cellophane and tie with ribbon.

MERRY CHRISTMAS!!

Tuesday, November 30, 2010

Dessert Me Not

Give me any excuse and I'll be in the kitchen making a dessert. Give me any occasion and I'll be in there trying to make a fancy one.
The funny thing about this one is I literally dreamed this dessert to life. I woke up and just had to make it.
Now I have to admit, many of my self-made recipes do not pan out, or need plenty of reworking before they are edible. I remember as a small child, occasionally my mum would allow me to have free range of the kitchen ingredients and let me cook what I wanted. I remember my first ever creation...a sponge-like slice, involving many eggs and coloured sprinkles. She was so brave to let me experiment. And I am sure she took a bite and smiled as if it was wonderful, but to this day I wonder how much of it ended up in the bin.
But this one is so simple, it just cant go wrong. It is gorgeous, easy, effective and would make a great addition to the Christmas banquet table. I know it will be on mine.


FESTIVE CHOCOLATE BASKETS WITH WHITE GANACHE AND TIA MARIA COCONUT

100ml cream
200g white chocolate buttons
1/4 cup desiccated coconut
1-2 tbsp. Tia Maria Liqueur 
250g Dark chocolate buttons


Melt the white chocolate in the microwave, stirring often until  buttons have melted and the chocolate is smooth. Sit to cool.
When cool, add the cream and stir to combine until smooth. Sit to thicken.
Meanwhile, take the dark chocolate and melt. Stir until smooth. Take some plastic wrap and brush on the dark chocolate in a circular shape. Make sure the chocolate is a thick layer, then arrange inside the hollows of a muffin tin. Refrigerate until set before peeling from the plastic.
Place the coconut and Tia Maria together in a small bowl and combine. Spoon desiered amont into the bottom of the chocolate cups.
Spoon or pipe the white ganache over the top of the coconut. Decorate with chocolate curls or leaves. Serve with a dollop of cream.


NOTE: If your ganache becomes too hard, you can microwave it to return it to its liquid state.

Thursday, November 25, 2010

Tradition with a Twist

Christmas has crept up with amazing stealth this year, if you ask me. Where did the last six months go? I feel like I've just finished Christmas shopping from last year and am still a bit clueless for this year. Hmmm. Baking?
I think a nicely boxed batch of shortbread could never go astray in anyone's household around this time of year, and it gives the gift a personal touch if you make it yourself. Homemade shortbread. It couldn't get much better.
Except, it does.
Once you try out this traditional shortbread recipe with a twist, you'll be hooked!
Not only is it totally delicious, it is a very smooth shortbread, and can be jazzed up by being rolled in sugar or drenched in chocolate. Yum! No crumbling with this one, and you're sure to get rave reviews from your recipients!


COFFEE SHORTBREAD
250g butter, at room temperature
1 cup icing sugar
5 tsp. instant coffee
4 tsp. hot water
2 3/4 cups plain flour
Chocolate to drizzle

Preheat oven at 180C. 
With an electric beater, mix butter and icing sugar until it becomes light and fluffy.
Dissolve coffee in water and beat into the mixture. Stir in the flour until well combined.
Roll dough into walnut-sized balls and press with a fork onto greased and lined trays. Bake for 15-20 minutes until golden and crisp. Set aside to cool before drizzling or dipping in chocolate.
Makes 30.