Showing posts with label easy. Show all posts

Thursday, December 18, 2014

Dark Chocolate Ganache and Coconut Tart

Being in Australia, I missed out on all the foodie enjoyment associated with Thanksgiving-but that didn't stop me from making pie! I believe it's a Martha Stewart creation originally- and so simple, delicious and gluten free just as an added bonus. I love that only four ingredients are used to create this luscious silky dark chocolate tart. It's somewhat ganachy, with a gorgeous coconut crust-sort of like a giant, chocolate covered macaroon, really. It's impressive yet takes next to no effort or skill, and feeds an army due to its glorious richness. Could there be any more perfect a dessert for Christmas? Easy, quick, delicious, festive, impressive! Perfection.


DARK CHOCOLATE GANACHE & COCONUT TART (Adapted from Marin Mama Cooks)

4 tbsp butter, room temperature
2 cups dessicated coconut
350g dark chocolate
1 1/2 cups heavy cream

Preheat your oven to 180C.
Place one third of the coconut into a medium bowl with the butter and stir thoroughly to combine. using your fingers, combine the remaining coconut with the butter coconut mix.
Line a 9in pie dish with baking paper. Press the coconut mixture firmly into the base and then up the sides of the dish, leaving the top edge more loosely packed and fluffy. Lay a sheet of foil underneath your pie dish and draw a circle around it. Cut off the edges so that you have a foil cover the size of the pie. Fold this in half and cut a half circle about two inches from the edge. Unfold to reveal a "o" shaped ring of foil. Place this on the pie so that it covers the top of the edges. This will stop it from over browning. Place the pie in the oven. You will need to carefully watch the pie, as ovens vary hence does the cooking time. Also what you cook in (glass, tin, ceramic etc) will alter the browning time. I cooked mine in a tin and it took about 12-15 minutes to start tuning a golden brown. Then remove the foil and cook for a further 4 minutes until just golden on the edges. Be careful not to let the bottom get too brown. If one area is getting too brown, cover in a piece of foil to stop the browning process in that area.
Remove from the oven and set aside to cool. When the crust is cool, chop up the chocolate and place it in a medium sized heat proof bowl. Place the cream in a small saucepan. Over a medium-low heat, bring the cream just to the boil.  Pour the cream over the chocolate, and let it sit for 10 minutes undisturbed. Mix together until fully incorporated and smooth and glossy. Pour into the coconut base and smooth the top if you need to.
Refrigerate until the chocolate has set (this will depend on the the of chocolate you use, it can take from 2 to 24 hours)

Serves: 10-12 (slice small as this tart is very rich)


Saturday, December 6, 2014

Cupcake Christmas Wreath

In celebration of Cupcake Day and that of Christmas, I have utilized a stack of left over cupcakes to create an edible wreath. What a great activity to do with the kids in the lead up to Christmas! If you're looking for things to do with kids in the Christmas holidays, here's a memorable and yummy activity that is bound to keep them busy and get them excited.
All you need is a number is small cupcakes-enough to make a circle, and perhaps an inner circle to make the wreath thicker. Then you will need enough green coloured icing mixture to cover the cupcakes, as well as a large "grass" nozzle. A grass nozzle has several holes in the end to create a grass effect, or in this case, a rough pine needle look. You can most likely pick one of these nozzles up from your local cake decorating store. To the finished wreath, I also added a large gold bow, and some artificial red berries to make it look more festive. The kids went wild for it!


CUPCAKE CHRISTMAS WREATH

Basic butter cake recipe for cupcakes (makes 12 or 24 mini cupcakes. I used mini ones for the wreath):

125g butter
2/3 cup sugar
1 tsp vanilla
1 egg
1 cup SR flour
1/2 cup corn flour
2/3 cup milk
2 egg whites

Preheat the oven to 180C.
Line a 12 hole cupcake tin with 12 cupcake cases. Beat the butter and the sugar until pale and fluffy. Add the vanilla and egg and beat until combined.
Sift the self raising flour and the corn flour and fold into the butter mixture along with the milk. Beat the eggwhites in a clean bowl until soft peaks form. Fold into the milk mixture (don't worry if the mixture looks a little curdled.)
Divide the mixture between the 12 cupcake cases. Bake for 20-25 minutes or until golden and just firm to touch. Leave for 5 minutes before transferring to a cooling rack. 

Basic Butter cream icing:

250g butter
2 1/2 cups icing sugar
2-3 tbsp milk
1 tsp vanilla essence
green food colouring

Beat the butter until creamy. Sift the icing sugar into the butter mixture and whisk, along with enough milk to get a nice thick texture. Add the vanilla and the food colouring, and thoroughly combine. You may want to add a little more icing sugar if your icing does not hold shape.

Assembly:
Take all the wrappers off the completely cooled cupcakes. Arrange one circle of cupcakes, then use the remainder to add another inner circle Fill a ziplock bag fitted with a grass nozzle with the butter cream icing. Pipe onto the cupcake wreathe using until the tops are well covered. Decorate as desired with ribbons and holly to complete.


Check out other bloggers involved in cupcake day!

Thursday, October 23, 2014

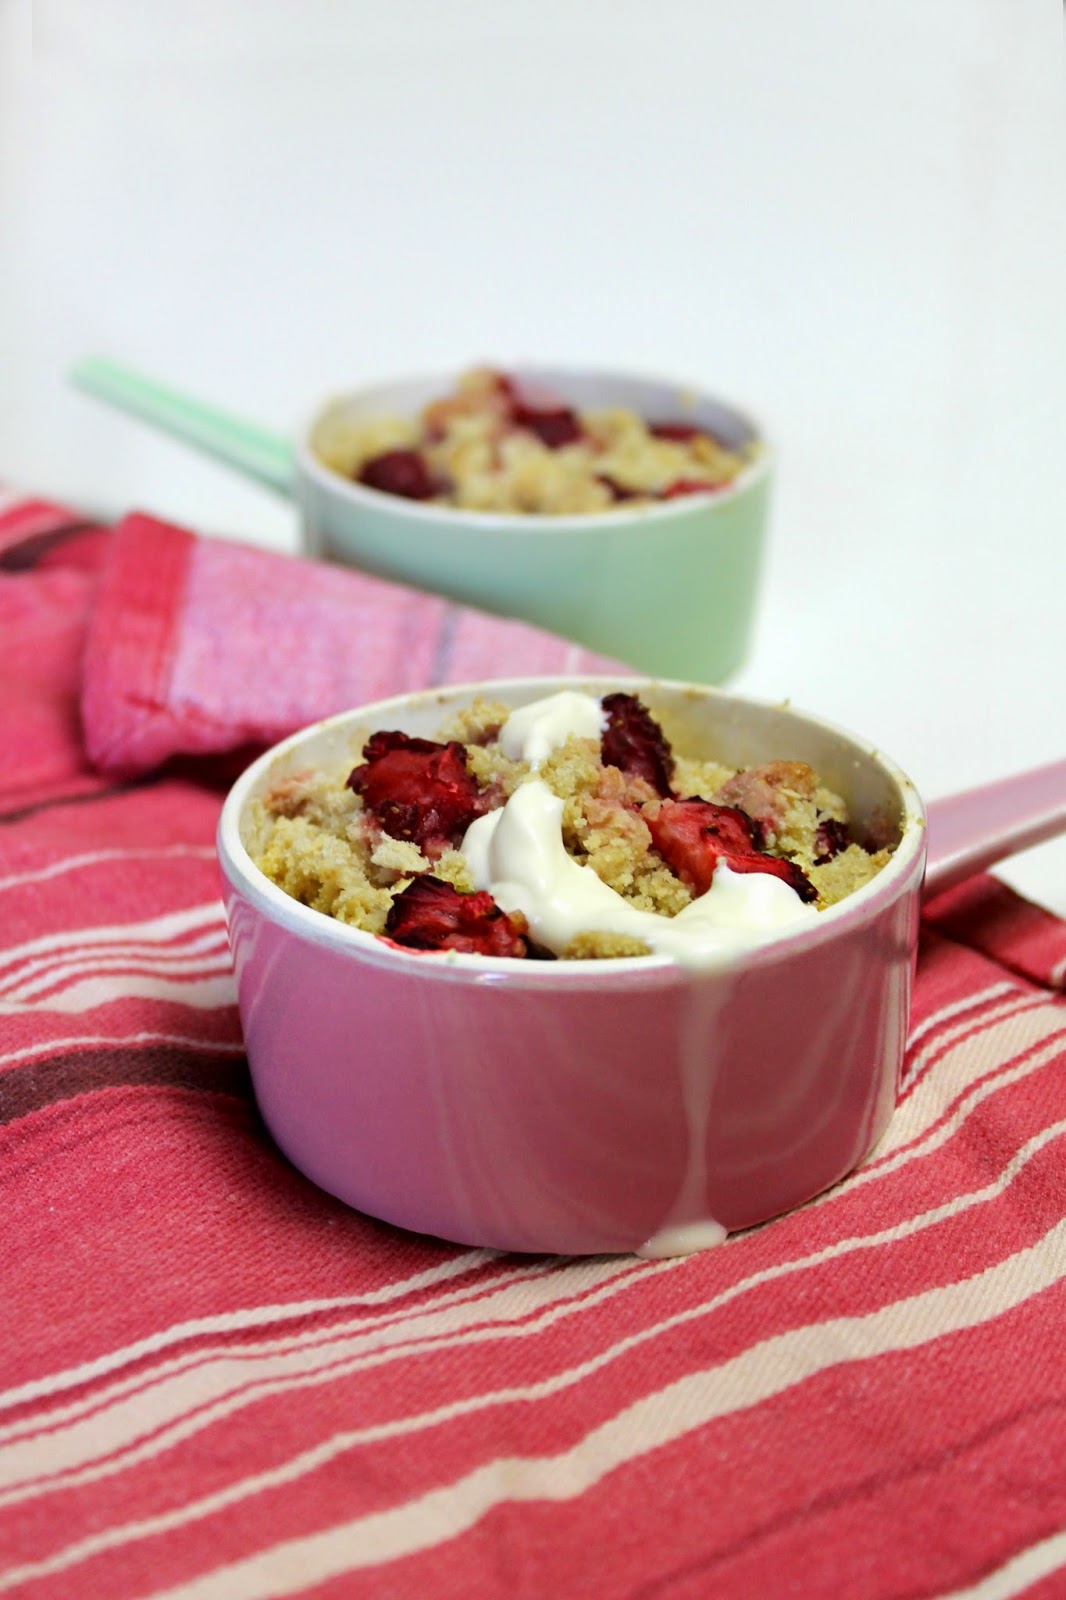
Strawberry and Pear Crumbles

 It was a brown slimy substance defrosting in a ziplock bag on the counter. Brown liquid was accumulating in the bottom. My husband came home and pulled a face of disgust as he gingerly inspected it , and asked me what on earth that ungodly looking goop on the bench was. You know, when you buy too many bananas, and they start going brown on the outside and a little soft under the skin? I peel them and pop them in a ziplock bag in the freezer, ready for banana bread when I have the chance. When I told my husband that I intended to make a cake with this squelchy mess, I think he almost passed out.
He was so disturbed by it that I promised to throw it out. The next time I served banana bread, he had no idea that I used the same method for saving my bananas, and he loved that bread! I secretly chuckle and continue with the practice. What do they say-what you don't know can't kill you? I doubt that saying rings true for many cooking substances, but hey, I've worked in kitchens and seen chefs use the ten second rule and worse multiple times. Shhh...don't tell anyone I told you!
But back to over ripe fruit, it seriously carries an intensified flavour. I'm sure it doesn't apply to all old fruit and there's a fine line between old and OLD. Browning bananas always make the best banana bread, soft tomatoes make the sweetest chutney, you get the picture.
Well, I had a bruised pear and some strawberries that were looking pretty tired. I decided to slice them up and pop them into an apple crumble style dessert, without the apple. Also, being a sucker for vintage kitchen wares, I couldn't resist the opportunity to get out those pastel ramekins!
This is a really easy, go to recipe for a quick, delicious and nutritious dessert. It took as little as five minutes to assemble.
I was so surprised by how these two fruits came together in perfect harmony, topped with a delightful oat laden buttery crumble on the top with a dollop of cream. The juices of the strawberries had coloured the pear a soft pink, and it was a very pretty and scrumptious end to a meal.


STRAWBERRY AND PEAR CRUMBLES (A Lick the Spoon original)

1 large pear
1/2 cup strawberries
1 tbsp butter, melted
3 tbsp. plain flour
1 tbsp brown sugar
1 tbsp rolled oats
Cream to serve (optional)

Preheat the oven at 180C.
Peel, core and slice the pear. Slice the strawberries. Layer these two cut fruits between two oven proof ramekins. In a small bowl, pour the melted butter. Add the flour, brown sugar and oats. Combine until a crumbly dough forms. Sprinkle this mixture over the tops of the fruit in the ramekins. Cook for 15 minutes. Cool for a few minutes before serving with cream or ice cream if desired.

Serves 2


Tuesday, November 12, 2013

One Minute Self Saucing Nutella Mug Pudding for One

Movie ticket for one. Table for one. Pudding for one.
Sounds lonely.
I don't like doing those sorts of things on my own. Never really have had to fortunately. But it sounds way too lonely to be any fun.
Until last night.
I did it.
I went solo.
My husband said it was the perfect night for pudding. It was cool--the type of night you just want to roll up in a ball in front of a log fire like a cat and bask in warmth and hibernate there forever.
But what to do when you can't be bothered cooking pudding for an hour because you're way too tired and it feels like a hundred hours past your bed time?
One minute self saucing microwave mug pudding. And even better, it's choccas with Nutella. Can't really go wrong there.
I can tell you I got a little excited seeing the pudding magically rising before my eyes in the coffee mug and it made its way slowly around the microwave carousel. Nothing really beats chocolate self saucing pudding made in the oven, but this came pretty close, and considering it took so little time, it turned out to be a winner. It's a self saucing pudding, and the sauce sits awaiting at the bottom of the mug, making it fudgy the further you dig the spoon down. Ooh laa la! So good with ice cream...and perfect consolation food for those damn heartbreaks and breakups most people suffer at least once in their lives. Forget eating out of a tub of ice cream. Get to it! It will only take two minutes of your time to put together, and another in the waiting for it to cook, and voila! Better than tall, dark and handsome? Yes...it's rich too.
This decadent recipe makes one generous serve in a large mug (my mug wasn't on the large side, hence the explosion)...so if you're in a wonderfully happy loving relationship, grab two spoons and share it with your significant other. You could even add walnuts to this recipe for something really special--and I also like to add a dollop of cream for nice contrast. Dessert tonight--sorted! In less than 5 minutes from beginning to end.


ONE MINUTE SELF SAUCING NUTELLA MUG PUDDING FOR ONE (from Live Love Pasta)

1 egg
4 tbsp self raising flour
4 tbsp sugar
3 tbsp unsweetened cocoa powder
3 tbsp nutella
3 tbsp milk
3 tbsp oil

Place all the ingredients in a large mug. Thoroughly whisk with a fork until well incorporated and the egg is well broken down. Place in the microwave and cook on high, for approximately 1-1.5 minutes. Cooking time will vary due to the differences in strength from microwave to microwave. Serve with cream or ice cream if desired.


Friday, October 25, 2013

Mango Butter Cream Sponge Cake

 I've been noting the trending goings-on in the food world of late. One of the great things about food blogging, is that even people who approach me and don't know me always have something interesting to share about their food experiences. Food is such an awesome universal binder, is it not?
Anyway there have been a few trendy things going on of late. Forget bacon on sweets and salted caramel,  that's so 2012. Things have gone to another level, with bars serving fried locusts on the side of cocktails (to be eaten) and some sort of sand worms have also made an appearance in fancy restaurants up here in Queensland. I know St. John lived off locusts and honey--but would you choose it when you have a menu of delicacies before you? (Having said that, apparently they are low fat and high protein, might make a good snack for weight watchers!) Call me a wimp, but I don't go in for these things. That includes sheep's brains, offal, haggis and the likes. Really, some things should not be eaten.
Speaking of unsavoury things in Queensland, what's with the fried feet? You'd think no one owned shoes around here. (Seriously this is a great embarrassment to me, seeing grown people walking about the streets and in shops with no shoes. We don't live in a seaside town either. I have the feeling we're going back to primitive times.)
On a loftier note, mango is back in season, and I couldn't help myself with this gorgeous sunny, fruit laden sponge cake. You will love the airy texture of this quick and easy sponge, layered with decadent mango butter cream and girdled with toasted coconut. It's a wee piece of heaven, and makes an effortlessly impressive addition to any table.


MANGO BUTTER CREAM SPONGE CAKE (partially adapted from Better Homes and Gardens, April 2010)

1 cup self raising flour
1 tsp cornflour
1 cup caster sugar
3 tbsp milk
2 tbsp melted butter
3x 60g eggs
finely grated zest of 1/2 lemon
1 tsp. baking powder

Preheat the oven to 190C.
Grease and line two 20cm cake pans with butter and baking paper. Sift the flour and cornflour into a large bowl, then add sugar, milk, butter, eggs and zest and beat with the electric mixer on high. Beat until light and fluffy, approximately 3 minutes. Fold the baking powder into this mixture.
Divide the mixture evenly between the two cake pans. Bake for 18-20 minutes until golden in colour and cooked through when tested with a skewer.
Leave to cool in pan for 5 minutes before removing to complete the cooling process on a wire rack.

To make the Mango Butter Cream:

*please note, quantities stated below are just rough measurements, I tend to add a little more icing sugar or liquid until I reach the desired consistency, so feel free to do the same*

1 mango, peeled, seeded, pureed
3 cups icing sugar
1/3 cup butter, room temperature
1/4 cup cream
1/2 cup toasted coconut, to decorate
1 extra mango, sliced, to decorate

Place pureed mango, icing sugar and butter in a large bowl, and beat with an electric beater. Gradually add the cream until the desired texture is achieved. Whip until light and airy before smoothing between the two sponge cakes, on the sides and the top. Press toasted coconut to the sides of the cake, and decorate with extra mango slices if desired.


NOTES: This sponge cake is best eaten on the day it is made, for maximum softness.


Sunday, October 20, 2013

Mad Easy Jam Coconut Macaroons

Coconut, shmokonut, we all love it around here. Thanks to this subtropical climate I live in, such flavours are much desired and a great match for the other tropical fruits that grow locally here, such as mango and banana. But there's long been a combination I've desired to see together. I'm a terrible matchmaker-most matches I make end in tears, so I'm better of sticking with food rather than ill-suited couples. I give myself brownie points for trying though (lets make that dark chocolate fudgy brownie points).
The local Woolworth store here has these amazing coconut drops with strawberry jam on the top, and I have been long looking for a recipe. The coconut is sweet and moist, but the little drops hold together beautifully and hardly look cooked--how do they do it? Anyway, I have not been able to find any recipe to compare. But I'm back with the Secret Recipe Club after my post baby break, and I was given the blog A Couple In The Kitchen to cook from. They have a great 4 ingredient recipe for coconut macaroons--and I just had to try it. It's so simple, quick, and gluten free--exactly the type of recipe a new mummy like me needs between baby sleeping and waking. They're also strangely addictive, and are sure to disappear from the kitchen very quickly.

When you first inhale that warm coconut aroma, and the sweet scent of boiling strawberry jam, you will realise that eating these coconut jam drops straight out of the oven is well worth burning the tongue for.

I've adapted the recipe a little to see if I could make them anything like the Woolworth's coconut drops. (It turns out, to my absolute glee, that they are very much like those delicious morsels! They're soft, sweet and moist with a little crunch on the outer--divine!) My husband also has a strong aversion to almond essence, which was in the original recipe, so I made them just vanilla instead. I also did not have sweetened flake coconut (I don't think we even sell sweetened coconut here in Australia!) so I used dessicated coconut, and found that the sweetness from the condensed milk was enough to satisfy any sweet tooth. I think the addition of strawberry jam also added just a little more sugar, and made these darling little coconut jam macaroons the perfect addition to an afternoon tea platter or even a festive little treat for the Christmas table.
Please don't forget to check out  A Couple In The Kitchen's blog...they are recent award winning bloggers!


MAD EASY JAM COCONUT MACAROONS (adapted from A Couple in the Kitchen)

3 cups dessicated coconut (unsweetened)
300g sweetened condensed milk (approx. 3/4 can)
3 tsp vanilla essence
1/4 cup strawberry jam

Preheat the oven to 180C.
Line one large baking tray with non stick paper. In a large bowl, place the coconut, condensed milk and vanilla essence. Stir until well incorporated. Scoop amounts the size of a golf ball into your hand and gently form into a round shape. Using your index finger, make a small indentation to the top, and place on tray and lightly flatten. Repeat until all the mixture is used up. Then fill the indentations with a little jam. Bake for 10-12 minutes, until lightly browned. Allow to cool on the tray before removing.


Makes approximately 18


Friday, August 23, 2013

Ultimate Meringue

Meringue. There's something nostalgic about meringue and it makes me think of white, fluffy fairy castles. I used to watch my mum piling that sticky, sweet goodness up into high mounds before baking it and turning it into a most impressive pavlova. "Pav" was always a favourite around our house when I was a child, and sinking my teeth into it makes me a little bit proud too, being a particularly Australian dessert.
Unfortunately when this little girl grew up into a woman and tried piling meringue fairy castles up for her own children, I was hit was huge waves of dissapointment.
Flat. Sticky. Weeping. Gooey inside.
The meringue, not me.
Although I felt a little how it all looked, sagging there on the kitchen bench in delicious disarray. (Good thing you can still put failed meringue to good use with an Eton Mess Dessert)
I blamed it on the humid, tropical climate I moved up to. Then my sister in law Liz told me her mum, who long resided in the same climate as I do, made the best pavlovas despite the humidity. That made me feel a million dollars. It was official--I was a failure at meringue.
So as you may well guess, I went crazy trouble shooting meringue and all the possible mistakes I could be making that made my meringues so temperamental. To my joy I found I was correct about the humidity and rain playing a roll in its failure, so be sure that if you want to succeed, chose a dryer day if you can to get baking. Having said that, it's winter here and still 70% humidity and my meringues, using the below recipe for the ultimate meringue, formed glorious, crisp on the outside, slightly chewy on the inside, non-weepy, non-gooey, non-sinky, gorgeous meringues. I think it might be fail proof. Finally.
I now have two favourite meringue recipes that have never failed me to this day. One I use for making Meringue Swans, and it does brown a bit, and has the most delicious crunchy outer and caramelly inner. But this recipe keeps its whiteness and I (almost) promise, you won't have any issues with it. Bon appetit!


ULTIMATE MERINGUE (From BBC Good Food)

4 large egg whites
115g caster sugar
115g icing sugar
a few drops of food colouring if desired

Preheat the oven to 100C (110C for a fan forced oven).
Line two or three trays with baking paper and set aside. In a medium to large, clean and dry glass bowl, add the egg whites. Beat on medium speed until the whites stand up in stiff peaks when the beaters are lifted and they resemble fluffy clouds.
Turn up the speed to high and begin to add the caster sugar, a tablespoon at a time with 5 seconds in between each addition. (If you add the sugar too quickly, the meringue may weep at a later stage) You may add some food colouring at this stage if desired.
The mixture should look thick and glossy when it is ready--do not over beat.
Divide the icing sugar into three parts. Add the first part, and fold it into the mixture with a rubber spatula or big metal spoon. Repeat with the two remaining parts. Don't over-mix at this stage, just fold until the mixture looks smooth and billowy, like a snow drift.
Y0ou can place the meringue mixture in a ziplock bag fitted with a piping nozel and pipe the mixture as desired, or simply spoon the mixture onto the tray, using another spoon to help ease it off.
Bake for 1 1/2 hours to 1 3/4 hours in a fan oven, or 1 1/4 hours in a conventional oven. Meringues are ready when they feel dry to touch and sound hollow when tapped underneath. Leave to cool on the trays for a few minutes, then remove to cooling racks. Meringues will store in an airtight container for up to 2 weeks, and can be frozen for a month.

Wednesday, July 31, 2013

Thick, Creamy Chocolate Custard Yogo

Where do you keep your chocolate stash? Come on, I know you all have one, even if it is just an unintentional stash. Sometimes I find myself in the pantry with my hand in the cooking chocolate bag.
Last night I sneaked the block of chocolate out of my hospital bag. It was meant to be a midnight treat for after the baby is born, but now baby is overdue and  necessity calls--the chocolate is out, paired with girlie movies and other feel good things when the night comes and the babies are tucked up in bed. Why is the waiting game so hard?
I don't know...but chocolate sure makes everything feel a little better.
And I have just found the ultimate chocolate feel good recipe that pleases little people and big people alike. It reminds me of the chocolate custard recipe my mum used to make--or those yummy chocolate yogo tubs you get at the supermarket (although they're never big enough.) This super thick, creamy chocolatey goodness is easy and simple to make and cost effective--considering you buy a tub of the stuff for about 5 or 6 dollars. This probably costs a dollar. And I could seriously eat a litre of this stuff in a sitting. Although I can't, because my stomach isn't big enough anymore to do something as reckless as that. Just as well!
You can use cocoa powder instead of Milo powder for this recipe, but I used Milo/chocolate drinking malt for it's added nutritional benefits, and lowered the sugar from the original recipe. My kids can't get enough of this stuff and it makes a nice and not too naughty treat for them that they can scoop on their own from individual little plastic tubs. It's a winner all around.


THICK, CREAMY CHOCOLATE CUSTARD YOGO (Adapted from Best Recipes)

3 cups milk
1/2 cup Milo powder
1/3 cup sugar
4 tbsp. corn flour
1/2 cup boiling water

Place two cups of milk in a medium saucepan over a medium heat. Heat until it boils. Meanwhile, in a medium bowl, place the chocolate powder, sugar, corn flour and boiling water. Stir to combine and dissolve. Add the final cup of milk to this mixture and stir.
When the milk on the stove-top is coming to a boil, pour the chocolate milk mixture into the saucepan through a sieve or strainer. Lower the heat and whisk continuously until the mixture begins to thicken, approximately 5 minutes. Remove from heat and pour into a container or individual tibs. Place a layer of plastic wrap directly over the top of the custard to avoid a skin forming. Refrigerate until cool before serving. Custard will thicken on refrigeration.

NOTES: Makes about 700mL. You can use cocoa powder instead of Milo for this recipe. Some brands of cocoa are stronger than others, so adjust accordingly. You may also like to add a little more sugar if you use cocoa, as Milo is sweetened.


Sunday, July 21, 2013

Peanut Butter Cup Bars

 They're a little bit of smooth and creamy with a little bit of crunch. The delightful flavours of the chocolate top layer combine in complete harmony with the fudgy peanut butter and make it oh so rich and irresistible.
Peanut Butter Bars. I knew when I came across Christine's blog Kitchen Chronicles that she would be the culprit of a weekend's indulgence and possible weight gain. (Don't worry Christine, I already can't see my toes anyway. My hubby had to do a few more kilometers at the gym though, he doesn't have pregnancy as an excuse!)
I loved everything about this slice, not only the flavour and appearance, but that because of the divine richness, it forced portion control. It's also a really easy recipe to make, and requires no use of the oven, just a little bit of the stove or microwave, which makes it great for summer. The only problem I had was a wee one--the peanut butter layer tended to come away with the knife when I cut through the bar. It was probably an error in my butter calculations that made it so. I heated the knife to make it easier to cut the chocolate layer, so maybe that had something to do with it as well.
Well, I'm off for a while from the Secret Recipe Club to have my bub! Wish me luck!


PEANUT BUTTER CUP BARS (Adapted from Kitchen Chronicles)

Peanut Butter Layer:

3/4 cup butter
1 3/4 cups icing sugar
1 cup smooth peanut butter
3/4 cup biscuit crumbs (I used crushed Scotch Fingers but biscuits such as Graham Crackers do the trick well also)

Chocolate Layer:

1/3 cup butter
1 cup dark chocolate buttons

Garnish:

1 tbsp smooth peanut butter

Grease a 9x9 inch tray and line with baking paper.
To make the peanut butter layer, place the butter in a medium saucepan and melt over a low heat. Add the icing sugar, peanut butter and biscuit crumbs and stir until well combined.
Pour this mixture into the prepared tray and smooth with a spatula. Set aside.
For the chocolate layer, place the butter and chocolate in a small saucepan over a low heat. Stirring continuously, allow the chocolate and butter to melt and incorporate. Remove from heat. Gently pour this mixture over the peanut butter layer and smooth with a spatula.
In a zip lock bag, place the remaining peanut butter for the garnish. Microwave gently for 15-30 seconds until the peanut butter is runny, then decorate the top of the chocolate layer as desired. Refrigerate for at least 30 minutes before cutting with a hot knife.


Wednesday, July 10, 2013

Award Winning Lemon Crinkle Biscuits

They say when you start talking about the weather, you have nothing to say.  In some cultures, when they have nothing to say to one another, they talk food instead of weather. I know I'm always talking about the weather on here, but it's because to me, without a question, food and weather go hand in hand. Casseroles and cold winter nights, lemon and summertime, rainy days and comfort food. Call me boring, but weather sways my every move in the kitchen. So here I go again--Today was particularly warm for a winter's day--25C, and it made me rip off my cardigan and get baking in the kitchen with the kids, doors and windows flung open. We whipped up these amazing lemon crinkle biscuits, and the house was infused with citrus scents for the duration of the cooking. I've never tasted anything quite like them.  

They're sweet and crisp on the outside, soft and fudgy on the inside and taste just like summer feels to me--warm and golden, zesty and fresh. 

You absolutely will not be able to stop at one--so make a double batch, I guarantee you won't regret it. And a little note--do use fresh lemon juice and zest! It really makes all the difference and packs a punch. Now I want a lemon tree. Oh for a lemon tree. Lemon really is a perk-me-up.


LEMON CRINKLE BISCUITS (Adapted from LDS Living)

1/2 cup butter, softened
1 cup sugar
1/2 tsp vanilla essence
1 egg
1 tsp lemon zest, finely grated
1 tbsp lemon juice, freshly squeezed
pinch salt
1/4 tsp baking powder
1/8 tsp baking soda
1 1/2 cup plain flour
1/2 cup icing sugar

Preheat the oven to 180C. Grease and line baking trays with non stick baking paper and set aside.
In a medium bowl, beat the butter and sugar together until creamy and light. Add the vanilla, egg, zest and lemon juice. Beat until combined. Stir in the salt, baking powder, baking soda and flour until just combined. In a small bowl or plate, place the icing sugar. Take walnut sized balls of dough and roll them in the icing sugar until well covered. Place on the baking sheets and cook for 9-11 minutes, until the surfaces are matte and the bottoms are just beginning to brown ever so slightly. Remove from the oven and let sit on the baking trays for 3 minutes before removing and placing on a cooling rack.

Makes approximately 25-30
Tastes most awesome when still slightly warm from the oven.


Tuesday, July 2, 2013

Banana Cinnamon Puddings with Butterscotch Sauce

My kids are what I call faze-eaters or gorge-feeders. My daughter has a bird-like, grazing appetite, and my son is a heavy snacker and eats small main meals. But when they discover something new, they gorge themselves on it like they cannot get enough. I don't mind this when it's a healthy thing, and it always is, or I wouldn't let them do it. For the duration of a week it was strawberries. Now they wont look at them. For two weeks it was bananas. Now they wont touch them. It's been beans, chickpeas, pasta, mandarins and yogurt. The banana faze left me with tonnes of bananas I had to cut up and freeze, hence this recipe perked my curiosity and made me feel I could get a little condensing done from the freezer.
And who doesn't love that banana cinnamon and butterscotch combination? Its like a match made it heaven, and its also made with greek yogurt which makes it light and airy with a bit of a tang. Scrumptious!


BANANA CINNAMON PUDDINGS WITH BUTTERSCOTCH SAUCE (From Taste)

100g butter, softened
1/2 cup brown sugar, firmly packed
2 eggs
1 1/4 cup self raising flour
1 tsp ground cinnamon
3/4 cup mashed banana
2/3 cup greek yogurt

Sauce:
1/3 cup brown sugar, firmly packed
1/2 cup cream
25g butter, chopped

Preheat the oven to 180C. Beat the butter and sugar until light and fluffy, then add one egg at a time and beat thoroughly between each addition. Add the flour and cinnamon and mix until combined. Fold in the mashed banana and yogurt. Divide between 6 greased ramekins or 6 greased Texas muffin tins.
Cook for 30-35 minutes or until the tops are golden and a skewer comes out clean.
To make the sauce, place the brown sugar, cream and butter in a small saucepan. Heat on low, stirring for 3 minutes or until the butter melts. Increase the heat and bring to the boil. Lower the heat again and continue cooking for a few more minutes until the mixture thickens. Pour over warm puddings to serve.

SERVES 6.


Banana Cinnamon Puddings with Butterscotch Sauce

Sunday, March 31, 2013

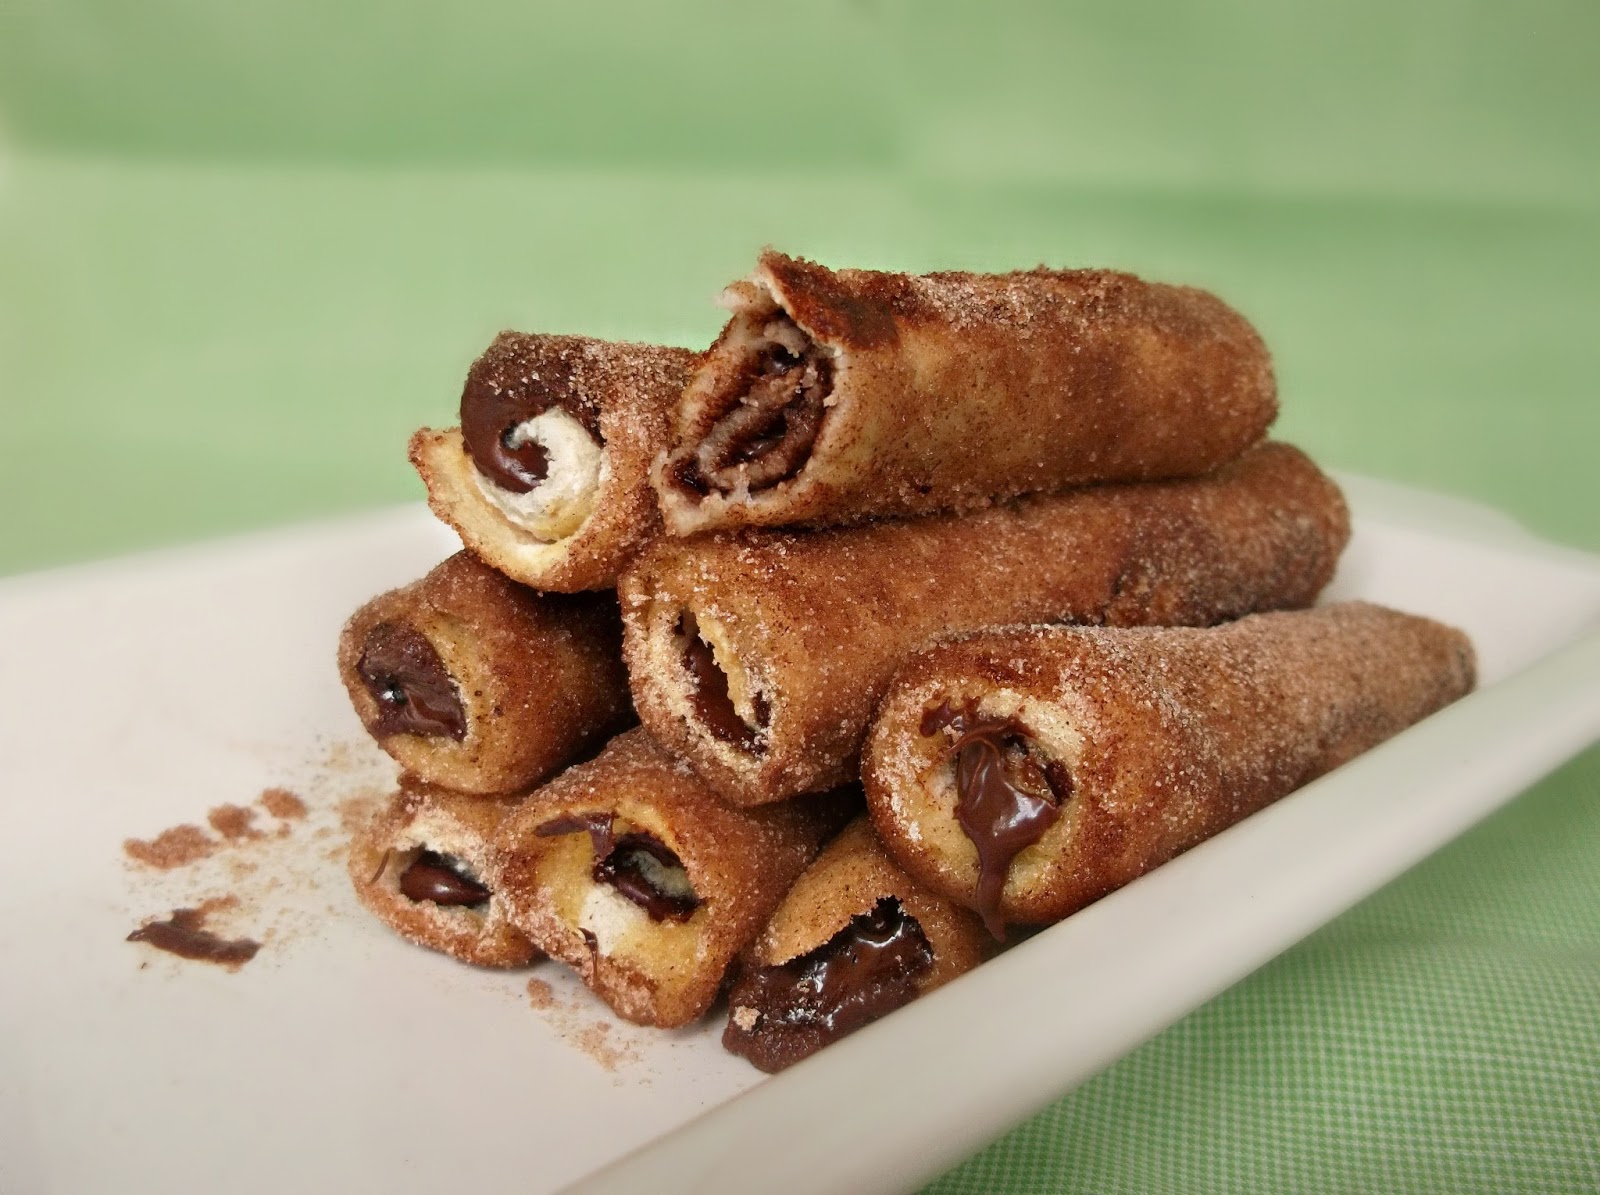
Nutella French Rolls with Cinnamon Sugar

It's been a little quiet around here. I'm always suspicious of silence. I find myself floating, floating, feeling relaxed, and then I think "what the heck is happening? It's actually quiet. Something's up!" Well that's the way you have to think when you have kids. You go and check what they're up to and nine out of ten times they're doing something they shouldn't be doing, like stuffing crayons up each other's noses.
It's a crazy time of the year and nothing should be this quiet. So today I am sharing with you a total gem of a recipe. I'm almost loathed to share it. It's sort of one of those wow recipes that requires absolutely no effort or skill in anyway, and has people wondering how you made it. Once the secret is out however it's a no-brainer. It's so easy and so delicious, you wont be able to stop at one. And the sky's the limit when it comes to filling choices. Here we have nutella filled french toast rolls coated in a delicious golden layer of cinnamon sugar. Imagine them oozing with caramel or strawberry jam? Talk about the perfect breakfast in bed!


 NUTELLA FRENCH TOAST ROLLS WITH CINNAMON SUGAR  
(Adapted from Cinnamon Spice and Everything Nice)

10 slices soft white bread
10 tsp nutella
1 large egg
1 1/2 tbsp milk
1/2 cup caster sugar
1 heaped tbsp ground cinnamon

Remove the crusts from the slices of bread. Discard the crusts.
Take each piece of bread and roll flat with a rolling pin.Spread each piece of flattened bread with one teaspoon of nutella, in a portion measuring about one inch wide and the length of the bread, one inch from the edge of the bread. Roll the bread up tightly.
In a shallow dish, combine the egg and the milk and whisk to combine the two and break down the egg. In another shallow dish, combine and the sugar and cinnamon.
Heat a little butter (or oil) in a frying pan. Dip each roll briefly in the egg mixture until well coated, and then place in the hot frypan. Lightly fry until golden-brown all over, then roll in the cinnamoned sugar. Serve immediately.

Makes 10

Sunday, January 6, 2013

Oreo Cheesecake Swirls

I did it. I ignored my queasy stomach, listened to my heart and mind and set about to create in the kitchen again, determined. It's probably been a month or more since I ventured in to make something I didn't have to make.
It was great, because I had an idea in my mind and just went with it, and within 15 minutes it was all completed before me. Except for the washing up, of course.
The cook should never have to clean up.
Unless you're a cook like me, and it appears a bomb has gone off in that room after you've finished. No one should have to deal with that sort of explosion. So I guess it's up to me. I'm beginning to think I ought to hire cleaners of some sort. Housework gives me blisters. Seriously. My baby hands probably need to do a bit more of it, I'm guessing.
Anyway, nothing worthwhile comes at an easy price, they say. We had some dramas, however not with the cooking (actually, there's no cooking involved in this recipe, it's bake free and summer friendly!) The drama came in the transportation of these gorgeous little morsels. We were headed to my parents in law's house, and I brought dessert. My husband is an exceptional driver, but the Oreo Cheesecake Bites did not stand much of a chance in my hands on that glass plate, with frequents stops at traffic lights and crazy drivers on the road. I figured there's a technique to keeping them on the plate--after we had several go zooming across the car, cheesecake flying and smearing in unimaginable, unreachable places like aircon vents and smooshing into the carpet. We can't wait for that creamy substance to start rotting in the summer heat in that oven like vehicle. Not.
When we stopped at the in-law's place, I promptly opened the door and tossed out the ruined Cheesecake bites, in a truly "un-epic" manner. I tossed them so badly, that the cream simply splattered straight onto the side of the car (where it remains). My husband couldn't believe it. We later found cheesecake smeared over the Christmas presents in the car on the way home. Don't ask!
Anyway, drama aside, the Oreo Cheesecake bites where a hit. The recipe makes approximately 25 (give or take a few depending upon the quantity you pipe on the top), and it's one of the quickest, simplest recipes you'll ever impress your guests with. It's a smooth swirl of cookies and cream cheesecake atop a decadent dark chocolate and vanilla Oreo biscuit.
Life doesn't get much sweeter.


OREO CHEESECAKE SWIRLS

3 packets of original Oreo biscuits
1 cup cream
250g cream cheese, room temperature
1/3 cup caster sugar
Chocolate chips to decorate (optional)

Beat the cream cheese in a medium bowl until smooth. Add the sugar and mix to combine.
In a separate, smaller bowl, whip the cream until firm peaks form.
Take one packet of Oreos and split the biscuits in half, removing and reserving the cream in the centre, by using a butter knife. Place the biscuit halves in a food processor or blender, and blitz until it all resembles fine crumbs.
Add the whipped cream, Oreo crumbs and the reserved Oreo cream into the cream cheese mixture, and fold through until well combined. Set out the remaining two packets of Oreo biscuits on a large serving platter. Fill a piping bag, set with a large star nozzle tip, with the creamy mixture. Pipe swirls of the mixture onto the top of each biscuit. Serve immediately or refrigerate until serving.

Makes approximately 25-30

NOTES: It is easy to make your own caster sugar if you don't have it in your pantry. Simply place the required amount of sugar in the blender and blitz for a few seconds until it becomes finer.For a less rich Oreo bite, you could omit the cream cheese.


Friday, May 11, 2012

Strawberry Oreo Kulter Hund Chunks

It literally translates to "Cold Dog", but that conjures up images of jellied, chunky canned pet food to me. Have you ever wondered how dogs and cats could like eating that stuff?
Well, if eating this German Kulter Hund makes me a dog, so be it, and if it makes me a cold dog, well...maybe I am?
This German favourite is usually made with plain baby biscuits. The plain, rectangular milk biscuits that would be given to babies in the first year or two of life are the ones I'm talking about. The ones that are always the last to go from the family selection pack of biscuits.
So here's a wonderful way to use up those more plain biscuits that can accumulate in the bottom of the tin. I've used strawberry oreos for this recipe to add extra decadence. Who knew oreos have been around for 100 years? I only heard of them about two years ago...I must have been living under a rock. I suppose they're not as common in Australia as they are in America, but I decided to give them a go. After all, just about every cooking blog has something oreo. They must be good!
Truth is...they're delicious. Chocolate ripple biscuits are still my favourite all time biscuit for recipe additions though. Both biscuits have been known to make fabulous pie crusts and fillings for various desserts.
Now just a quick note about these Oreo Kulter Hund Chunks. They're so easy to put together that a child could do it, and there's no cooking involved (just the chocolate melting which can be done in the microwave). They can be a bit messy to make, especially as I made this lot in a 20x20cm bundt tin, but it's so worth it when it's set, and you cut off those lumps of chocolatey-oreoey goodness. It can be a little crumbly between cuts, so grab a zip lock bag and sweep up the crumbly bits...it's fantastic over ice cream! So...even for those of you who don't bake, there's no excuse not to whip this up for your mum on Mother's Day! It's child's play.


STRAWBERRY OREO KULTER HUND CHUNKS

450g good quality compound chocolate (I used Nestle)
250g strawberry flavoured oreo biscuits

Grease and line a pan of your choice. (I used a 20x20cm bundt tin, but a loaf pan is fine as well). Melt half the chocolate very gently in a microwave proof bowl, stopping at 30 second intervals until the chocolate is almost melted and can be stirred smooth. pour a layer of chocolate into the pan to cover the bottom. Cover the chocolate in a layer of oreos. Smooth on more melted chocolate over the oreos. Melt the remaining chocolate.
Layer again with oreos, and repeat with the remaining oreos and chocolate, finishing off in a layer of chocolate. Refrigerate to set, before cutting into rough chunks.

Wrap in cellopane and tie with a ribbon for a budget friendly and delicious Mother's Day gift!


Monday, May 7, 2012

5 Minute Strawberry Cream Sponge Cake

Are you a time-poor or super distracted cook? I often find myself with the intense desire to cook and create something beautiful, but can't find the hours to spend baking and decorating as I would like. Interruptions in the kitchen don't suit at the best of times, and often I have found myself called away to rescue the baby from our frisky cat Poe, or to change a stinky nappy, or to make an unscheduled feed for a baby who has hit her head and needs comforting.
These are major cooking-mojo killers, for often you return to the kitchen to find the bottom of something overcooked, the custard lumpy, or a pot over boiling on the stove.
A failed attempt to create something awesome is enough to kill off my cooking passion for weeks. It's ridiculous, I know. But more than anything, I hate failing.
You don't have to worry about failing with this delicious sponge cake though. I've made it several times now and I'm almost at the conclusion that it's fail proof and idiot proof. There's really nothing to it skill wise and it's quick and fabulous, and looks particularly impressive with the use of a stencil or doily to help decorate the surface in icing sugar powder. That is also something that takes no skill what so ever, but looks super pretty and detailed without the effort. No longer fear thy sponge! You can assemble it in as little as 5 minutes. In fact, the thing that took me longest concerning this recipe was lining the cake tins. So here's one for time poor cooks or those who cant seem to get 10 minutes straight in the kitchen. It's the perfect recipe to whip up when guests are about to pop over and you find the cupboards bare. So little effort, so little time, and such a winner all around.


5 MINUTE STRAWBERRY CREAM SPONGE CAKE (adapted from Better Homes and Gardens, April 2010)

1 cup self raising flour
1 tsp cornflour
1 cup caster sugar
3 tbsp milk
2 tbsp melted butter
3x 60g eggs
finely grated zest of 1/2 lemon
1 tsp. baking powder
1/3 cup strawberry jam for filling
1/2 cup whipped cream, for filling
1/4 cup icing sugar to decorate

Preheat the oven to 190C.
Grease and line two 20cm cake pans with butter and baking paper. Sift the flour and cornflour into a large bowl, then add sugar, milk, butter, eggs and zest and beat with the electric mixer on high. Beat until light and fluffy, approximately 3 minutes. Fold the baking powder into this mixture.
Divide the mixture evenly between the two cake pans. Bake for 18-20 minutes until golden in colour and cooked through when tested with a skewer.
Leave to cool in pan for 5 minutes before removing to complete the cooling process on a wire rack.
Spread the top of one of the cakes with strawberry jam.Whip cream and spoon onto the top of the jam layer. Top this with the remaining sponge cake. Decorate with a sprinkling of icing powder, and serve.

NOTES: This sponge cake is best eaten on the day it is made, for maximum softness. I used a stencil on the top of the cake when decorating with icing sugar for the pictured effect. For other serving suggestions and pictures try our individual strawberry cream sponge cakes or our popular easy sponge cakes with fondant roses.


Thursday, April 19, 2012

Super Easy Peanut Butter Biscuits

Okay this post comes with a little warning. I'm about to get a bit ooey gooey about my husband.
Besides being able to cook, he's a fabulous cook. That's a quality I always wanted when I thought of a husband, before I was married to this gem. I'm a firm believer of men cooking, especially when there's a wife and family to look after. It's wonderful to not "have" to cook, and my husband is more than happy to get in there--in fact, he loves it!
So all my boys as well as the girls will be able to cook, at least the basics. How to fry and boil an egg, cook pasta, bake a cake, cook a roast, you name it, they will be capable when they move out of home. I'm going to make great catches out of my kids--they can thank me when they're happily married. (Besides, who is going to make my birthday cake and Mother's Day cake every year?)
Anyway, my son Ben is almost two years old now, and has already shown an interest in cooking. Mind you, he cooks up army men stew, a cake made of dinosaurs and toy cars. He stirs it with a spoon from the kitchen and then goes around asking the other members of the house to "taste".
He often asks to "cook".
So this morning Ben and I took a large glass bowl and put it on the kitchen floor, and got cooking. It was the perfect recipe to make with him because he has such a short attention span, and it was quick and easy. You should have seen the pride on his face when he saw the tray come out of the oven with biscuits on it! This is what we made.


SUPER EASY FLOURLESS PEANUT BUTTER BISCUITS (from cooks.com)

1 egg
1 cup sugar
1 cup peanut butter
1  tsp honey (optional, but recommended if your dough it too dry)

Set the oven at 180C. Combine all ingredients in a bowl and stir until well incorporated. Place spoonfuls on a greased and lined baking try, and gently press with a fork. Cook for 8-10 minutes or until beginning to brown. Remove from oven and let cool on the tray for 5 minutes before removing to a rack to finish cooling.

Makes 12-16, depending how much dough the kids eat!

NOTES: this recipe can turn out a little differently depending on the peanut better brand and type used. If you find your mixture is dry, add a spoonful of honey and stir through to give a little life and some extra flavour.

Friday, March 2, 2012

Easy Strawberry Cream Sponge Cakes

 I was so impressed with the simplicity of the sponge cakes I made the other day, I just had to make them again. Who doesn't love quick, easy, versatile recipes? Mind you, there a few things I steer well away from in the kitchen for fear of failure, and one of them WAS sponge. I suppose its one of those cakes you hold your breath to throughout the whole cooking process for fear it won't have risen to its soft, airy self.
But have no fear with this recipe, I'm beginning to feel its a foolproof sponge.
There are so many great things about this cake besides the taste.
And I turned these cakes from an afternoon tea delight into a dessert, with just a change of topping! they looked delightful and were so quick to put together.


EASY STRAWBERRY CREAM SPONGE CAKES (adapted from Better Homes and Gardens, April 2010)


1 cup self raising flour
1 tsp cornflour
1 cup caster sugar
3 tbsp milk
2 tbsp melted butter
3x 60g eggs
finely grated zest of 1/2 lemon
1 tsp. baking powder
12 strawberries, to garnish
1/2 cup whipped cream, to garnish

Preheat the oven to 190C.
Grease and line a 12 hole cupcake pan with butter and paper cases or baking paper. Sift the flour and cornflour into a large bowl, then add sugar, milk, butter, eggs and zest and beat with the electric mixer on high. Beat until light and fluffy, approximately 3 minutes. Fold the baking powder into this mixture.
Spoon the mixture into the prepared muffin tin amongst the 12 holes. Bake for 18-20 minutes until golden in colour and cooked through when tested with a skewer.
Leave to cool in pan for 5 minutes before removing to complete the cooling process on a wire rack.
Whip cream and pipe onto the top of each sponge cake. Decorate with a single strawberry in the centre, serve.

Makes 12

NOTES: These cakes are best eaten on the day they are made, for maximum softness.
To make a whole sponge instead of 12 mini sponges, divide the batter between two greased and lined 20cm round tins. Bake at 190C for 18-20 minutes until golden and cooked when tested with a skewer. Cool on wire racks 5 minutes after removal from the oven, and wedge together with jam and whipped cream. To decorate the top, sprinkle a little icing sugar over the surface, add some berries to the centre if desired and serve.