Showing posts with label high tea. Show all posts

Friday, January 31, 2014

Shabby Chic Bridal Shower Hightea

It's been quiet around the blog since my camera gave up the ghost, despite the fact I have been quite busy in the kitchen. Christmas Holidays meant taking time off to be with the family, but I had a few parties in the mix too. One of which was a gorgeous shabby chic style high tea held in honor of a friend who was to be married. It was for her bridal shower and screamed all things feminine and girlie. I themed the menu so that everything was decadent and pink, featuring roses and sugared rose petals, pearls and floral fondant toppers. Teapots sporting beautiful roses, delicate ferns, and lisianthus decked a table strewn with cake stands and champagne glasses, tiered high tea trays and pretty china saucers. Our poison was sweet moscato, with the addition of old fashioned pink lemonade for the non drinkers, and we also had some Rose on the side.
The trays were piled with ornately decorated cupcakes, mini banoffee tarts, mini lemon meringue tarts, pink lamingtons, cake pop skewers, pastel meringues, coconut ice domes topped with edible roses, jelly cheesecake shots, dark chocolate cointreau truffles, white chocolate Tia Maria truffles, dark chocolate royals, and a strawberry topiary.
And, as you can see, one of my Christmas presents was a nice camera, which I was able to take these photos with. I am still working out all the settings and getting used to it, so please bare with me for a while while the photos are not at their best. I will eventually get there! (If you wish for any of the recipes for the above menu, click on the word above--it will take you to the recipe link. Any that are not linked up, these recipes are yet to come! Keep checking back!)

Shabby Chic Bridal Shower Hightea


Tuesday, January 14, 2014

Strawberry Topiary

As a table centre peice for a shabby chic style high tea, I thought a strawberry topiary would work a treat. It stood 40cm tall and stood atop a french provincial style candle stand I purchased from Dusk. It brought out "wows" from the guests and they all enjoyed pulling a couple off each during the afternoon tea I threw. I recommend placing this in the centre of a round table within arms reach of all your guests. I made the mistake of placing this in a place where only one side of a table could reach, and topiary was picked at from one side and the ball ended off overbalancing in the end because one side was all strawberries and the other was bare. If you cant place this in the centre of a small round table, I recommend rotating the topiary every so often, so that the strawberries are taken from all sides.
This would be great on a table at Christmas, for a baby shower, wedding or any sort of girlie or feminine party. It looks decadent and fancy as a table centrepeice while offering your guests a fresh, healthy, gluten free fruit option.


Step by Step Strawberry Topiary How To

You will need:

6x 250g punnets of strawberries
1x 15 cm Styrofoam ball
1x candle holder or similar stand (this must have a metal prong in the centre to secure the ball)
cocktail toothpicks
a small knife


Secure the styrofoam ball in the centre of the candle holder. The stand you choose should have a metal spike in the centre to hold the ball on securely. Glue may be another option if your stand doesn't have a spike in the centre.


Cut the leaves from the strawberries. Cut as closely to the leaves as possible, taking off as little fruit as you can. Keeping a little bit of the "woody" part of the top of the strawberry helps in holding it to the toothpick, so it doesnt just slide off. Reserve the leaves for the final touches of the topiary. These will be used to fill any gaps in the completed topiary.


You will see above that the toothpick is inserted into some of the harder part on the top of the strawberry. This is the goal in the following steps--it doesn't have to be completely centred as long as its well secured in the strawberry. Unlike the picture above, the toothpick goes into the foam ball partway before the strawberry is inserted.


Insert one toothpick partway into the top of the foam ball. Positioning is not very important yet, but it helps if you put the strawberries on the ball evenly so that the ball does not overbalance as you are creating the topiary.


 Push the strawberry onto the toothpick, ensuring that the wood is driven through the thick/woodier part of the strawberry top.


 Carefully push the strawberry downwards to the foam ball. If the toothpick end pops through the top point, ensure you push subsequent toothpicks a little further into the foam ball before topping with the strawberry.


Continue this method over the top of the styrofoam ball.Do not worry to much if there are gaps, as these will be later filled with the strawberry leaves.Try however to limit the size of any gaps, choosing strawberries that are the best size for particular areas.


Continue securing the strawberries until the entire surface is covered in strawberries.


Take the strawberry leaves to fill any gaps (I should have used more but I was in a hurry to snap this photo before guests arrived. Alternatively use clusters of mint leaves for larger gaps--this is also very aromatic and offers a breath freshener to your guests too)

Wednesday, October 30, 2013

Sunday High Tea Buffet at The Stamford Plaza

All the cool kids in the blogosphere have their posts going on about Halloween treats, and oh what to make? And here I am sipping rose tea at a Sunday High Tea Buffet at The Stamford Plaza. Meanwhile less people are visiting the blog at this time of the year because in my world, Halloween is a negative, and I refuse to glorify ghoulishness by cooking up pumpkin heads and the likes. This blog has until now, contained no Halloween goods, zero, zilch!
Ah call me old fashioned, yeah I am! I'm enjoying an elegant high tea by the Brisbane river in my ruffled pink dress with all my the ladies. There's a Sunday High Tea here every week, a glorious chocolate buffet and a yummy savory buffet as well (the smoked salmon quiches are to die for, and I seriously considered bribing the chef for the recipe). They have some really talented and creative chefs working on all the beautiful finger foods we all enjoyed during our visit.
It so happened that the girls and I headed out on the Sunday that the high tea was Halloween themed. So here I am now talking Halloween food. And I'm about to show you what they had on display. It may give some of you ideas for Halloween treats to make if you're into that sort of event--there were white chocolate ghosts, pumpkin head cake pops, and cleverly named desserts such as "Phantom of the Opera Cake" (it was that delightful layered Opera cake that we all want to make but looks too time consuming).
As lovely a time as I had in those glorious surroundings, I was a little zapped out that the high tea was Halloween themed. It certainly took out some of the elegance associated with the tea, cake and scones affair that a high tea usually is. However, the food was still magnificent! The surroundings also absolutely luxurious, and I can say with all certainty, I will be returning to sip many more cups of tea in that river side pavilion surrounded by gorgeous gardens.
Sending a very special thanks out to Marcela for the use of her photos, I was too busy drooling to take any decent ones. And just look at those bright pink finger sandwiches!

Smoked salmon quiches were to die for!
Halloween themed buffet.
Can't have a high tea without scones!

Rose tea (tasted like Turkish delight! Yum!
Macadamia Caramel Slice with a few chocolate ghosts are floating around. (You can make your own by pouring melted white chocolate over the ends of ice cream cones)
This made me not want to eat. I think it's some sort of punch.


Angry little pumpkin head cake pops

True elegance with all the beautiful silverware!


Phantom of the Opera Cake far centre

Oh so fudgy!
Purple and orange macaroons
The Pavilion
Some of the lovely gardens that lead on to Brisbane Botanical Gardens


Yeah that's me biting my lip


Friday, October 25, 2013

Mango Butter Cream Sponge Cake

 I've been noting the trending goings-on in the food world of late. One of the great things about food blogging, is that even people who approach me and don't know me always have something interesting to share about their food experiences. Food is such an awesome universal binder, is it not?
Anyway there have been a few trendy things going on of late. Forget bacon on sweets and salted caramel,  that's so 2012. Things have gone to another level, with bars serving fried locusts on the side of cocktails (to be eaten) and some sort of sand worms have also made an appearance in fancy restaurants up here in Queensland. I know St. John lived off locusts and honey--but would you choose it when you have a menu of delicacies before you? (Having said that, apparently they are low fat and high protein, might make a good snack for weight watchers!) Call me a wimp, but I don't go in for these things. That includes sheep's brains, offal, haggis and the likes. Really, some things should not be eaten.
Speaking of unsavoury things in Queensland, what's with the fried feet? You'd think no one owned shoes around here. (Seriously this is a great embarrassment to me, seeing grown people walking about the streets and in shops with no shoes. We don't live in a seaside town either. I have the feeling we're going back to primitive times.)
On a loftier note, mango is back in season, and I couldn't help myself with this gorgeous sunny, fruit laden sponge cake. You will love the airy texture of this quick and easy sponge, layered with decadent mango butter cream and girdled with toasted coconut. It's a wee piece of heaven, and makes an effortlessly impressive addition to any table.


MANGO BUTTER CREAM SPONGE CAKE (partially adapted from Better Homes and Gardens, April 2010)

1 cup self raising flour
1 tsp cornflour
1 cup caster sugar
3 tbsp milk
2 tbsp melted butter
3x 60g eggs
finely grated zest of 1/2 lemon
1 tsp. baking powder

Preheat the oven to 190C.
Grease and line two 20cm cake pans with butter and baking paper. Sift the flour and cornflour into a large bowl, then add sugar, milk, butter, eggs and zest and beat with the electric mixer on high. Beat until light and fluffy, approximately 3 minutes. Fold the baking powder into this mixture.
Divide the mixture evenly between the two cake pans. Bake for 18-20 minutes until golden in colour and cooked through when tested with a skewer.
Leave to cool in pan for 5 minutes before removing to complete the cooling process on a wire rack.

To make the Mango Butter Cream:

*please note, quantities stated below are just rough measurements, I tend to add a little more icing sugar or liquid until I reach the desired consistency, so feel free to do the same*

1 mango, peeled, seeded, pureed
3 cups icing sugar
1/3 cup butter, room temperature
1/4 cup cream
1/2 cup toasted coconut, to decorate
1 extra mango, sliced, to decorate

Place pureed mango, icing sugar and butter in a large bowl, and beat with an electric beater. Gradually add the cream until the desired texture is achieved. Whip until light and airy before smoothing between the two sponge cakes, on the sides and the top. Press toasted coconut to the sides of the cake, and decorate with extra mango slices if desired.


NOTES: This sponge cake is best eaten on the day it is made, for maximum softness.


Tuesday, October 1, 2013

Coconut Ice Domes with Roses

We've hit a million views. And that makes me want to come out and give a give hug to everyone who has ever been to visit the blog--unless you're some sort of creepy stalker type, then I will refrain. Politely.

Where have I been?
Am I alive?
Why am I posting less frequently?

There are a few reasons:

1. Every time I make or go to eat anything that could be classed as sweet, my husband reminds me I have to visit the dentist. (Random I know, but did you know the pickle in the cheeseburger is the only thing that stops it from being classed as confectionery?)

2. There's someone in this house that needs me more than my blog fans--oh yes, the precious new baby of the house! I would not miss those precious new born moments with her. Yes I am with her every waking hour, and do manage to cook a few things while she's sleeping every so often. So don't worry, I'm not going anywhere!

3. I wish baby weight melted away from eating lots of naughty food. I don't think I stand a chance. (Note to self: It's time to seriously start cooking for my husbands colleagues to keep the recipes rolling. The fat must be shared around.)

4. Blogger is posting my pictures with some sort of grainy, grey film over my shots...making them look super inedible. Slightly moldy, to be honest. (see pictures below for example) I don't know why or how to fix this problem--any ideas? The original shots are light and warm and just beautiful...why have they uploaded like this?

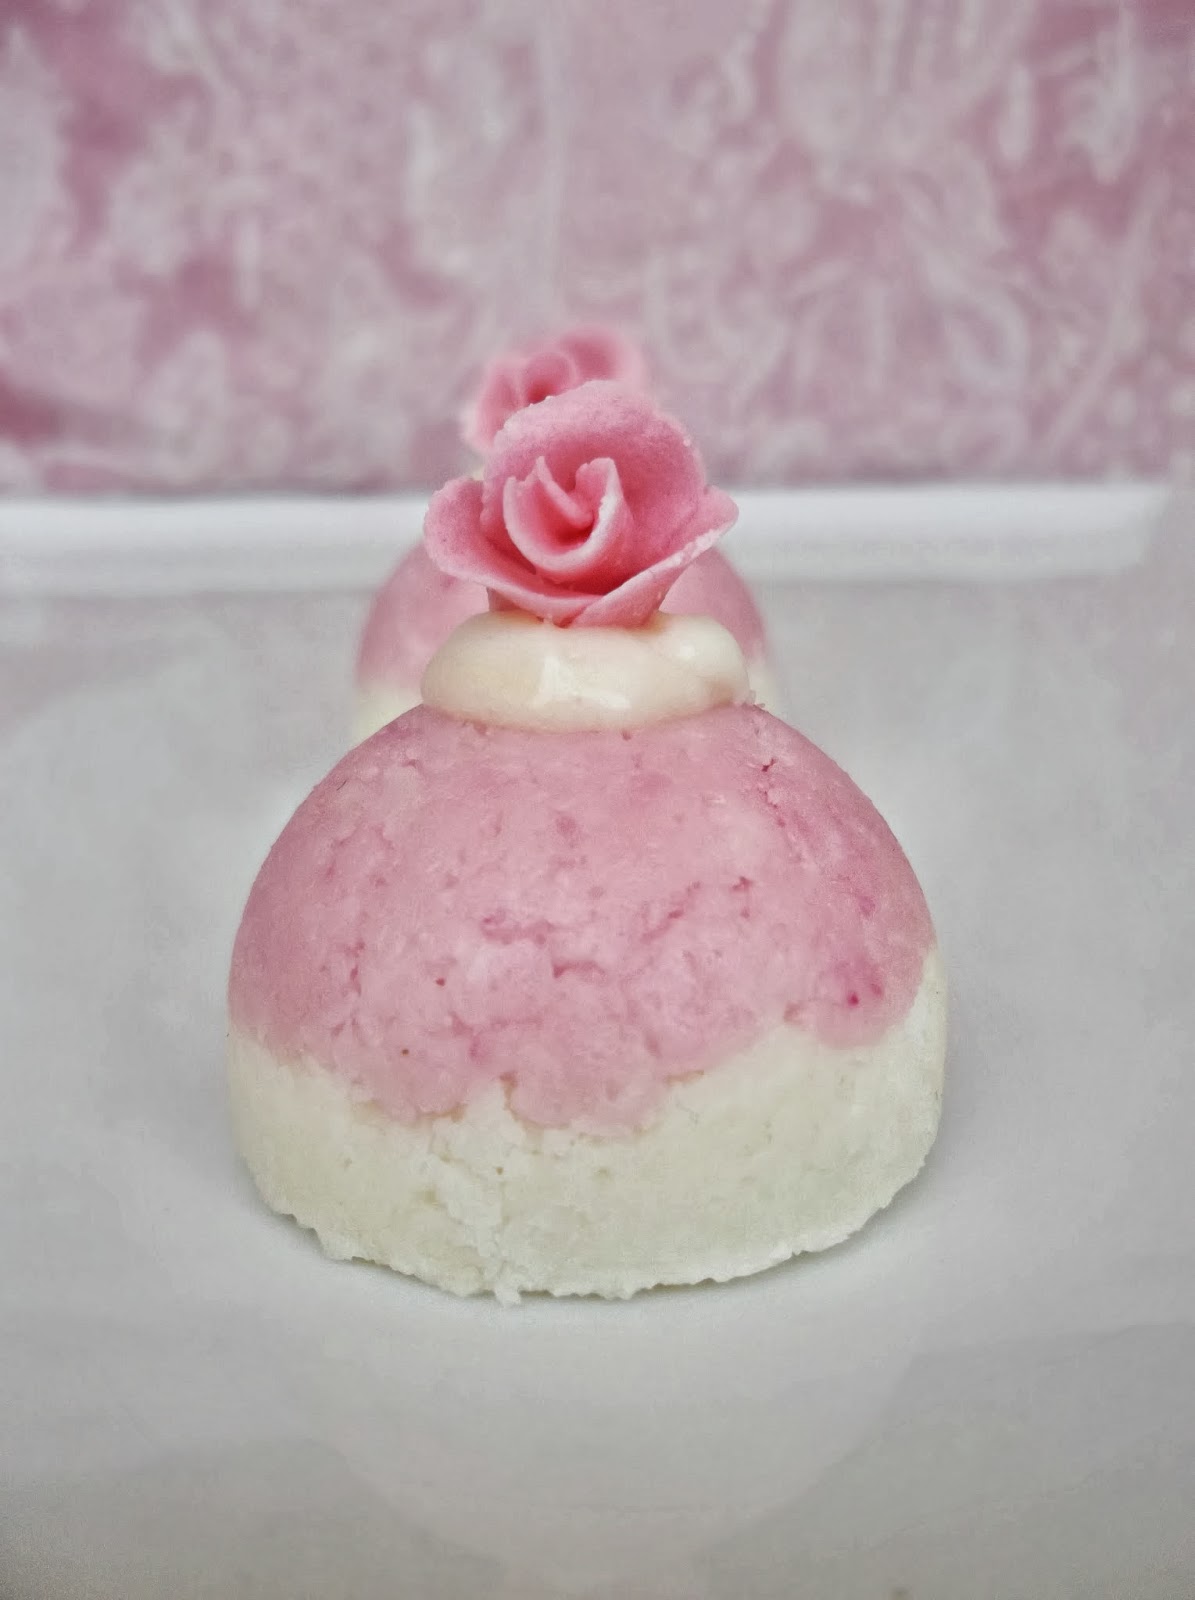
Anyway, now you know, I'm not among the deceased, and it's time to present a school fete favourite--Coconut Ice--all grown up this time, domed in shape and decked with pretty little fondant roses. These would make such a pretty addition to a high tea or girls party as they are definitely feminine and a bit of a show stopper, if I say so myself. They sport a vanilla infused coconut base, topped with a lightly strawberry flavoured pink dome (I had to find a way to use those gorgeous dome molds that have not been of much use so far...makes for a fancy looking dessert after all!) with a dollop of vanilla cream icing and a pink fondant rose. And they are incredibly delicious, and rich, and it is, I warn you, a little hard to stop at one...


COCONUT ICE DOMES WITH ROSES (Adapted from Delicious, October 2002 by Valli Little)

Domes:

2 cups icing sugar
pinch cream of tartar
395g can of sweetened condensed milk
1 tsp vanilla essence
3 1/2 cups dessicated coconut
1/2-1 tsp strawberry essence
15 small fondant roses (make your own here!)

Icing:

1/2 cup icing sugar, extra
a few drops vanilla essence, extra
2-4 tbsp. heavy cream

Sift the icing sugar and cream of tartar into a medium sized bowl. Add the sweetened condensed milk, vanilla and coconut and stir until well incorporated. Divide the mixture between two bowls. Add the vanilla essence to one, and the strawberry essence to the other. Mix until thoroughly incorporated.
In the bowl containing the strawberry essence, add a drop or two of red or pink food colouring. Stir again until the colour saturates the mixture. (If you find that the addition of this extra liquid has made the texture too wet, add a little more icing sugar to the mixture. You don't want it to be too damp, but able to hold its shape when you press it together in your hand.)
Liberally grease your dome molds. Spoon the pink mixture into 15 molds until the mixture is evenly distributed between them. Firmly press the mixture into each so that it is firmly compressed and flat on the top. Repeat with the white mixture on top of the pink, filling each dome to the rim, and pressing down again firmly. Refrigerate for two hours before gently removing with the help of a spoon if necessary.
To make the icing, place the extra icing sugar and extra vanilla in a small bowl. Combine with just enough cream to get a nice texture that will not drip when applied to the coconut ice domes. Dollop a small amount on the top of each dome, and then top with a fondant rose.

Makes 15 domes


NOTES: If you do not have a dome mold such as the one used in this recipe, you can easily make this in a 30x20cm slice tin and cut it into squares.