Monday, March 28, 2011

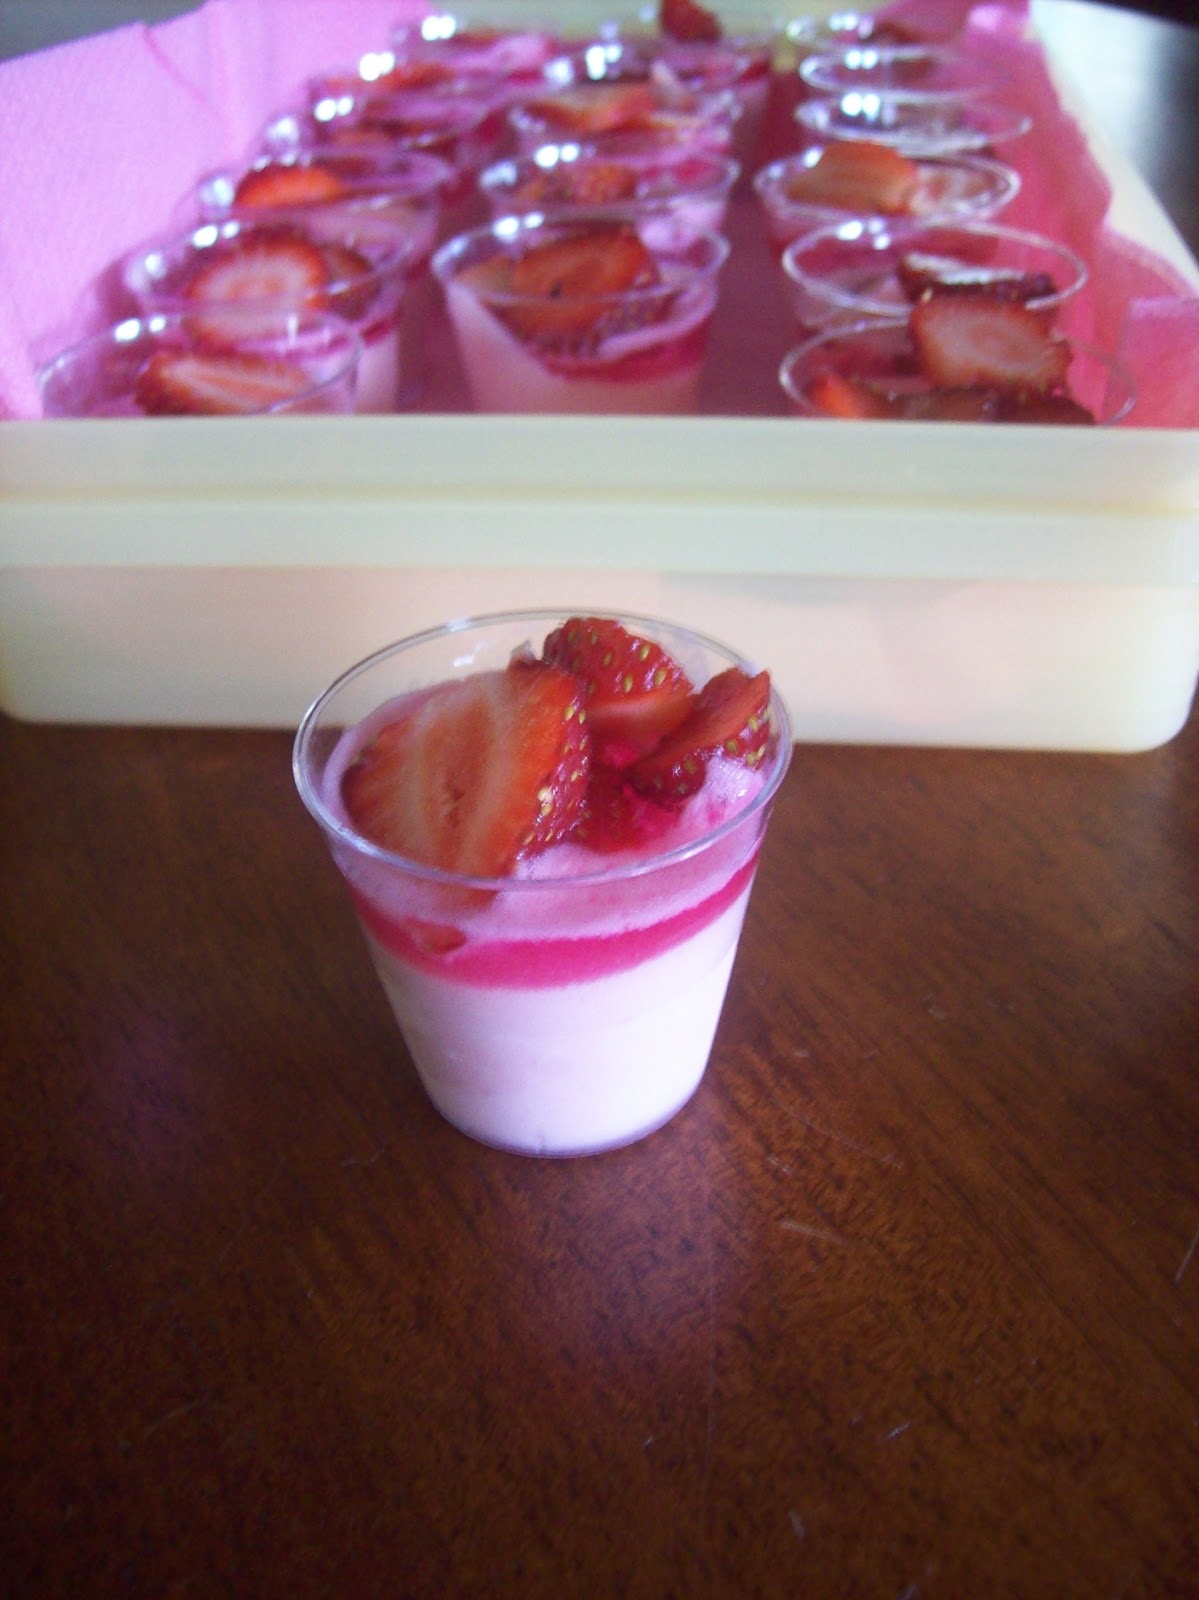
Strawberry Mousse Cups

Oddly enough, when I was a child and even a teenager, I hated food. I was never hungry, and it was always forced into me because I wouldn't eat otherwise. In fact, it started at a very young age and I became quite sick from eating so little. Then there were the thousands of nights I would still be sitting at the dinner table poking at my silver-beet and peas and concocting sly ideas in that little mind how to stifle the food from the plate without eating it so I could leave the table. Tissues were handy, as was the small ledge under the table near my chair, that soon became the burial grounds for carrots and fried zucchini and bits of potato.
The first time I ever felt hungry was after a day of skiing, when I was 16 years old. I was shocked! Now, my love for food has grown at such a rapid pace, and I blame it on working in gourmet hospitality over the last 4 years. My mind has exploded with ideas. I dream food, I create food, I even live in food. You know how it is, living with a toddler. I don't know why I bother sometimes. White is an absolute no-no, and showering seems near useless, for as soon as I'm fresh and clean again, a Vegemite toast is smeared down my leg and I find bits of custard in my hair. He catapults pureed apple across the room with his spoon, and a few hours later, after answering the door and going down the street, I happen to look in the mirror and find smeared fruit dried to my face. So yes...I live in food.
Food has finally become a part of life. It certainly helps that my husband is a conosure of sorts and happens to cook scrumptious meals for me now and then.
But food! It's about to become something I cant bear to eat, smell and cook. Salt and vinegar chips were all I could keep down last pregnancy, so I fear a little for the frequency of this blog over the next few months. Stay tuned though. I have a large amount of recipes I have made and photographed over the year that I have not had time to put up on here. Just don't expect  me to be as enthusiastic with my food descriptions!

I'm still whipping out recipes from Marcela's Kitchen Tea Party!


STRAWBERRY MOUSSE CUPS


3x 85g packets Strawberry Jelly Crystals
3 cups boiling water
375ml can evaporated milk
strawberries to garnish


Dissolve two packets of  jelly crystals in 2 cups of boiling water. Refrigerate until chilled, but not set.
Meanwhile, beat evaporated milk for a few minutes on high until thick and foamy. Stir the cooled jelly through evaporated milk.
Pour into shot glasses or small cups. Refrigerate to set, covered in plastic wrap.
Dissolve the remaining jelly crystals in 1 cup of boiling water. When cool, gently ladle over the top of the set creamy jelly, cover in plastic wrap and refrigerate to set.
Serve with strawberries and cream if desired.


NOTES: you may use any type of jelly crystals and any type of fruit. You can even jazz it up by mixing fresh fruit or grated chocolate through the mousse. I cannot tell you how many shot glasses this recipe makes, but it will make over 30. I ended up using the remaining mousse for another recipe which will follow, so you may like to halve the recipe or serve in glasses or molds larger than shot glasses if you wish, unless you have a large group to serve. Keep in mind you will definitely want more than one!

Coming soon--another way to use this delicious mousse recipe!
YUM!

Saturday, March 26, 2011

Brandy Snaps and Cream Horns

Okay, so maybe I wasn't talking to a black hole as much as I thought I was. The silence on here is so deafening, I thought it was high time I cooee'd and tried listening for a reply. The news of me having "one in the oven" flew around surprisingly fast, so I am guessing I have an audience. Hello readers! I feel better now.
So just continuing on from the brandy snap basket blog, I wanted to share some findings, and tell everyone how easy it is to make those delicious brandy snap cream horns you only dream of being able to create. They're super easy, all you need is this blog, the ingredients and a cone shaped glass..and a little self control. Finding number one: Brandy snaps are irresistible when just out of the oven...chewy, gooey and seductive in their toffee-ish goodness! Back to what you need. If you don't have a cone shaped anything, the end of a wooden spoon will do the trick, or a cylindrical handle of any other utensil  (preferably wooden or plastic.) I found I didn't have enough cone shaped glasses on hand and used one of my son's mini toy witches hats (yes, a replica of the cones they use on the roads...washed, of course) and it worked a treat.
So what I learned by trial and error may save you some time, ingredients and disappointment. Don't you love it when someone makes the mistakes for you?


Brandy Snap Cream Horns:

60g Butter
1/3 cup brown sugar, lightly packed
1/3 cup golden syrup
1/2 cup plain flour
pinch of salt
1 tsp. ground ginger
A few drops vanilla essence
12 Strawberries
Vanilla sugar to dust

Preheat oven to 160 C.
Place butter, sugar and syrup in a small saucepan and stir over a moderate heat until butter melts and the sugar dissolves. Remove from heat and cool for a minute.
Sift in flour, salt and ginger, stirring to combine. Add vanilla and incorporate.
Drop 10-12 teaspoons of batter onto a ready greased tray, leaving a few inches between each for them to spread. Bake in preheated oven for 10-12 minutes.


Apologies for the awful picture, but your brandy snaps should look like this before removal from the tray

Remove and cool for five or more minutes. The longer you leave them on the tray, the harder they will be. This makes them easy to remove, unless you have left them too long. You will know they are ready to remove when you can peel them up with your fingers and they do not tear.The edges will harden first. Working quickly, gently lift each gently form each into cones or cylinder shapes, rolling around the end of a spoon or shaping by placing inside a cone shape glass.


These shapes should harden within minutes. If they remain pliable and refuse to harden, return to oven on the tray for a few more minutes, and repeat. If they are too hard to remove from the tray, return briefly to the oven, as this softens them again.
Remove from your molds when hard, and store in an airtight container in a dry place until ready to fill with custard or whipped cream. Fill just before serving as the Snaps may very well lose their "snap" after an hour or so due to the moistness of the filling. Sprinkle with vanilla sugar before serving.

Makes 10-12

NOTES: Usually honey acts as a good substitute for golden syrup. I tried this and the snaps actually turned out more like flat biscuits. Doubling the recipe also poses some complications. As they cannot all be in the oven at once, mixture may thicken to the wrong consistency while you wait to remove the trays with the ready brandy snaps. Its best to do them in lots of 10-12.

Brandy Snap Baskets with Custard and Berries

I am now under the impression that one should never smirk proudly about anything. God obviously read my last blog where I proudly mentioned my goodies have no affect whatsoever on my weight and He probably had a chuckle. I am soon to be a HUGE, gelatinous mass, without even indulging--I am pregnant!
So goodbye skinny cook, goodbye lots of gooey goodies, and goodbye cooking with wine! Serves me right for rubbing my fat immunity in everyone's faces.
As dismayed as I am to be growing massive, my husband and I are thrilled out of our minds to be having a new addition to our family! Prepare yourselves for some healthier recipes though. (not yet, as I have many recipes I have made and not put up yet, so the sweets will go one for quite a while)
Anyway, being fat may make more people take me an my blog seriously...I mean, no one really ever does trust a skinny cook, do they?
Here's a recipe for Brandy Snap Baskets with Custard and Strawberries I recently made as my mother in law's birthday dessert. They are surprisingly super easy to make and look adorable. You could fill them with any filling and fruit, but this was a delicious option and not too heavy on the stomach. (I cannot stop eating this vanilla custard by the spoonful, be sure to make extra!)

Brandy Snap Baskets with Vanilla Custard and Strawberries


World's Best Vanilla Custard:

2 cups milk
4 large egg yolks
6 tbsp. sugar
3 tbsp. cornflour
40g butter, at room temperature

Place milk in a small saucepan and bring to the boil.
Meanwhile, in a separate saucepan, combine yolks, sugar and cornflour and whisk over a low heat. When the milk has boiled, add a few tablespoons into the yolk mixture and whisk. Gradually add the remaining milk and whisk vigorously on a medium heat. Custard will thicken. Continue to whisk until boils, and remove from heat. Scrape into a small bowl and sit in a tray of ice, to cease the cooking process. When cooler, add the butter in 3-4 installments, stirring until combined. Add essence, mix and refrigerate. Stores for 2-3 days.


The Brandy Snap Baskets:

60g Butter
1/3 cup brown sugar, lightly packed
1/3 cup golden syrup
1/2 cup plain flour
pinch of salt
1 tsp. ground ginger
A few drops vanilla essence
12 Strawberries
Vanilla sugar to dust

Preheat oven to 160 C.
Place butter, sugar and syrup in a small saucepan and stir over a moderate heat until butter melts and the sugar dissolves. Remove from heat and cool for a minute.
Sift in flour, salt and ginger, stirring to combine. Add vanilla and incorporate.
Drop 10-12 teaspoons of batter onto a ready greased tray, leaving a few inches between each for them to spread. Bake in preheated oven for 8-10 minutes.

Apologies for the awful picture, but your brandy snaps should look like this before removal from the tray

Remove and cool for five minutes. Working quickly, gently lift each with an egg flip and gently lay inside the cups of a muffin tray, and push to the base, creating a cup shape. These should harden within minutes. If they remain pliable, return to oven in the muffin tray for a few more minutes. If they are too hard to push to the base to form into cups, return briefly to the oven, as this softens them again.
Remove from muffin tin when hard, and store in an airtight container in a dry place until ready to fill with custard and berries. Sprinkle with vanilla sugar before serving.

Makes 10-12

coming soon...how to get the brandy snap cream horns perfect!

Thursday, March 17, 2011

Fudge Mint Brownie with Peppermint Marshmallow Creme Parfaits

After mentioning he thought he might be turning onto "a geletinous mass" (or Mass-ey), I thought I had better cut back on the sweet baking for the sake of my darling husband. After all, not everyone in the world can eat all the rubbish I do and somehow get away with it. *insert horror laugh*
Its a good thing that Lent soon followed, as we give up sweets during the week until Easter, anyway. So it was a little easier for me to resist.
But when Saint Patrick's Day shot up on the calendar, my plotting began. Starved of sugar and all things gooey for a week or two made me feel a little evil, and I dreamed up a deadly concoction--Chocolate Mint Brownie and Peppermint Marshmallow Creme Parfaits with Chocolate Fudge Sauce.
Of course, I had to invite my darling guinea piglets (my in laws, who have happily taken on the task) over for dinner and dessert on that wonderful feast day.
We stared with Spicy Tomato Koftas and ended with these lethal desserts...which no one could finish. They were the definition of decadence in the extreme. They resulted in lots of ooohs! and ahhs! and a little later... *ooooooohs* and *ahhhs* of defeat. Next time I make these babies, they will be half the size. I didn't hear anyone complaining though. But next time I will make the portions a little more appropriate.
As I have said before, everything I make is experimental. The recipe I found for Marshmallow Creme called for corn syrup, which I substituted with glucose which was hanging around in the pantry. It was a perfect replacement. Feel free to use either though, in the same measurements, as its impossible to buy this fluffy goodness in Australia. Ooh la la!


BEST EVER CHOCOLATE FUDGE BROWNIES WITH MINT SLICE

1/2 cup butter
1/2 cup cocoa powder
1 cup brown sugar, firmly packed
2 eggs
1/2 tsp. vanilla
1/2 cup plain flour
1/4 tsp salt
300g Chocolate Mint Slice Biscuits, broken into quarters

Preheat your oven to 190C.
Melt butter and remove from heat. Stir through the cocoa and brown sugar until combined.
Beat in the eggs and vanilla. Next, blend in the flour and salt. Spread a thin layer of mixture in an 8 inch greased pan. Place a layer of broken mint biscuits ontop of this mixture. Spoon on the rest of the brownie mixture and smooth the top.
Bake for 20 minutes.

PEPPERMINT MARSHMALLOW CREME

3 large egg whites
1/4 tsp. cream of tartar
2 tbsp. granulated sugar
1/3 cup water
3/4 cup glucose
2/3 cup granulated sugar
1 tbsp. peppermint extract
several drops of green food colouring

In a clean, dry glass bowl, beat the egg whites and the cream of tartar until light and foamy. Gradually add the 2 tablespoons of sugar and beat on high until soft peaks form.
In a small saucepan, place glucose, granulated sugar and water. Cook over a medium heat until the mixture boils and comes to the firm ball stage (syrup should turn into a firm but pliable ball when dropped into a glass of cold water).
Slowly drizzle the hot syrup into the egg white mixture with the beaters running on low. Turn the mixer to high and beat for 5 minutes until the mixture is super thick and glossy. (My beater died as a result. I think it overheated, as it stopped working and strated smoking. Be sure to give it a few minutes rest after a few minutes of beating!)
Beat in the extract and some food colouring until it is the desired shade of green.

CHOCOLATE FUDGE SAUCE

1 cup thickened cream
1/4 cup brown sugar, packed
1/8 cup butter
1 1/2 cups chocolate chips

Heat cream and sugar in a small saucepan on a medium heat, until the sugar dissolves. Add the chocolate and butter and stir on low until all melted and combined. Liqeur may be added if desired, for extra flavour.

THE PARFAITS:

With your fingers, break up the brownie and place a layer at the bottom of each glass. (this recipe makes 8 large glasses of this dessert) pour a little fuge sauce over the top of the brownie. Fill a piping bag with a large star nozzle with marshmallow cream and pipe around the top of the fudge sauce to form a layer. Continue layering in such manner until the desserts are completed. You may wish to finish off withsome coarsely grated chocolate or leftover mint slice.
Enjoy!!!


NOTES: these desserts may also be enjoyed after freezing for a few hours. You may also wish to make mini parfaits in shot glasses for a party. Delicious!

Thursday, February 17, 2011

Strawberry Mountains

Remember my whiney blog about St Valentine's Day disasters? Apologies. And as a peace offering, I'm sharing my recipe for a St Valentine's Day dessert that wasn't such a disaster! Truth be told, even though our restaurant sank into the Brisbane River before we could get there, my hubby and I had a fantastic candlelit dinner under the stars...Norah Jones in the background, baby sound asleep, candles, bubbly in the ice bucket...it was amazing! We ate simply, a meal cooked by the both of us (chicken schnitzel and salad), drank almost a bottle of moscato each and it was all topped off with a scrumptious dessert I created. Bliss! What did you lovers do for St Valentine's Day this year?

Best Ever St. Valentines Day Dessert
TRIPLE CHOCOLATE STRAWBERRY MOUNTAINS

1 packet chocolate creme biscuits
100ml cream
200g chocolate
strawberries to decorate

Place all biscuits in the blender and process until they resemble fine breadbrumbs.
Remove and place contents in a bowl. Add enough cream so that the crumbs begin to clump and can be formed into a shape. Press into disposable shot glasses or moulds and refrigerate until hard. With the help of a butter knife, remove.
The removed biscuit mountains. Rough edges are not a problem as these will be hidden beneath a chocolate layer.

Coat each with melted chocolate, strawberries and cream. Alternately pile crushed honeycomb on the top of each mountain, or your choice of decoration, and refrigerate to keep firm.

What is worth eating if not smeared in melted chocolate?

NOTES: Disposable shot glasses make fantastic molds. They are thin plastic, so when removing with a knife they may crack, allowing for easier removal. These can be found at your local supermarket and have multiple uses. You may also try other types of biscuit in this recipe. How divine does choc mint creme biscuit towers sound?
Ta Da!


As the French so sweetly put it, Bon Appetit!

Tuesday, February 15, 2011

Kitchen Tea Teapot Cake

Last year, one of my friends who was helping to organise a Dinner Auction for our school, asked if I would auction off a cake. I envisioned myself being requested to create the most impossible design by some high paying winner, and very unskillfully modeling something out of icing and chunks of crumbling cake. I knew only disappointment could result from agreeing, so I declined.
I added the idea to my personal Cooking Challenges of 2011 list though, along with those mouth watering croissants. I found an excuse to attempt it with my sister-in-law-to-be's Kitchen Tea. I knew she would forgive me if it ended in disaster. But it didn't!
After much experimenting (one being the removal of a cupboard handle to use as the teapot handle) and several attempts, the end result was not too bad for a first timer.. I think. (even if I say so myself) But you know me, everything I do in the kitchen is highly experimental. Next time (if I ever go there again) I will definitely be doing some things differently. It was grey hair experience. Tea he he.

This post is for Julia, who is trying to wrap her head around the cake and wanted to see some pictures.

Marcela's Kitchen Tea Teapot Cake
Firstly I had to find something small enough and curved enough to create a round cake. I found a small bowl and baked two cakes in it (one after the other, of course) and glued them together with icing, tops inwards, to create an oval shaped cake.

The bowl used to form two dome shapes

A rough oval shape was formed by placing them together
I chose a basic butter cake for this particular experiment, and it turned out nicely. If you plan on making a cake like this however, be sure to shave the cake with a knife so there are no bumps on the surface. I had some bumps that I wish I had smoothed away. These where formed by the baking paper I used to line the bowl. You could smooth the rough bits with a knife and fill the gaps with a thick icing paste I imagine. If you do not, they still show up even underneath the thick fondant icing.
I didn't take any photos of the home made fondant being rolled and placed on the cakes. It was too stressful a time and the fondant needed to be re-rolled a few times before I got a smooth-ish result. It looked a bit bumpy due to not shaving the lumps off the cake, so I coloured a little of the fondant and made a couple of flowers and vines to cover some of the undesirable parts!

far from perfect but cute as a Shabby Rose

The spout and handle where the hardest parts to get right. I think I should have made them days ahead so that they dried in time for the party. With the help of some toothpicks and the handle off the cupboard (which I modeled icing around), I managed to get them on the cake without too much hassle! Some wire would have come in handy if I could get my hands on it.


ROLLED FONDANT

1 tablespoon unflavored gelatin
1/4 cup cold water
1/2 cup glucose (can substitute light corn syrup)
1 tablespoon glycerin 
1 tablespoons butter
2 pound bag of icing sugar, sifted.
1 teaspoon flavoring
  
Pour water in a small saucepan. Shower the gelatin over the cold water so that the gelatin is evenly distributed.  Let gelatin soften in the water for five minutes.
Sift the icing sugar into a large bowl. When all sugar is sifted, make a well in the center of the bowl. Heat the water and gelatin over gentle heat, stirring, until the gelatin is dissolved. Mix in glucose (or corn syrup) and glycerin. Add the butter and mix until melted. Remove from heat and stir in desired flavouring. I used vanilla essence. 
Pour wet ingredients into the well of powdered sugar. Mix with a wooden spoon until cool enough to handle. 


Then use a lightly greased hand to knead the ingredients together. Knead in the bowl until most of the icing sugar is incorporated. 
Turn out on a lightly greased bench and knead until the fondant is smooth and pliable. If it feels sticky, add additional icing sugar. If it feels too dry and doesn't feel elastic, work in a small bit of butter. 
Shape into a thick disk shape and cover with a thin coating of butter. Wrap well in several layers of plastic wrap, and place in a large ziplock bag. The fondant can be used immediately, but works much better if its left to cure for at least 12 hours. The fondant will store at room temperature this way for three months, and can be frozen for up to 12 months. Add food colouring as desired.

Friday, February 4, 2011

The Proof Is In the Pudding

Hello and welcome to the guest edition of Mummy's blog.
My name is The Pudding, and my uncles say I have more rolls than a bakery.

More rolls than a bakery, as I said.

Its because I eat everything I make. I try to keep my culinary skills secret otherwise THEY might make me do all the cooking everyday. My parents think I know nothing of cooking, but I'm the pro in the family! After all, I have learnt quite a bit, listening to beaters buzzing, and dishes clanging for nine months, plus eight months of visual experience from my highchair.
Today we are going to make Watermelon Sorbet, because its really very hot at the moment. I got the idea from my aunty Renee and I found the recipe on Taste.com.
First, taste your selected watermelon to make sure its a juicy one...a dry watermelon just wont cut it!


WATERMELON SORBET

1 cup water
1/2 cup caster sugar
600g seedless watermelon, rind removed, coarsely chopped
1 egg white

Combine the water and sugar in a small saucepan and stir over low heat for 5 minutes or until sugar dissolves. Increase heat to high and bring to the boil. Boil for 5 minutes or until mixture thickens. Set aside for 30 minutes to cool.

Meanwhile, place watermelon in the jug of a blender and blend until pureed. Make sure their are no lumps (you should have about 600ml of watermelon juice)
Add sugar syrup to watermelon juice and stir until well combined. Pour into an airtight container, cover and place in the freezer for 4-5 hours or until almost set.
Roughly break up the sorbet with a metal spoon and transfer to the bowl of a food processor. Process briefly until sorbet is smooth and has a soft, icy texture.


Return sorbet to container and place in the freezer for a further 4 hours or until firm. Remove from the freezer and repeat. Return sorbet to the container and place in the freezer for a further 5 hours or until firm.
Place the sorbet and egg whites in the bowl of a food processor and process until sorbet is pale and smooth. Return to the container and place in the freezer for a further 4 hours or until almost firm. Scoop into serving glasses or bowls and serve immediately.


Now to lick the spoon!

Thursday, February 3, 2011

Cajun Chicken with Mango and Avocado Salsa

Last week I was fortunate enough to make it to the book festival in Brisbane...making a bee line to the cooking section as soon as quickly as my legs could carry me. Okay, well, maybe after ploughing through the literature section. I came across some great cookbooks printed in the 1980's and have been browsing them now at my leisure in the comfort of my humble abode. AHHH!
How incredible the pictures are. The colours used, the ingredients used, the lighting, the workmanship, the presentation. Everything has, I have to say with relief, changed in the cook-book world for the better.
I was startled by the way every dessert was covered in fresh or baked fruit, jellies and mousses where created from prunes and other fruits not particularly known for their appeal.
I am a very visual person, the pictures are what always grab my attention first and foremost. Give me modern cookbooks any day! There are some wonderful recipes in these books I collected, I might add. We just have to adapt them, give them a modern twist...don't worry, I'll pull the pineapple rings and prunes off the cupcakes and top them with a sole blueberry and some sugar dusting with a tendril of lime zest arching around that little dot of fruit. I just inspired myself. Look out for those cupcakes!
And now...for something completely different...
My husband made an incredible dinner and I just have to share it.
So simple.
So delicious.
So gourmet!
This one is for you Suzanne. Easy enough to cook blindfolded!


CAJUN CHICKEN WITH MANGO AVOCADO SALSA
Adapted from recipe from Taste.com

4 large chicken breast fillets
2 tbs vegetable oil
2 tsp sal1 tsp garlic powder
2 tsp. french onion soup powder mix (or dried onion flakes)
1 tsp dried oregano
1 tsp dried thyme
1 tsp sweet paprika
1/4 tsp cayenne pepper
1/2 tsp freshly ground black pepper
Rocket leaves to serve


MANGO SALSA
1 ripe mango
1 avocado, halved, stone removed, peeled, finely chopped
1 red capsicum, halved, de-seeded, finely chopped
1/2 red onion, finely chopped
1 tbs fresh lime juice
1 tbs finely shredded fresh mint
Salt & freshly ground black pepper

Combine oil, salt, garlic and onion powders, oregano, thyme, paprika, cayenne and black pepper in a large bowl. Add chicken and turn to coat.
Heat a frying pan over medium heat. Cook chicken for 5 minutes each side. Transfer to a plate. Cover loosely with foil and set aside.
Meanwhile, to make salsa, cut mango cheeks close to seed and peel away skin. Finely chop. Combine in a bowl with avocado, capsicum, onion, lime juice and mint. Season with salt and pepper. Serve chicken with salsa and rocket leaves.